What is Com Android Vending? (How to Fix Play Store Errors)

com.android.vending is the package name for the Google Play Store app on your Android devices. The «Process com.android.vending has stopped unexpectedly» error message is a common one, but it can usually be fixed by restarting the Android phone or clearing Google Play Store data.
Many Android package names aren’t that descriptive. This makes it hard to know which app the package name belongs to. That’s why I’m never surprised when Android users spot unusual names in their Google Activity or in an error message. I’ve had a lot of friends come to me with questions about these Android package names. The good thing is that com.android.vending belongs to one of the most popular apps on your Android phone!
I’ll talk about all the important things you need to know about the Google Play Store app on your Android device. Let’s jump into it.
What is the Com Android Vending App?
The com.android.vending package belongs to one of the most popular applications on Android — the Google Play Store app.
As you probably know, the Google Play Store app is the official store that holds apps for the Android platform. However, some people don’t know that you can get other forms of media and entertainment through the Play Store.
For instance, you can buy movies, watch TV shows, listen to and buy music, and even purchase books and magazines.
The Play Store app offers all these features, as well as making it possible for you to update apps downloaded through the platform.

Is It Necessary to Have Google Play Store on My Android Device?
Most people with an Android device have Google Play Store installed on their phone. However, not having this does not make the phone unusable.
Android phones made for the Chinese market do not come with the Google Play Store in the first place, which shows that it is not integral to the functioning of the Android platform.
You can choose to uninstall it for whatever reason you like, but the process is generally harder if you’re doing it from a non-rooted Android phone.
Related Reading
- What is Com.sec.epdg on Android? — Is It Spyware?
- ConfigAPK App: What Is It For & How To Remove It?
- What is Com.tmobile.pr.adapt? An Ultimate Guide
- What Is Android Package Installer? All You Need to Know
How to Fix «Process com.android.vending Has Stopped Unexpectedly»?
A frequent error that some people face on their Android devices is the Com Android Vending error. This happens when the Google Play Store application crashes on the device, typically in the background.
The good thing is that the problem can be fixed relatively easily. There are a few solutions you can try, which I have described below.
1. Restart the Smartphone
I recommend restarting your Android smartphone as the first solution to most software issues that you might face.
Restarting an Android device takes a minute or two to complete. Just follow these steps:
- Make sure the phone is on.
- Hold down the power button. The power-off menu should appear. You can release the button once it does.
- Select «Restart» or «Reboot». You may need to confirm the action.
- Once you do this, the device’s screen should go black, before it begins restarting.
Once the device has loaded up again, this should hopefully fix the issue you’re facing.
2. Clear the Google Play Store Cache
When you use the Google Play Store application a lot, you increase the size of the cache. When the cache for an app gets too large, it can frequently cause glitches or cause the application to close on its own.
Clearing the cache is a good option if you’re dealing with the «The application process com.android.vending has stopped» error message.
- Open the «Settings» app.
- Go to the «Apps» or «App Manager» entry, depending on your device manufacturer.
- On some devices, you may see the Google Play Store application directly in the list. On others, you may need to press the menu button (three vertical dots) and tap «Show System Apps» or «Show All Apps».
- Select the Google Play Store entry.
- Tap «Force Stop».
- Now, select «Storage».
- From this menu, press «Clear Cache».
- Press «Clear Data».
You can choose to restart the smartphone after this, but I’ve found that this fix is successful in most instances.
3. Update the Google Play Store App
I recommend keeping all your applications up to date because new updates tend to fix bugs discovered in previous versions. I especially recommend this with Google Apps like the Play Store.
However, updating Google applications like the Play Store is not as straightforward as others.
Typically, the Play Store updates itself automatically in the background, but sometimes, this might not happen. In these cases, you can prompt an update.
To update the app, do the following:
- Launch the Google Play Store.
- Select the icon in the top-right corner. It should be the profile icon for your Google account.
- Select «Settings».
- Tap «About».
- Tap «Play Store version».
- This will bring up a prompt informing you that a new version will be downloaded and installed if one is available. However, if you are up to date, it will say so.
You may find that the «application process com.android.vending has stopped» error no longer occurs after this.
4. Perform a Factory Data Reset
If this error occurs despite trying all the fixes I’ve mentioned above, you may need to perform a factory reset to get rid of it permanently.
This is an extreme option. I recommend doing it only if the error is seriously affecting how you’re able to use your Android device.
Before you perform a factory reset, make sure that you’ve backed up all your data. You can do this easily by following the steps for your media here and other files here.
To perform a factory reset, just follow the steps outlined below. Note that these steps may differ depending on the smartphone manufacturer.
- Open «Settings».
- Select «System».
- Look for «Reset» or «Reset options» and select it.
- This option you’re looking for may be called «Factory Data Reset» or «Erase All Data», but they all mean the same thing. Tap on this option.
- You will need to confirm the action.
- Your device will require your PIN code or password before it proceeds. Once you enter it, the device will begin to reset to factory settings.

Related Reading
- Content://com.android.browser.home/ (Here’s What You Need to Know)
- What is Captiveportallogin app? (An In-depth Guide)
- What is AppLinker on Android? — Is It Safe?
- What is Setup Wizard on Android Phone?[Explained]
How Do I Get Rid of Com Android Vending?
If the constant errors caused by the Play Store app are getting on your nerves, you can uninstall it entirely.
This option should be considered only if you don’t mind removing the app entirely. However, one of the fixes above will usually do the trick.
Note that you don’t need a rooted device or any kind of root explorer app to do this. You can make it work on a non-rooted smartphone too. Make sure you know what you’re doing though, as this process can be risky.
Just have a USB cable, a computer, and your smartphone, and you can proceed.
Install ADB
The first step thing to do is install Android Debug Bridge (ADB) tools on your computer:
- Download Android Platform Tools. Pick the software package for the desktop OS that you’re on.
- When it completes, extract the zip file to a folder on your computer. Make sure to note where it is.
Enable USB Debugging
For ADB to work with non-rooted phones, you will need to turn on USB Debugging on your Android.
- Open «Settings».
- Tap «About».
- Tap the «Build Number» entry multiple times. Note that it may be in a «Software Information» submenu.
- A prompt should pop up showing that you are «now a developer».
- Go back to Settings. You should see a «Developer Options» menu entry that has appeared.
- Scroll through the options and look for the «USB Debugging» option. Enable the toggle.
Related Reading
Uninstall com.android.vending
At this point, you can uninstall the Google Play application. This process is irreversible, though you can sideload an APK of the Play Store afterward.
- Plug your Android device into the computer with a USB cable.
- If you’re on Windows, look for the folder where you extracted ADB. Go to the platform-tools sub-directory. Press Shift + Right-click and select «Open command window here».
- On a Mac, launch Terminal. Navigate to the location using: cd . Replace the path in the brackets with the actual path to the adb.exe folder.
- Type «adb devices». Press Enter.
- A prompt will show up on your Android. Accept it.
- Type «adb devices» again and press Enter. A serial number will show up if you do this right.
- Type and enter «adb shell».
- To uninstall the Play Store, enter: pm uninstall -k —user 0 com.android.vending
- Press Enter.
How to Reinstall Google Play Store?
After uninstalling it manually, you can attempt to download a fresh APK. You can get an APK for the application from a site like APKMirror.com.
Download the latest version and install it once completed. You will now see the Play Store application appear like any other new app.
Related Reading
- Fixing Error 492 On Android Phone — 9 Easy Tricks
- Com.sec.android.daemon app: Everything You Need to Know
- How DCB_Association Work? (Complete Guide)
- What is Com Android Settings Intelligence: Things You Didn’t Know
- How To Fix Black Screen of Death on Android (7 Quick Methods)
Final Words
com.android.vending is the package name for the Google Play Store application. This is responsible for downloading apps, updating them, and purchasing digital media like movies and music.
The application may close in the background frequently, but this can be remedied by restarting the device, clearing the app’s cache, and even performing a factory reset.
Hopefully, this article helped you solve the issues you were facing with this app. You can find equally helpful information in our related articles section.
As Seen On
Darrel Bryant
There’s no two ways about it – I am a huge nerd and I love it! When I’m not testing out new gadgets, I’m pulling apart the ones that I do have at home to find out what makes them tick. Not a lot of them get put back together, but I have become a pro at telling the good gadgets from the bad!
Ошибка приложения com.android.vending — что делать
Сегодня мы поговорим об очередной проблеме на Андроид — ошибке com.android.vending, которая не дает скачивать приложения и игры из маркета. Вы узнаете что это за процесс и что нужно сделать, что бы убрать этот баг.
Итак, многие пользователи, при попытке запустить Play Market или скачать из него софт, могут получать уведомления о том, что приложение остановлено или в нем произошла ошибка, а всему виной процесс com.android.vending. После этого сам Маркет аварийно прекращает работу. Давайте разберемся, за что конкретно отвечает данный процесс и что может стать причиной сбоев.
Что это за приложение?
Com.android.vending — это фоновый процесс, являющийся важным компонентом программы Сервисы Google Play и отвечающий за нормальную работу Плей Маркета. Посредством процесса vending реализуется возможность скачивания, установки и обновления программ из магазина.
По мере использования Android устройства, возможны некоторые сбои в работе данного процесса. Из-за этого пользователь не может провести нормальное скачивание или просто запустить Андроид магазин.
Возможные причины появления ошибки:
- отсутствие актуальных обновлений ОС Андроид или Плей Маркета, в частности;
- отсутствие синхронизации дата-время;
- наличие приложений, конфликтующих с сервисами Google и блокирующими их запуск;
- битые файлы в системе;
- Нехватка оперативной или физической памяти на телефоне.
Причин может быть много и разбирать их все мы не будем, а просто опишем реальные способы решения.
Что делать с ошибкой?
Итак, давайте идти от того, что все настройки даты и времени в порядке и памяти хватает. Далее я опишу несколько методов, которые помогут решить проблему, начав с простых и заканчивая сложными.
Применение свежих обновлений
Первый метод, который практически всегда помогает — загрузка актуальных обновлений Play Market или его переустановка. Учетная запись Google должна быть синхронизирована на телефоне, а выход в интернет желателен через Wi-Fi.
- Откройте Play Market, войдите в Настройки и нажмите на пункт Автообновление.
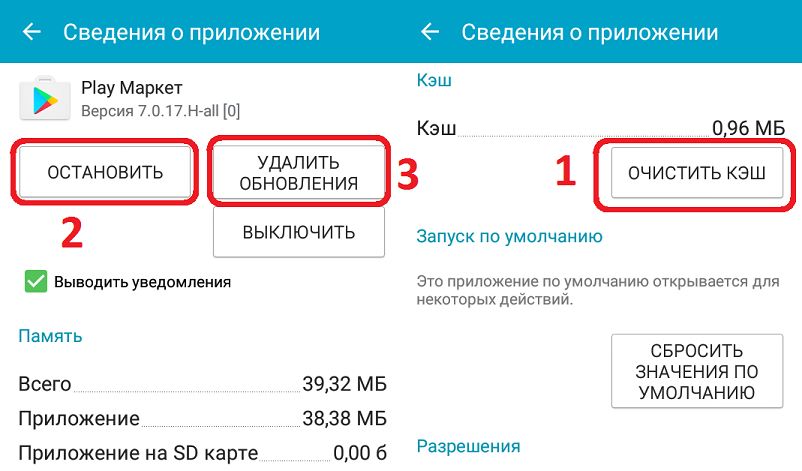
- Если ошибка не дает запустится, тогда очистите кэш и остановите приложение через Диспетчер. Также можно удалить последние обновления. Далее перезагрузите телефон, сразу же открывайте Market и запускайте автообновления.
- Также вы можете полностью удалить из телефона Плей Маркет и установить заново, скачав apk-файл с актуальной версией из сторонних источников. Я например использую ресурс Trashbox для таких целей. Перед первым запуском обязательно (!) пройдите в лицензионное соглашение и откройте его через мобильный браузер.
Именно переустановка приложения, в большинстве случаев, помогает решить проблему com.android.vending. Но если у вас баг остался, тогда приступаем к следующему шагу.
Установка com.android.vending.apk
Если применение актуальных обновлений не помогло (что вряд ли) вам понадобится сделать замену непосредственно самого apk-файла процесса на телефоне. Вам потребуется скачать из сторонних файлообменников такой com.android.vending.apk (ищите проверенные источники), наличие рут прав на телефоне, а также установить на смартфон Root Explorer (или же Titanium Backup), с помощью которого будете работать с корневым каталогом файлов на телефоне.
Вот понятная видео инструкция по устранению ошибки при помощи замены.
На этом все, если один из способов помог, дайте нам знать в комментариях, или же расскажите про свой реальный способ решения. Спасибо.
Библиотека для совершения покупок внутри приложений (Android In-App Billing v.3)

Checkout («касса», «кассовый аппарат») — это библиотека для совершения покупок внутри приложений на базе Android In-App Billing v.3. Основная цель — уменьшить время разработчика, затрачиваемое на внедрение платежей в Андроид приложения. Проект был вдохновлён библиотекой Volley, и проектировался для того, чтобы быть максимально простым в использовании, быстрым и гибким.
▌ Подготовка
- Загрузить исходный код из github репозитория и скопировать его в свой проект
- Для пользователей Maven использовать следующую зависимость:
org.solovyev.android checkout x.x.x compile 'org.solovyev.android:checkout:x.x.x@aar' Библиотека требует com.android.vending.BILLING разрешение (permission).
Если вы подключили библиотеку как зависимость (например, в Maven или Gradle), то дополнительно делать ничего не надо. В противном случае, нужно добавить следующую строчку в AndroidManifest.xml:
▌ Использование
Библиотека содержит 3 основных класса: Billing, Checkout и Inventory.
Класс Billing обрабатывает запросы на покупку (см. методы IInAppBillingService.aidl) и управляет подкючением к сервису Google Play. Этот класс лучше всего использовать как синглтон, для того чтобы все запросы выстраивались в одну очередь и использовали один кеш. Например, класс приложения может выглядеть следующим образом:
public class MyApplication extends Application < /** * For better performance billing class should be used as singleton */ @Nonnull private final Billing billing = new Billing(this, new Billing.Configuration() < @Nonnull @Override public String getPublicKey() < return "Your public key, don't forget to encrypt it somehow"; >@Nullable @Override public Cache getCache() < return Billing.newCache(); >>); /** * Application wide instance (can be used anywhere in the app). * This instance contains all available products in the app. */ @Nonnull private final Checkout checkout = Checkout.forApplication(billing, Products.create().add(IN_APP, asList("product"))); @Nonnull private static MyApplication instance; public MyApplication() < instance = this; >@Override public void onCreate() < super.onCreate(); billing.connect(); >public static MyApplication get() < return instance; >@Nonnull public Checkout getCheckout() < return checkout; >//. > Класс Billing можно использовать для выполнения запросов напрямую, но чаще удобнее использовать посредника — класс Checkout . Последний добавляет к каждому запросу тег, по которому запрос может быть отменён, что может быть полезным, например, в Activity . Checkout позволяет загрузить текущее состояние покупок через метод Checkout#loadInventory() . Также Checkout , а точнее его наследник ActivityCheckout , предоставляет доступ к PurchaseFlow , который в свою очередь осуществляет действия, нужные для покупки. Код класса Activity , в котором отображается список покупок, и который позволяет совершать покупки, представлен ниже:
public class MyActivity extends Activity < @Nonnull private final ActivityCheckout checkout = Checkout.forActivity(this, MyApplication.get().getCheckout()); @Nonnull private Inventory inventory; @Override protected void onCreate(Bundle savedInstanceState) < super.onCreate(savedInstanceState); checkout.start(); // you only need this if this activity starts purchase process checkout.createPurchaseFlow(new PurchaseListener()); // you only need this if this activity needs information about purchases/SKUs inventory = checkout.loadInventory(); inventory.whenLoaded(new InventoryLoadedListener()) >@Override protected void onActivityResult(int requestCode, int resultCode, Intent data) < super.onActivityResult(requestCode, resultCode, data); checkout.onActivityResult(requestCode, resultCode, data); >@Override protected void onDestroy() < checkout.stop(); super.onDestroy(); >//. > ▌ Исходный код, примеры
Исходный код доступен в моём репозитории на github. Там же вы найдёте исходный код тестового приложения (само приложение может быть установлено из Google Play). Всё под лицензией Apache License, Version 2.0.
▌ Заключение
В библиотеке есть над чем работать (например, не хватает покрытия тестами, и было бы неплохо иметь процедуру миграции из одной популярной библиотеки). Но в целом, ей уже можно пользоваться в продакшене, что я и делаю в своём приложении Say it right!.
Вопросы и пожелания приветствуются в комментариях к статье, а также в багтрекере на гитхабе.
UPD Для библиотеки есть тестовое приложение в Google Play. Для того чтобы совершать тестовые платежи нужно вступить в эту Google+ группу.
- android
- in-app purchases
- in-app billing
- андроид
- покупки в приложении
- Open source
- Разработка под Android
What is com.android.vending.splits?
The package name «com.android.vending.splits» refers to a component of the Android operating system related to the Google Play Store app. This specific component is responsible for managing split APKs.
Split APKs are a feature introduced in Android to overcome the limitations of the 100MB size restriction for APK files. When an app exceeds this limit, developers can split the APK into multiple smaller files called split APKs. Each split APK contains a specific part of the app’s resources or code, such as language resources or device architecture-specific code.
In your provided code snippet, the elements within the or section are used to define metadata information about the app’s APK splits.
The first element specifies the resource file for the splits configuration. It points to an XML file named «splits0». This file likely contains information about how the app’s APK is divided into split APKs.
The second element with the name «com.android.vending.derived.apk.id» and value «3» is related to the Play Store app’s internal tracking of APKs. This metadata is used by the Play Store to keep track of different versions of the app and ensure proper updates and compatibility.