Node.js tutorial in Visual Studio Code
Node.js is a platform for building fast and scalable server applications using JavaScript. Node.js is the runtime and npm is the Package Manager for Node.js modules.
Visual Studio Code has support for the JavaScript and TypeScript languages out-of-the-box as well as Node.js debugging. However, to run a Node.js application, you will need to install the Node.js runtime on your machine.
To get started in this walkthrough, install Node.js for your platform. The Node Package Manager is included in the Node.js distribution. You’ll need to open a new terminal (command prompt) for the node and npm command-line tools to be on your PATH.
To test that you have Node.js installed correctly on your computer, open a new terminal and type node —version and you should see the current Node.js version installed.
Linux: There are specific Node.js packages available for the various flavors of Linux. See Installing Node.js via package manager to find the Node.js package and installation instructions tailored to your version of Linux.
Windows Subsystem for Linux: If you are on Windows, WSL is a great way to do Node.js development. You can run Linux distributions on Windows and install Node.js into the Linux environment. When coupled with the WSL extension, you get full VS Code editing and debugging support while running in the context of WSL. To learn more, go to Developing in WSL or try the Working in WSL tutorial.
Hello World
Let’s get started by creating the simplest Node.js application, «Hello World».
Create an empty folder called «hello», navigate into and open VS Code:
mkdir hello cd hello code . Tip: You can open files or folders directly from the command line. The period ‘.’ refers to the current folder, therefore VS Code will start and open the Hello folder.
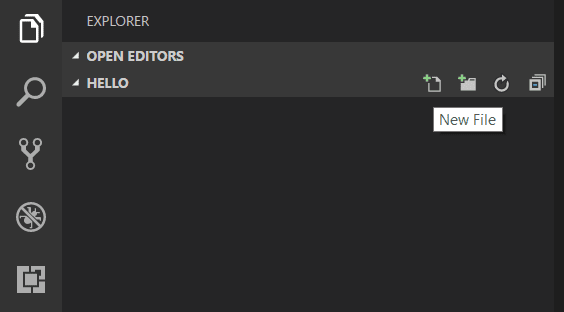
From the File Explorer toolbar, press the New File button:
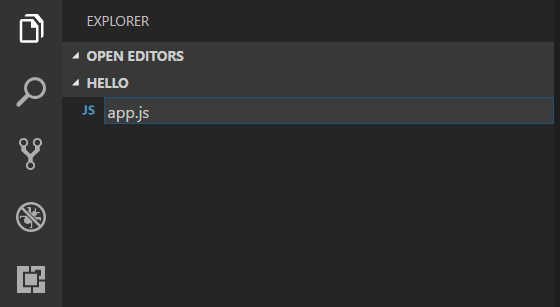
and name the file app.js :
By using the .js file extension, VS Code interprets this file as JavaScript and will evaluate the contents with the JavaScript language service. Refer to the VS Code JavaScript language topic to learn more about JavaScript support.
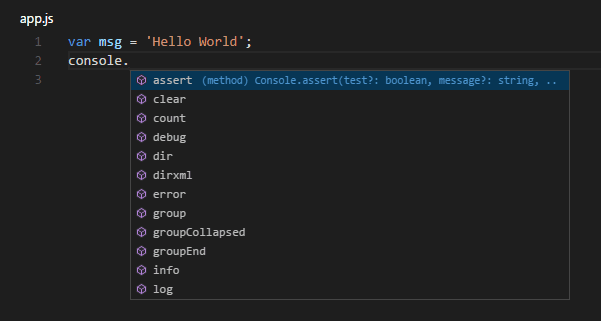
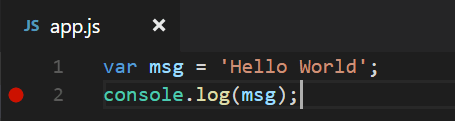
Create a simple string variable in app.js and send the contents of the string to the console:
var msg = 'Hello World'; console.log(msg); Note that when you typed console. IntelliSense on the console object was automatically presented to you.
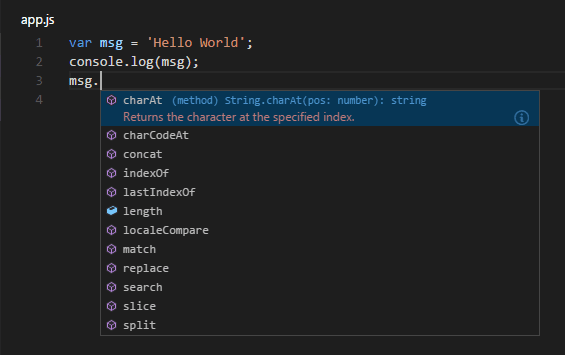
Also notice that VS Code knows that msg is a string based on the initialization to ‘Hello World’ . If you type msg. you’ll see IntelliSense showing all of the string functions available on msg .
After experimenting with IntelliSense, revert any extra changes from the source code example above and save the file ( ⌘S (Windows, Linux Ctrl+S ) ).
Running Hello World
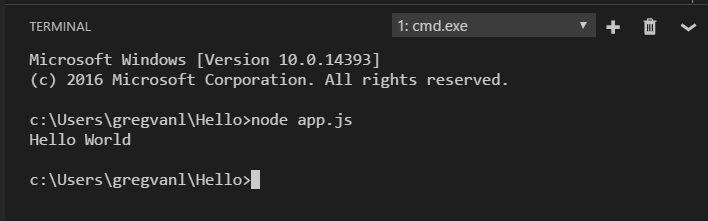
It’s simple to run app.js with Node.js. From a terminal, just type:
node app.js You should see «Hello World» output to the terminal and then Node.js returns.
Integrated Terminal
VS Code has an integrated terminal which you can use to run shell commands. You can run Node.js directly from there and avoid switching out of VS Code while running command-line tools.
View > Terminal ( ⌃` (Windows, Linux Ctrl+` ) with the backtick character) will open the integrated terminal and you can run node app.js there:
For this walkthrough, you can use either an external terminal or the VS Code integrated terminal for running the command-line tools.
Debugging Hello World
As mentioned in the introduction, VS Code ships with a debugger for Node.js applications. Let’s try debugging our simple Hello World application.
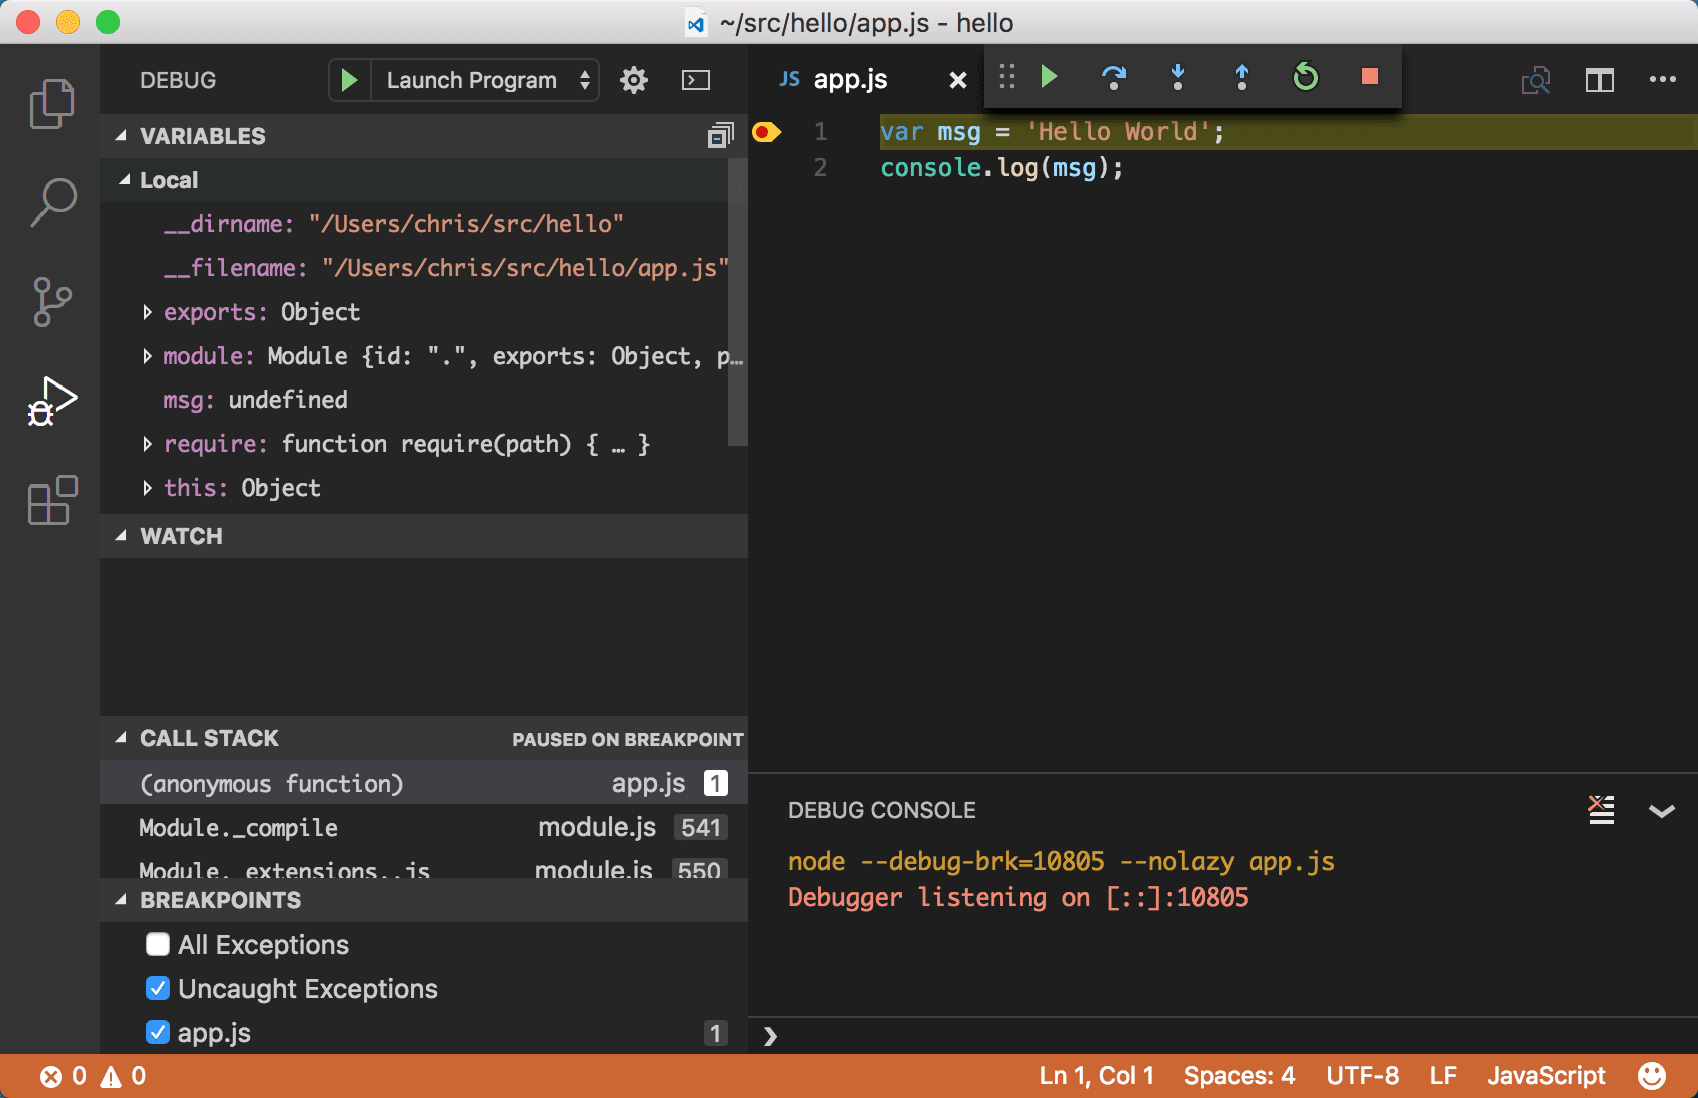
To set a breakpoint in app.js , put the editor cursor on the first line and press F9 or click in the editor left gutter next to the line numbers. A red circle will appear in the gutter.
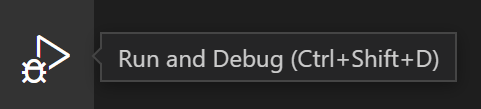
To start debugging, select the Run and Debug view in the Activity Bar:
You can now click Debug toolbar green arrow or press F5 to launch and debug «Hello World». Your breakpoint will be hit and you can view and step through the simple application. Notice that VS Code displays a different colored Status Bar to indicate it is in Debug mode and the DEBUG CONSOLE is displayed.
Now that you’ve seen VS Code in action with «Hello World», the next section shows using VS Code with a full-stack Node.js web app.
Note: We’re done with the «Hello World» example so navigate out of that folder before you create an Express app. You can delete the «Hello» folder if you want as it is not required for the rest of the walkthrough.
An Express application
Express is a very popular application framework for building and running Node.js applications. You can scaffold (create) a new Express application using the Express Generator tool. The Express Generator is shipped as an npm module and installed by using the npm command-line tool npm .
Tip: To test that you’ve got npm correctly installed on your computer, type npm —help from a terminal and you should see the usage documentation.
Install the Express Generator by running the following from a terminal:
npm install -g express-generator The -g switch installs the Express Generator globally on your machine so you can run it from anywhere.
We can now scaffold a new Express application called myExpressApp by running:
express myExpressApp --view pug This creates a new folder called myExpressApp with the contents of your application. The —view pug parameters tell the generator to use the pug template engine.
To install all of the application’s dependencies (again shipped as npm modules), go to the new folder and execute npm install :
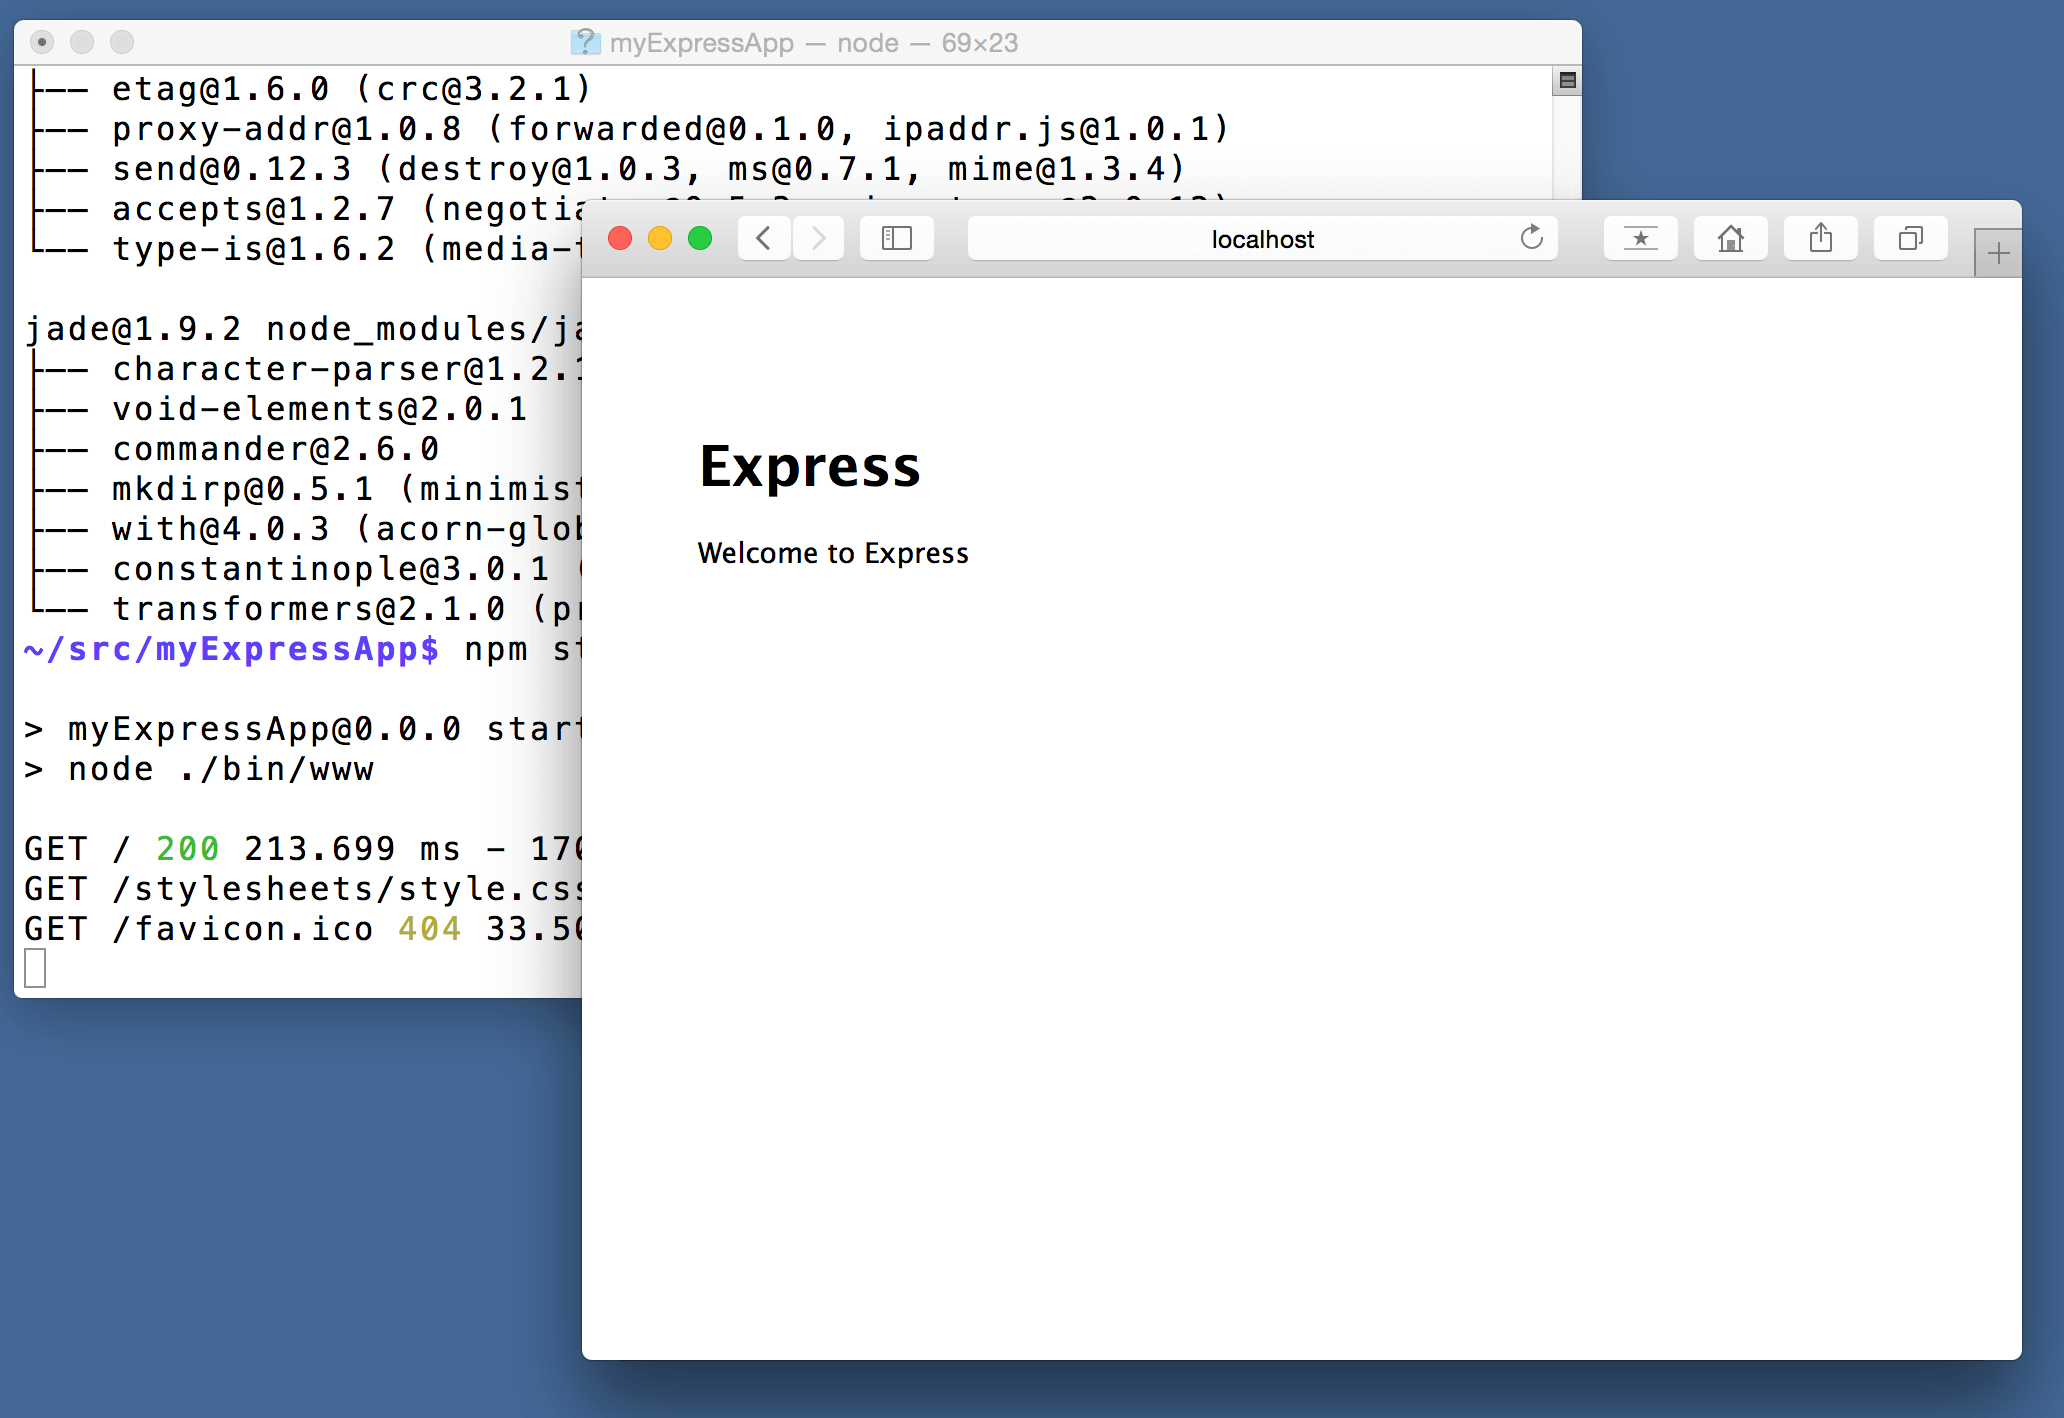
cd myExpressApp npm install At this point, we should test that our application runs. The generated Express application has a package.json file which includes a start script to run node ./bin/www . This will start the Node.js application running.
From a terminal in the Express application folder, run:
npm start The Node.js web server will start and you can browse to http://localhost:3000 to see the running application.
Great code editing
Close the browser and from a terminal in the myExpressApp folder, stop the Node.js server by pressing CTRL+C .
Now launch VS Code:
code . Note: If you’ve been using the VS Code integrated terminal to install the Express generator and scaffold the app, you can open the myExpressApp folder from your running VS Code instance with the File > Open Folder command.
The Node.js and Express documentation does a great job explaining how to build rich applications using the platform and framework. Visual Studio Code will make you more productive in developing these types of applications by providing great code editing and navigation experiences.
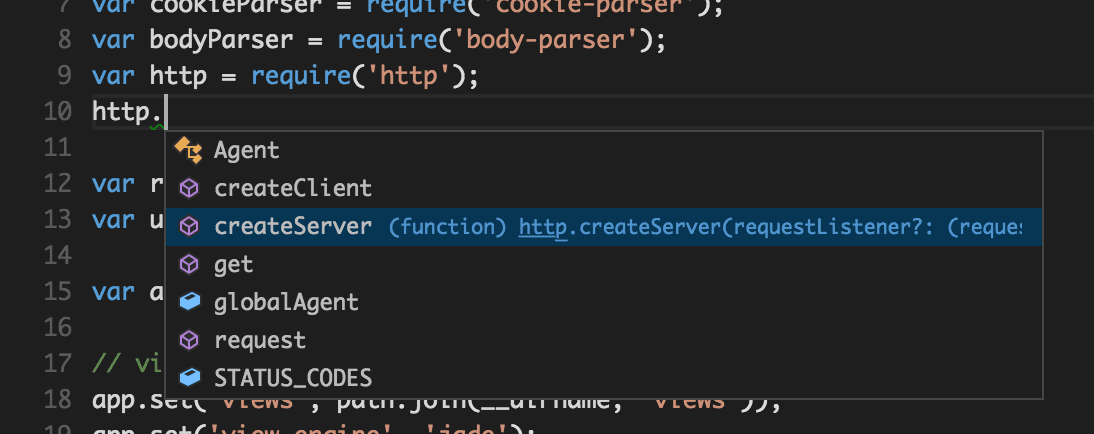
Open the file app.js and hover over the Node.js global object __dirname . Notice how VS Code understands that __dirname is a string. Even more interesting, you can get full IntelliSense against the Node.js framework. For example, you can require http and get full IntelliSense against the http class as you type in Visual Studio Code.
VS Code uses TypeScript type declaration (typings) files (for example node.d.ts ) to provide metadata to VS Code about the JavaScript based frameworks you are consuming in your application. Type declaration files are written in TypeScript so they can express the data types of parameters and functions, allowing VS Code to provide a rich IntelliSense experience. Thanks to a feature called Automatic Type Acquisition , you do not have to worry about downloading these type declaration files, VS Code will install them automatically for you.
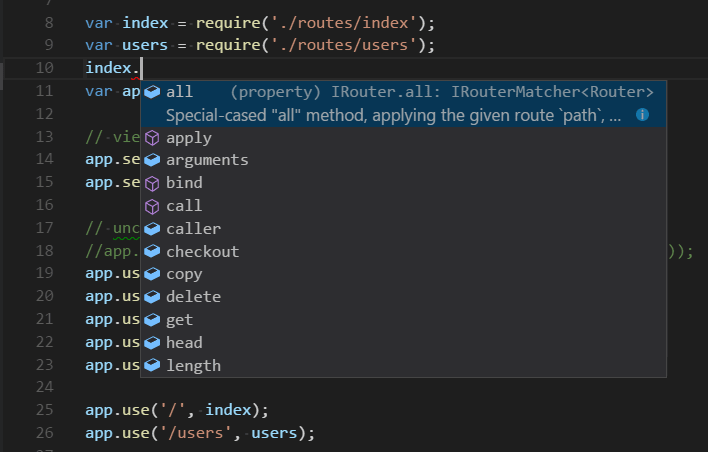
You can also write code that references modules in other files. For example, in app.js we require the ./routes/index module, which exports an Express.Router class. If you bring up IntelliSense on index , you can see the shape of the Router class.
Debug your Express app
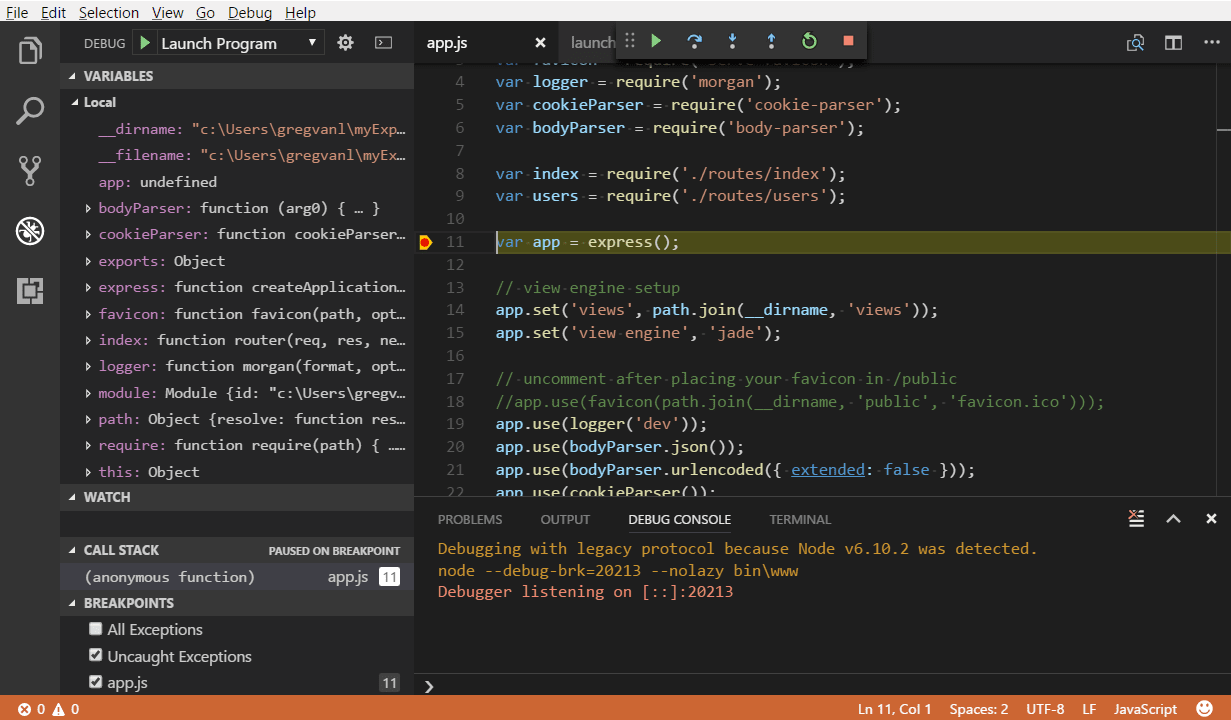
You will need to create a debugger configuration file launch.json for your Express application. Click on Run and Debug in the Activity Bar ( ⇧⌘D (Windows, Linux Ctrl+Shift+D ) ) and then select the create a launch.json file link to create a default launch.json file. Select the Node.js environment by ensuring that the type property in configurations is set to «node» . When the file is first created, VS Code will look in package.json for a start script and will use that value as the program (which in this case is «$\\bin\\www ) for the Launch Program configuration.
"version": "0.2.0", "configurations": [ "type": "node", "request": "launch", "name": "Launch Program", "program": "$ \\bin\\www" > ] > Save the new file and make sure Launch Program is selected in the configuration dropdown at the top of the Run and Debug view. Open app.js and set a breakpoint near the top of the file where the Express app object is created by clicking in the gutter to the left of the line number. Press F5 to start debugging the application. VS Code will start the server in a new terminal and hit the breakpoint we set. From there you can inspect variables, create watches, and step through your code.
Deploy your application
If you’d like to learn how to deploy your web application, check out the Deploying Applications to Azure tutorials where we show how to run your website in Azure.
Next steps
There is much more to explore with Visual Studio Code, please try the following topics:
- Node.js profile template — Create a new profile with a curated set of extensions, settings, and snippets.
- Settings — Learn how to customize VS Code for how you like to work.
- Debugging — This is where VS Code really shines.
- Video: Getting started with Node.js debugging — Learn how to attach to a running Node.js process.
- Node.js debugging — Learn more about VS Code’s built-in Node.js debugging.
- Debugging recipes — Examples for scenarios like client-side and container debugging.
- Tasks — Running tasks with Gulp, Grunt and Jake. Showing Errors and Warnings.
How to develop and debug Node.js with Visual Studio Code
Learn the steps to developer and debug your JavaScript Node.js project with Visual Studio.
Prepare your environment
- Install Visual Studio Code.
- Install git. Visual Studio Code integrates with git to provide Source Control management in the Side Bar.
- Add environment variables needed. The examples in this article use a mongoDB database connection string. If you don’t have a mongoDB database available, you can:
- Choose to run this local project in a multi-container configuration where one of the containers is a mongoDB database. Install the Docker and Remote — Containers extension to get a multi-container configure with one of the containers running a local mongoDB database.
- Choose to create an Azure Cosmos DB resource for a MongoDB database. Learn more with this tutorial.
Clone project
To get started, clone the sample project using the following steps:
- Open Visual Studio Code.
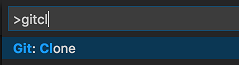
- Press F1 to display the command palette.
- At the command palette prompt, enter gitcl , select the Git: Clone command, and press Enter.
- When prompted for the Repository URL, enter https://github.com/Azure-Samples/js-e2e-express-mongodb , then press Enter.
- Select (or create) the local directory into which you want to clone the project.
Install dependencies
With this Node.js project, you must first ensure that all of the project’s dependencies are installed from npm.
- Press Ctrl + Shift + ` to display the Visual Studio Code integrated terminal.
- Use the following command to install dependencies:
npm install Navigate the project files and code
In order to orient ourselves within the codebase, let’s play around with some examples of some of the navigation capabilities that Visual Studio Code provides.
- Press Ctrl + p .
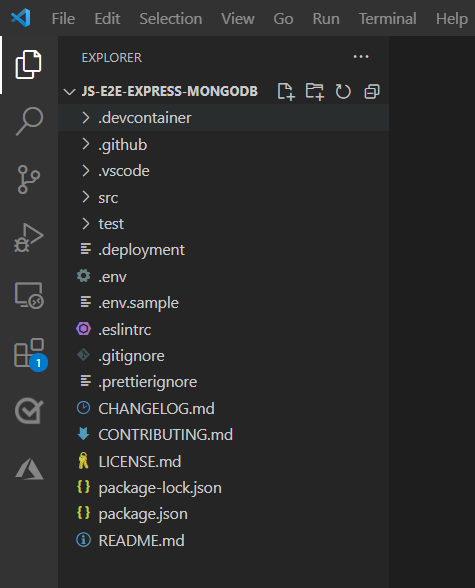
- Enter .js to display all the JavaScript/JSON files in the project along with each file’s parent directory
- Select server.js, which is the startup script for the app.
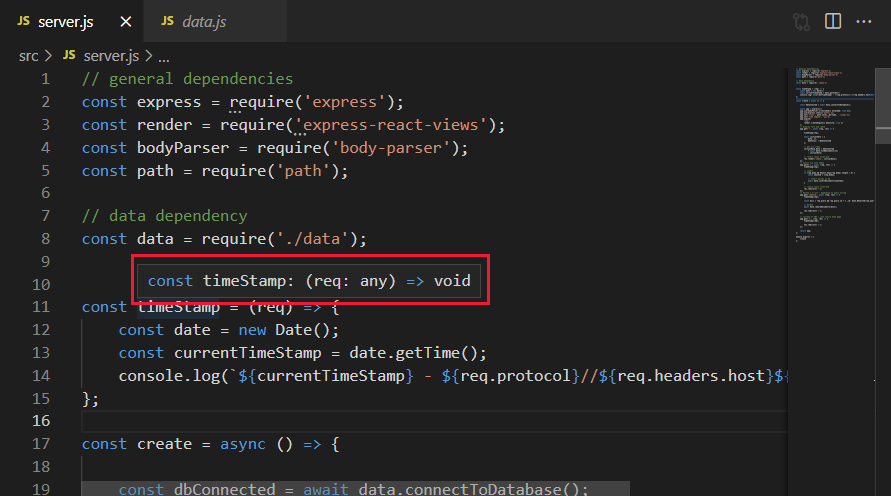
- Hover your mouse over the timestamp on line 11. This ability to quickly inspect variables, modules, and types within a file is useful during the development of your projects.
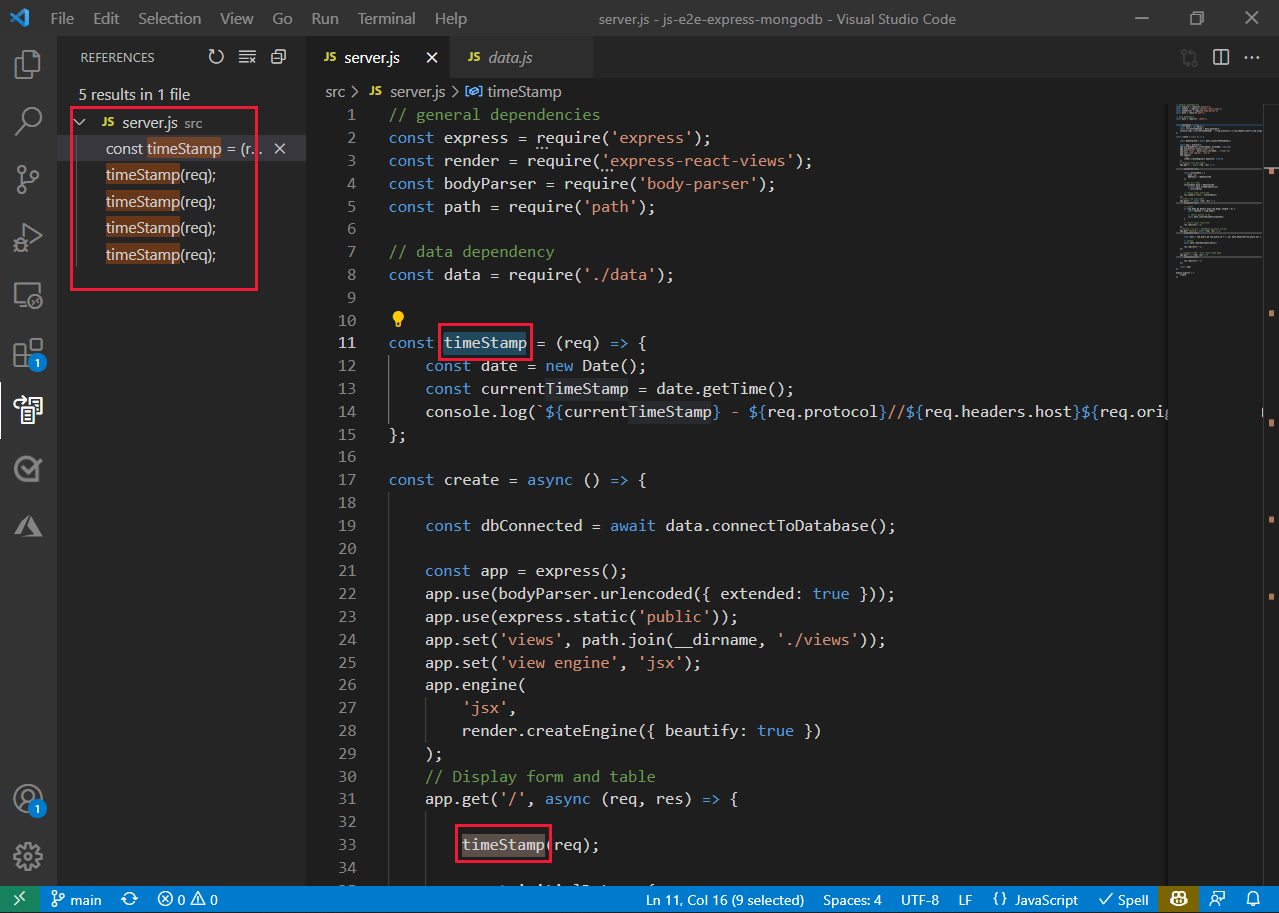
- Clicking your mouse on a variable — such as timestamp — allows you to see all references to that variable within the same file. To view all references to a variable within the project, right-click the variable, and from the context menu, and select Find All References.
Use Visual Studio Code autocompletion with mongoDB
- Open the data.js file
- On line 84, enter a new use of the db variable by entering db. . Visual Studio Code displays the available members of the API available on db .
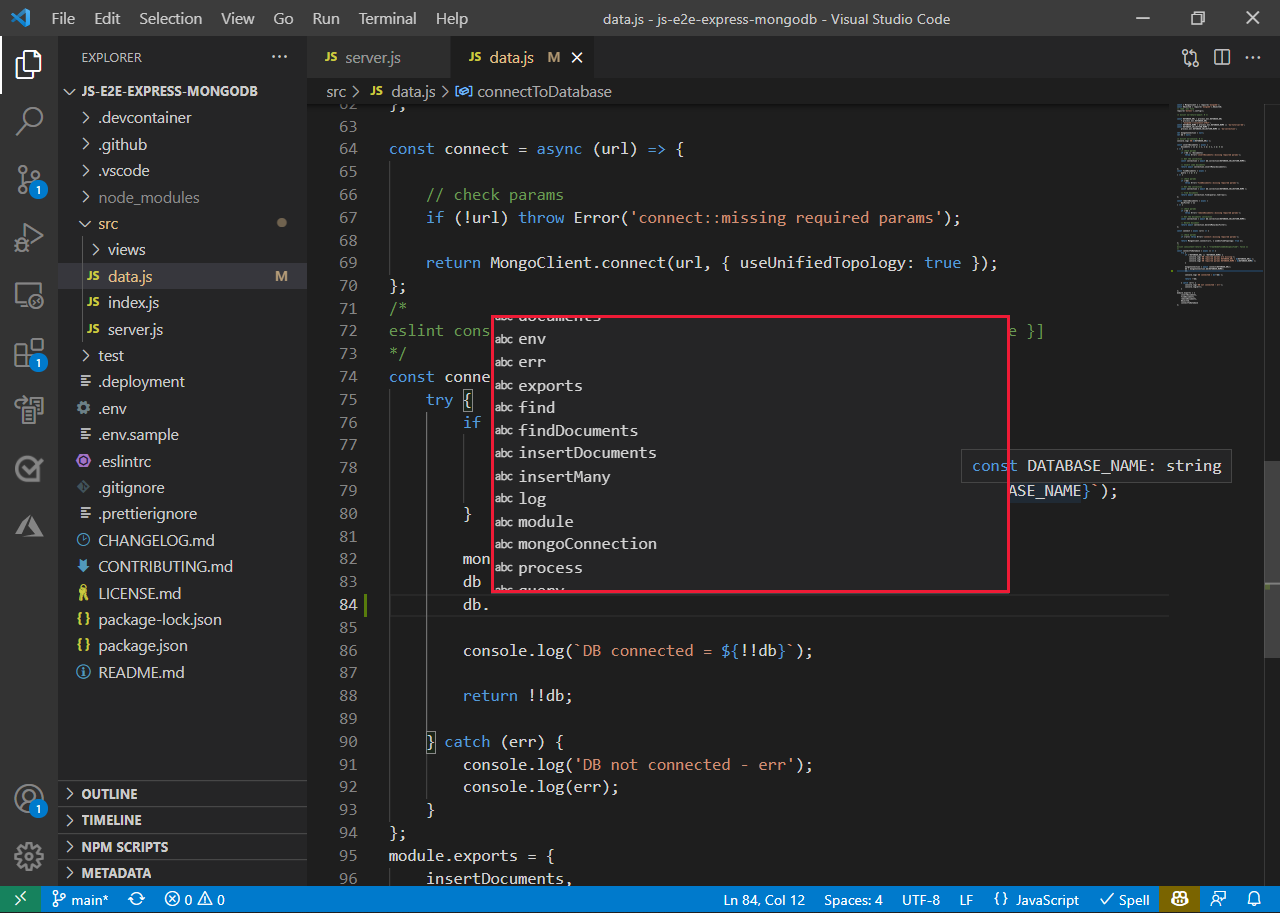
Autocompletion works because Visual Studio Code uses TypeScript behind the scenes — even for JavaScript — to provide type information that can then be used to inform the completion list as you type. This auto-acquisition of typings works for over 2,000 third-party modules, such as React, Underscore, and Express.
You can see which modules support this autocomplete capability by browsing the DefinitelyTyped project, which is the community-driven source of all TypeScript type definitions.
Running the local Node.js app
Once you’ve explored the code, it’s time to run the app. To run the app from Visual Studio Code, press F5 . When running the code via F5 (debug mode), Visual Studio Code launches the app and displays the Debug Console window that displays stdout for the app.

Additionally, the Debug Console is attached to the newly running app so you can type JavaScript expressions, which will be evaluated in the app, and also includes autocompletion. To see this behavior, type process.env in the console:

Open a browser, and navigate to http://localhost:8080 to see the running app. Enter text in the textbox to add an item to get a feel for how the app works.
Debugging the local Node.js app
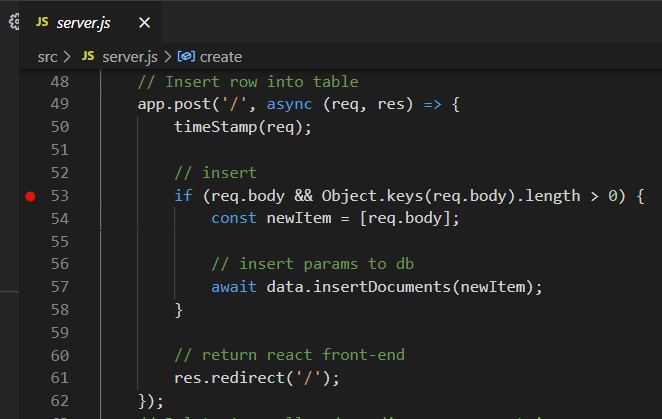
In addition to being able to run the app and interact with it via the integrated console, you can set breakpoints directly within your code. For example, enter Ctrl + P to display the file picker. Once the file picker displays, and select the server.js file.
Set a breakpoint on line 53, which is the if statement in the route for adding a new item. To set a breakpoint, simply click the area to the left of the line number within the editor as shown in the following figure.
In addition to standard breakpoints, Visual Studio Code supports conditional breakpoints that allow you to customize when the app should suspend execution. To set a conditional breakpoint, right-click the area to the left of the line on which you wish to pause execution, select Add Conditional Breakpoint, and specify either a JavaScript expression (for example, foo = «bar» ) or execution count that defines the condition under which you want to pause execution.
Once the breakpoint has been set, return to the running app in a browser and add an entry. This action immediately causes the app to suspend execution on line 28 where you set the breakpoint:
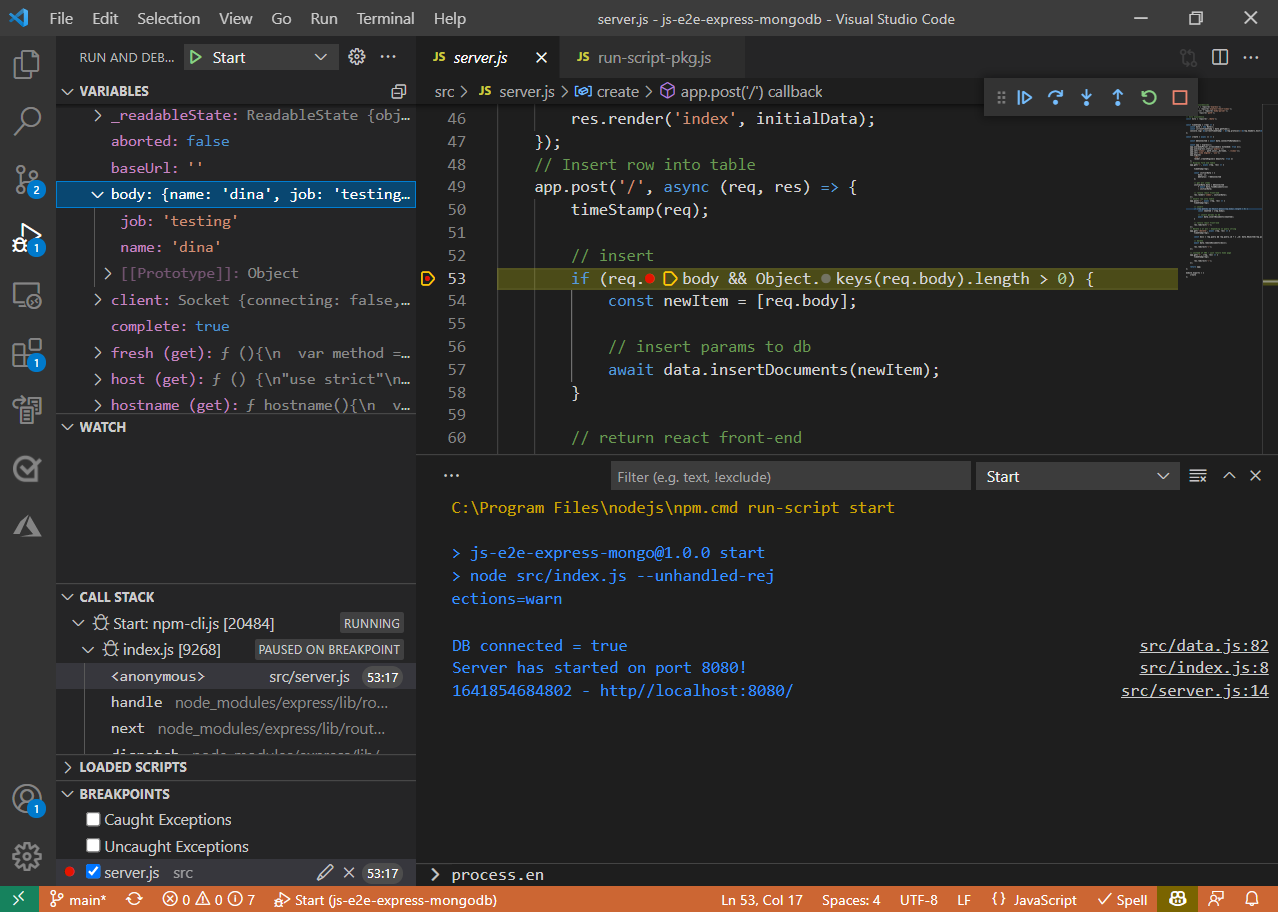
Once the application has been paused, you can hover your mouse over the code’s expressions to view their current value, inspect the locals/watches and call stack, and use the debug toolbar to step through the code execution. Press F5 to resume execution of the app.
Local full-stack debugging in Visual Studio Code
The front-end and back-end are both written using JavaScript. So, while you’re currently debugging the back-end (Node/Express) code, at some point, you may need to debug the front-end (Angular) code.
While you were able to run and debug the Node.js code without any Visual Studio Code-specific configuration, in order to debug a front-end web app, you need to use a launch.json file that instructs Visual Studio Code how to run the app.
This sample app includes a launch.json that includes these debug settings:
< // Use IntelliSense to learn about possible attributes. // Hover to view descriptions of existing attributes. // For more information, visit: https://go.microsoft.com/fwlink/?linkid=830387 "version": "0.2.0", "configurations": [ < "name": "Test", "request": "launch", "runtimeArgs": [ "run-script", "test" ], "runtimeExecutable": "npm", "skipFiles": [ "/**" ], "type": "pwa-node" >, < "name": "Start", "request": "launch", "runtimeArgs": [ "run-script", "start" ], "runtimeExecutable": "npm", "skipFiles": [ "/**" ], "type": "pwa-node" > ] > Visual Studio Code was able to detect that the app’s startup script is server.js.
With the launch.json file open, select Add Configuration (bottom right), and select Chrome: Launch with userDataDir.

Adding a new run configuration for Chrome allows you to debug the front-end JavaScript code.
You can hover your mouse over any of the settings that are specified to view documentation about what the setting does. Additionally, notice that Visual Studio Code automatically detects the URL of the app. Update the webRoot property to $/public so that the Chrome debugger will know where to find the app’s front-end assets:
< "type": "chrome", "request": "launch", "name": "Launch Chrome", "url": "http://localhost:8080", "webRoot": "$/public", "userDataDir": "$/.vscode/chrome" > In order to launch and debug both the front and back-end at the same time, you need to create a compound run configuration, which tells Visual Studio Code which set of configurations to run in parallel.
Add the following snippet as a top-level property within the launch.json file (as a sibling of the existing configurations property).
"compounds": [ < "name": "Full-Stack", "configurations": ["Launch Program", "Launch Chrome"] >] The string values specified in the compounds.configurations array refer to the name of individual entries in the list of configurations. If you’ve modified those names, you’ll need to make the appropriate changes in the array. For example, switch to the debug tab, and change the selected configuration to Full-Stack (the name of the compound configuration), and press F5 to run it.

Running the configuration launches the Node.js app (as can be seen in the debug console output) and Chrome (configured to navigate to the Node.js app at http://localhost:8080 ).
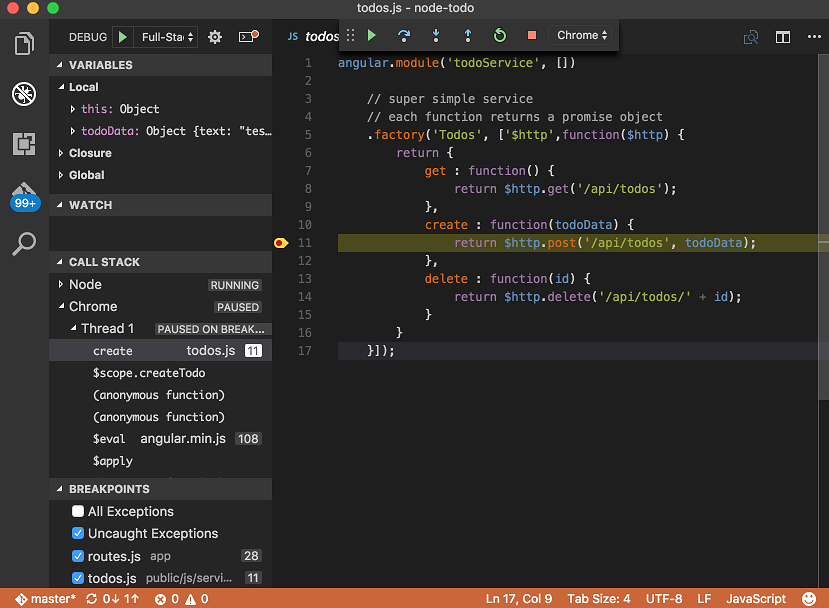
Press Ctrl+P, and enter (or select) todos.js, which is the main Angular controller for the app’s front end.
Set a breakpoint on line 11, which is the entry-point for a new to-do entry being created.
Return to the running app, add a new to-do entry, and notice that Visual Studio Code has now suspended execution within the Angular code.
Like Node.js debugging, you can hover your mouse over expressions, view locals/watches, evaluate expressions in the console, and so on.
There are two cool things to notice:
- The Call Stack pane displays two different stacks: Node and Chrome, and indicates which one is currently paused.
- You can step between front and back-end code: press F5, which will run and hit the breakpoint previously set in the Express route.
With this setup, you can now efficiently debug front, back, or full-stack JavaScript code directly within Visual Studio Code.
In addition, the compound debugger concept is not limited to just two target processes, and also isn’t just limited to JavaScript. Therefore, if work on a microservice app (that is potentially polyglot), you can use the exact same workflow (once you’ve installed the appropriate extensions for the language/framework).
Next steps
Как запустить код через Node.js
Когда запускаю код, через ctrl + alt + N мне вьіводится ошибка: Node.js не является используемой командой, что то вроде того, видел похожий вопрос, у меня потому что нет руського язіка просто вьіводится Node и куча символов (сели что у меня нет папки Node.js и я не знаю как не создать)Как запустить код? Помогите пожалуйста!
Отслеживать
3,563 8 8 золотых знаков 12 12 серебряных знаков 39 39 бронзовых знаков
задан 11 дек 2022 в 10:13
7 3 3 бронзовых знака
Кавычки неправильные. Это книжные кавычки.
11 дек 2022 в 10:14
js можно и в Visual Studio пилить, там все необходимое есть из коробки
11 дек 2022 в 10:16
И мне вьіводится ошибка — что ты делаешь, чтобы начала показываться ошибка? Какая ошибка показывается, полный текст?
11 дек 2022 в 10:31
попробуйте установить node js и перезапустить vs code
11 дек 2022 в 10:32
@Grundy запускаю код через ctrl + alt + N и мне вьіводится ошибка: Node.js не является используемой командой, что то вроде того, видел похожий вопрос, у меня потому что нет руського якзьіка просто вьіводится Node и куча символов
11 дек 2022 в 12:51
1 ответ 1
Сортировка: Сброс на вариант по умолчанию
1. Скачать Node JS с официального ресурса — ссылка
2. Установить его «глобально» к себе на компьютер (как обычную программу).
Использование:
3. Открыть VSCode и нажать Ctrl + ~ (~ — где буква ё). Внизу редактора кода, откроется терминал. (Скорее всего «powershell» или «bush», в крайнем случае «cmd».
4. В поле терминала ввести команду «node -v» и нажать enter. Если терминал вернул версию Node JS (например v16.18.0) значит установлено все верно.
5. Теперь можно либо выполнять .js файлы либо писать код самому.
5.1 Писать код самому (Вводим в терминал node и enter) дальше как в обычном JavaScript, все написанное будет храниться в пределах сессии. Выйти из Node — Ctrl + C или .exit.
5.2 Выполнять .js файлы — в терминале пишем node и путь к файлу (относительно корня папки) например: node index.js
Using Node.js with Visual Studio Code [Step-by-Step]
Knowing how to use Node.js with Visual Studio Code is easy. All you do is install your preferred Node.js version and Visual Studio Code for your operating system or kernel. Next, create or open a .js file with Visual Studio Code.
But if you want to be more comfortable building Node.js applications, you need to go an extra step in installing and customizing the tools for effective development.
This tutorial teaches you how to use Node.js with Visual Studio Code. It walks you through Node.js and Visual Studio Code installation, navigating the editor interface and settings, and using shortcuts and themes. Lastly, you will test your skills by building a simple web server.
This section focuses on installing Node.js and Visual Studio Code on your operating system.
Step-1: Download and Install Node.js
We will download and install Node.js on our Ubuntu server. Let’s start by inspecting what the Linux repositories have for us.
sudo apt-cache show node.jsInstall the default (lower) version of Node.js if you are comfortable with it. Otherwise follow these steps to install a higher version for your operating system.
For Windows, click the link the LTS or current version and answer prompts to install Node.js on your system. For Linux and MacOS, you should proceed with the following steps to install your preferred Node.js version.
Below the link to the current version, click on Other Downloads.
![Using Node.js with Visual Studio Code [Step-by-Step]](https://www.golinuxcloud.com/wp-content/uploads/other-downloads.png)
Scroll down the page to the links section. Choose the one written Installing Node.js via package manager.
![Using Node.js with Visual Studio Code [Step-by-Step]](https://www.golinuxcloud.com/wp-content/uploads/install-via-package-manager.png)
Choose the installer for your operating system/kernel type. I am picking the option called Debian and Ubuntu based Linux distributions because I am installing Node.js on Ubuntu 20.04 machine.
![Using Node.js with Visual Studio Code [Step-by-Step]](https://www.golinuxcloud.com/wp-content/uploads/Ubuntu-based-distros.png)
I then click on the link leading me to Node.js binary distributions repository.
![Using Node.js with Visual Studio Code [Step-by-Step]](https://www.golinuxcloud.com/wp-content/uploads/Nodejs-binary-distributions.png)
Scroll down the page and copy your download command on the target version section. I am picking version 18 (v18.x) for Ubuntu.
![Using Node.js with Visual Studio Code [Step-by-Step]](https://www.golinuxcloud.com/wp-content/uploads/curl.png)
Return to the terminal and run the command.
If curl is not found, install it first.
sudo apt install curlThen retry installing Node.js libraries.
curl -fsSL https://deb.nodesource.com/setup_current.x | sudo -E bash -Next, install the picked Node.js version.
sudo apt-get install -y node.js![Using Node.js with Visual Studio Code [Step-by-Step]](https://www.golinuxcloud.com/wp-content/uploads/install-Nodejs-1.png)
Lastly, confirm your installation by checking the Node.js version.
node --versionLikewise, you can confirm npm installation (automatically installed with Node.js) by checking its version.
npm --version![Using Node.js with Visual Studio Code [Step-by-Step]](https://www.golinuxcloud.com/wp-content/uploads/Node-version-2.png)
Now that you have installed Node.js, let me show how to install Visual Studio Code on your system.
Step-2: Download and Install Visual Studio Code
Installing on Windows and MacOS
Click on Download for Windows button. Likewise the website is intelligent enough to detect you have visited it with a Mac machine.
![Using Node.js with Visual Studio Code [Step-by-Step]](https://www.golinuxcloud.com/wp-content/uploads/download-for-windows.png)
Visual Studio Code starts downloading once the download is complete. Answer the straightforward prompts to install the editor on your system.
Installing on Linux
Select the installation package for your distro type. I am choosing .deb because it suits my Ubuntu distribution.
![Using Node.js with Visual Studio Code [Step-by-Step]](https://www.golinuxcloud.com/wp-content/uploads/deb-package.png)
Visual Studio Code is downloaded into your Downloads folder.
![Using Node.js with Visual Studio Code [Step-by-Step]](https://www.golinuxcloud.com/wp-content/uploads/vsc-downloads.png)
Navigate to the Downloads folder to confirm the successful download.
cd Downloads lsCopy the downloaded file’s name and install Visual studio using dpkg .
# sudo dpkg -i [filename] sudo dpkg -i code_1.67.2-1652812855_amd64.deb![Using Node.js with Visual Studio Code [Step-by-Step]](https://www.golinuxcloud.com/wp-content/uploads/install-Visual-Studio-Code-1.png)
Now, Visual Studio Code should be available under the installed applications.
![Using Node.js with Visual Studio Code [Step-by-Step]](https://www.golinuxcloud.com/wp-content/uploads/vsc-installed.png)
Now that we have installed both Node.js and Visual Studio Code let’s see how to use Node.js with visual studio code.
Step-3: Configure Visual Studio Code to use Node.js
3.1 Open Visual Studio Code
You can open Visual Studio Code using many GUI ways, but the fastest way is through the terminal or Windows Command Prompt.
# Open an empty editor or reopen the previously closed file/folder code # Open the current folder code .3.2 Create a new file
You can create a file on the terminal and open it with Visual Studio Code. Alternatively, you can open an empty Visual Studio Code window, open the Explorer, and create a folder followed by a file.
![Using Node.js with Visual Studio Code [Step-by-Step]](https://www.golinuxcloud.com/wp-content/uploads/Explorer.png)
Besides, you can click the File tab on the navigation menu, followed by New File.
![Using Node.js with Visual Studio Code [Step-by-Step]](https://www.golinuxcloud.com/wp-content/uploads/create-file-3.png)
Let’s create a file called server.js inside the test folder, then open it with Visual Studio Code. Head over to your Terminal, create a folder, and then open it with Visual Studio Code.
mkdir test cd test code .![Using Node.js with Visual Studio Code [Step-by-Step]](https://www.golinuxcloud.com/wp-content/uploads/open-a-folder.png)
Hover over the folder name. A menu pops on the right side of the folder name. The first link creates a file, while the second one creates a folder. The third link refreshes the screen, while the last one collapses all the (sidebar) opened files and folders. Let’s create the file using the first menu’s link.
![Using Node.js with Visual Studio Code [Step-by-Step]](https://www.golinuxcloud.com/wp-content/uploads/file-create.png)
3.3 Write your first javascript code
Let’s write some JavaScript in the file.
console.log('How to use Node.js with visual studio code')Save the file using ctrl+s . And run it with Visual Studio Code’s Terminal. There are many ways to toggle the Terminal. You can use the main navigation links or shortcuts: ctrl+~ or ctrl+j
Note: command for Mac is the equivalence of the ctrl key for Windows and Linux. So, it would be best to replace every ctrl instance with the command if the given visual studio code shortcut fails to work in Mac.
Now run the file with node.
node server.jsYou get the following output:
How to use Node.js with visual studio codeSimilarly, you can use the Visual Studio Code Terminal to install packages.
Step-4: Install additional packages on VSC
Let’s install the following packages using the Terminal.
Before that, let’s notify Node.js that we want to manage npm packages by running npm init command.
npm init -y npm i express nodemon![Using Node.js with Visual Studio Code [Step-by-Step]](https://www.golinuxcloud.com/wp-content/uploads/install-packages-4.png)
Let’s customize the package.json file to use nodemon , build the web server and start it.
npm run devThen make a request using your browser as the client on PORT 3000.
![Using Node.js with Visual Studio Code [Step-by-Step]](https://www.golinuxcloud.com/wp-content/uploads/create-server.png)
You can end a process running on the terminal using the ctrl+c shortcut.
You must have realized that visual studio code is intelligent enough to detect we are writing JavaScript. It attempts to autocomplete statements for us.
![Using Node.js with Visual Studio Code [Step-by-Step]](https://www.golinuxcloud.com/wp-content/uploads/autocompletion.png.png)
You probably wonder how I condensed the font size to accommodate more things or split the screen to accommodate the two files.
You can enlarge the font size by pressing the ctrl and + keys simultaneously or minimize it using the ctrl and — keys. You can split the screen by dragging one file to the top-right active corner of another.
![Using Node.js with Visual Studio Code [Step-by-Step]](https://www.golinuxcloud.com/wp-content/uploads/split-screen.png)
Step-5: Install extension packages on VSC
One of the main reasons programmers love Visual Studio Code is that you can build anything or use (almost) any programming language with it. It enables you to install extensions through its Extensions link on the sidebar.
All you do is click the Extensions link, search for a new or an installed extension then install or manage the extension.
![Using Node.js with Visual Studio Code [Step-by-Step]](https://www.golinuxcloud.com/wp-content/uploads/extensions-1.png)
You can also manage extensions through the command palette, accessible through the View tab -> Command Palette

The command palette, also reachable via the ctrl+shift+p shortcut, enables you to run commands.
Themes like Eva, One Dark Pro, Cobalt 2, and Material Theme change the appearance of the UI of your code editor. For example, let’s install One Dark Pro, set its dark mode and see how the interface looks.
![Using Node.js with Visual Studio Code [Step-by-Step]](https://www.golinuxcloud.com/wp-content/uploads/install-theme.png)
Additionally, you can install the Prettier extension for automatic code format. Then open the server.js file to see the impact of themes and extensions.
![Using Node.js with Visual Studio Code [Step-by-Step]](https://www.golinuxcloud.com/wp-content/uploads/new-look.png)
The file has a (better) new look.
Lastly, you can close the editor or open another project.
Conclusion
Knowing how to use Node.js with Visual Studio Code starts by installing Node.js and the editor on your machine.
You should then learn how to manage files by navigating Visual Studio Code’s interface. It would be helpful to know shortcuts and customize the editor for improved productivity.
Can’t find what you’re searching for? Let us assist you.
Enter your query below, and we’ll provide instant results tailored to your needs.
If my articles on GoLinuxCloud has helped you, kindly consider buying me a coffee as a token of appreciation.

For any other feedbacks or questions you can send mail to admin@golinuxcloud.com
Thank You for your support!!