Easiest Way to Connect a React Frontend with Node.js
When I first learned to use React, a frontend library for JavaScript, I was hyped. Managing state with React hooks and building nice looking web apps were awesome. However, I didn’t know how to connect that to a Node.js backend. All the tutorials I read and watched had too many unnecessary dependencies and complicated nuances. That’s why in this tutorial, we will be sticking to the bare basics.
I’m going to assume you already know a bit of Node.js and React.js for this tutorial. If not, don’t worry, I’ll explain things as we go. In this tutorial, we will be creating a simple quote generator web app.
1. The Folder Setup
First, create a folder in your working directory for the app. Then, inside that directory, make the folder for my backend in Node.js. I will name mine “backend” for simplicity’s sake. Then, install express for handling routes. For getting my quotes, I will use the inspirational-quotes npm package.
$ mkdir quotes-app
$ cd quotes-app
$ mkdir backend
$ cd backend
$ npm init -y
$ npm install express inspirational-quotes
Now let’s write some code.
2. The Backend
Create an app.js file and set it up like so:
const Quote = require('inspirational-quotes');console.log(Quote.getQuote());
If we run this, we will see that we get a JavaScript object containing two keys: text and author. Let’s finish setting up the rest of our express/Node backend. Instead of printing the JavaScript object to console, I will send it instead when the home route is accessed (like so):
const express = require("express");
const Quote = require('inspirational-quotes');const app = express();app.get("/", function(req, res) res.send(Quote.getQuote());
>);let port = process.env.PORT;
if(port == null || port == "") port = 5000;
>
app.listen(port, function() console.log("Server started successfully");
>);
Don’t worry about process.env.port for now, those of you who have used Heroku or deployed apps should find that familiar, however. From here, if we navigate over to our localhost, we should find a JSON with what we previously printed to console.
Cool, we’re done with the backend. Wait what, it was that easy. Yep, we’re really done.
3. The Frontend
Now let’s back out of our current directory, into the outer folder and create our react app. I’m going to call mine “frontend” just for simplicity’s sake, once again. Once that’s done, navigate into the “frontend” directory.
$ cd ..
$ npx create-react-app frontend
$ cd frontend
Inside the “src” directory, create a file called ”Quotes.jsx”. Populate it with this code: which just gives a button. For now, this button won’t do anything.
import React, from "react";function Quotes() const [text, setText] = useState("");
const [author, setAuthor] = useState("");return (
)
>export default Quotes;
Then, in the App.js, import this component and use it. I’ve removed some extra stuff that was auto-generated.
import React from 'react';
import logo from './logo.svg';
import './App.css';
import Quotes from "./Quotes";function App() return (


);
>export default App;
At this point, running the app will simply give you a button and a “-”. The next step is where the magic happens: we will combine the frontend and the backend.
Inside your package.json file, insert this line of code under the “private: true”. If you did not use 5000 as your backend port, make it whichever port you chose. However, this port MUST be different than 3000, since that is what our React app uses.
Now, install a dependency called axios. If you aren’t familiar with axios, don’t worry. We’ll write a few lines of code with it and that’s it. Axios just lets us make HTTP requests to our backend, and it works similarly to express.
import React, from "react";
import axios from "axios";function Quotes() const [text, setText] = useState("");
const [author, setAuthor] = useState("");function getQuote() axios.get("http://localhost:5000/", < crossdomain: true >).then(response => setText(response.data.text);
setAuthor(response.data.author);
>);
>return (
)
>export default Quotes;
At this point, when the button is clicked, it triggers our function “getQuote”, which then uses axios to get the information we wanted at route “/” . The information we want, our JavaScript object, is given to us with response.data, so if you printed it to console it would look identical to what we printed in the beginning of this tutorial.
Note: if you run your React app and the button is not doing anything, add this code to your backend app.js right above the app.get(“/”):
app.use(function(req, res, next) res.header('Access-Control-Allow-Origin', '*');
res.header('Access-Control-Allow-Headers', 'Origin, X-Requested-With, Content-Type, Accept');
next();
>);
Sometimes axios gets blocked by CORS, so we need to bypass this using the above code.
If anything doesn’t match up, be sure to check out the code, which is posted on GitHub. The frontend repo is here, and the backend repo is here.
Note: to deploy this app, you should deploy the backend separately. Then, use that link and replace the localhost link when using Axios. The frontend should then be deployed separately as well. You can do this easily with Github pages.
If this helped, please give me a clap! If you guys want to see a tutorial on deploying this app, let me know in the comments. 🙂 If you want to deploy the frontend and have a custom URL for free, check out my article on it:
Как настроить Node.js Express сервер для React
React — это библиотека JavaScript для разработки пользовательских интерфейсов. Она позволяет создавать эффективные и масштабируемые веб-приложения, основанные на компонентной архитектуре.
Express.js — это минималистичный и гибкий веб-фреймворк для Node.js, который облегчает разработку веб-приложений и API. Он предоставляет простой интерфейс и набор функций, позволяющих быстро создавать серверы и маршрутизировать запросы.
Введение
Это руководство поможет вам разработать простое приложение на React и подключить его к серверу, созданному с использованием Node.js. Мы начнем с создания React приложения с помощью команды create-react-app , а затем настроим его подключение к серверу Node.js c помощью proxy .
Необходимые условия
Для успешного выполнения данного гайда будет полезно иметь следующее:
- Предварительный опыт работы с Node.js, Express, npm и React.js.
- Установленный Node.js.
- Текстовый редактор, предпочтительно VS Code.
- Веб-браузер, в данном случае Google Chrome.
Настройка структуры папок

Первым шагом будет создание корневой папки для нашего приложения с именем express-react-app , в котором будут содержаться все файлы приложения. Затем мы создадим папку client , которая будет содержать все файлы React приложения.
Папка node_modules будет содержать все пакеты NPM для файла server.js . Папка node_modules будет автоматически создана при установке пакетов NPM.
Далее нам потребуется создать файл server.js . В этом файле будет размещен сервер Express, который будет выступать в качестве нашего бэкенда. Файл package.json будет автоматически сгенерирован, когда в терминале будет выполнена команда npm init -y .
Создание React приложения
Из терминала перейдите в корневую директорию с помощью команды cd и выполните следующие команды:
$cd express-react-app $npx create-react-app clientВышеуказанные команды создадут React приложение названием client внутри корневой директории.
Настройка сервера Express
Следующий шаг состоит в создании сервера Express в файле server.js .
Из терминала перейдите в корневую директорию и выполните следующую команду:
$npm init -yКоманда автоматически сгенерирует файл package.json . Затем нам потребуется выполнить следующую команду для установки Express, и она будет сохранена в качестве зависимости в файле package.json .
$npm install express --saveТеперь отредактируйте файл server.js следующим образом:
const express = require('express'); //Строка 1 const app = express(); //Строка 2 const port = process.env.PORT || 5000; //Строка 3 // Сообщение о том, что сервер запущен и прослушивает указанный порт app.listen(port, () => console.log(`Listening on port $`)); //Строка 6 // Создание GET маршрута app.get('/express_backend', (req, res) => < //Строка 9 res.send(< express: 'YOUR EXPRESS BACKEND IS CONNECTED TO REACT' >); //Строка 10 >); //Строка 11Строки 1 и 2 — подключают модуль Express и позволяют использовать его внутри файла server.js .
Строка 3 — Установка порта, на котором будет работать сервер Express.
Строка 6 — будет отображено сообщение в консоли о том, что сервер работает исправно.
Строка 9 и 11 — установка GET маршрута, который позже мы будем получать из нашего клиентского React приложения.
Настройка proxy
На этом шаге Webpack Development Server был автоматически сгенерирован при выполнении команды create-react-app . Наше React приложение работает на Webpack Development Server на стороне фронденда.
Webpack Development Server (WDS) — это инструмент, который помогает разработчикам вносить изменения во фронтенд веб-приложения и автоматически отображает эти изменения в браузере без необходимости обновления страницы.
Он уникален по сравнению с другими инструментами, которые делают то же самое, поскольку содержимое пакета не записывается на диск в виде файлов, а хранится в памяти. Это преимущество крайне важно при отладке кода и стилей.
Мы можем настроить проксирование запросов API с клиентской стороны на API на серверной стороне. API на серверной стороне (Express сервер) будет работать на порту 5000.
Сначала настройте прокси для перехода в директорию client и найдите файл package.json . Добавьте следующую строку в него.
“proxy”: “http://localhost:5000”Измененный файл package.json будет выглядеть следующим образом:
< "name": "client", "version": "0.1.0", "private": true, "dependencies": < "@testing-library/jest-dom": "^5.16.5", "@testing-library/react": "^13.4.0", "@testing-library/user-event": "^13.5.0", "react": "^18.2.0", "react-dom": "^18.2.0", "react-scripts": "5.0.1", "web-vitals": "^2.1.4" >, "scripts": < "start": "react-scripts start", "build": "react-scripts build", "test": "react-scripts test", "eject": "react-scripts eject" >, "eslintConfig": < "extends": [ "react-app", "react-app/jest" ] >, "browserslist": < "production": [ ">0.2%", "not dead", "not op_mini all" ], "development": [ "last 1 chrome version", "last 1 firefox version", "last 1 safari version" ] >, "proxy": "http://localhost:5000" >Измененный файл package.json позволит Webpack проксировать запросы API на сервер бэкенда Express, работающий на порту 5000.
Вызов бэкенд сервера Express из React
Сначала перейдите в папку client/src и отредактируйте файл App.js , чтобы он выглядел следующим образом:
import React, < useEffect, useState >from 'react'; import logo from './logo.svg'; import './App.css'; function App() < const [state, setState] = useState(null); const callBackendAPI = async () => < const response = await fetch('/express_backend'); const body = await response.json(); if (response.status !== 200) < throw Error(body.message) >return body; >; // получение GET маршрута с сервера Express, который соответствует GET из server.js useEffect(() => < callBackendAPI() .then(res =>setState(res.express)) .catch(err => console.log(err)); >, []) return (  className="App-logo" alt="logo" />
 Edit src/App.js and save to reload.
Learn React ); > export default App;Внутри хука useEffect() вызывается функция callBackendAPI() . Эта функция будет получать данные с ранее созданного маршрута на сервере Express. При получении ответа от запроса fetch , значение res.express устанавливается в состояние state с помощью функции setState() . Затем значение state выводится внутри элемента для отображения на странице.
Запуск приложения
Для запуска приложения перейдите в корневую директорию express-react-app и выполните следующую команду:
$cd express-react-app $node server.jsПосле запуска файла server.js следующим шагом будет переход в веб-браузер по адресу «http://localhost:5000/express_backend«, и будет отображено следующее сообщение:
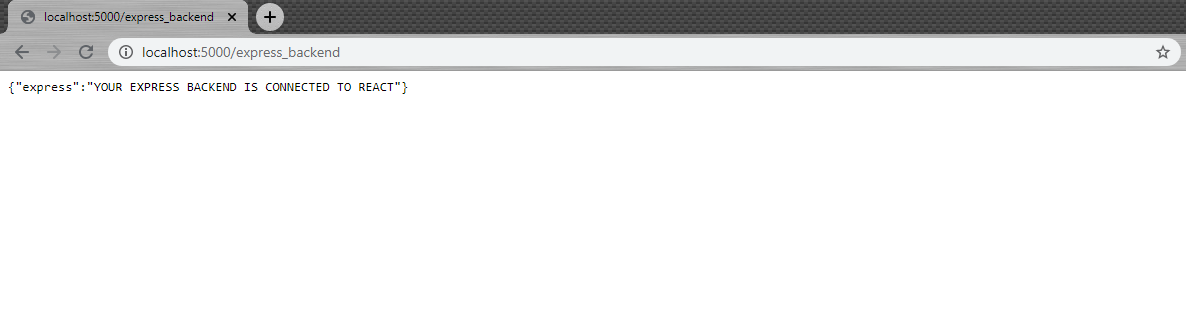
Вышеуказанное демонстрирует, что наш сервер Express работает должным образом, и созданный нами маршрут GET функционирует, а также возможно получение этого маршрута с клиентской стороны.
Также обратите внимание, что путь URL совпадает с путем, который мы указали в нашем маршруте GET в файле server.js .
Затем перейдите в директорию client в терминале и выполните следующие команды:
$cd client $npm startВышеуказанные команды запустят React сервер разработки, который работает на порту 3000, и автоматически откроется в веб-браузере.
На экране будет отображено следующее сообщение:
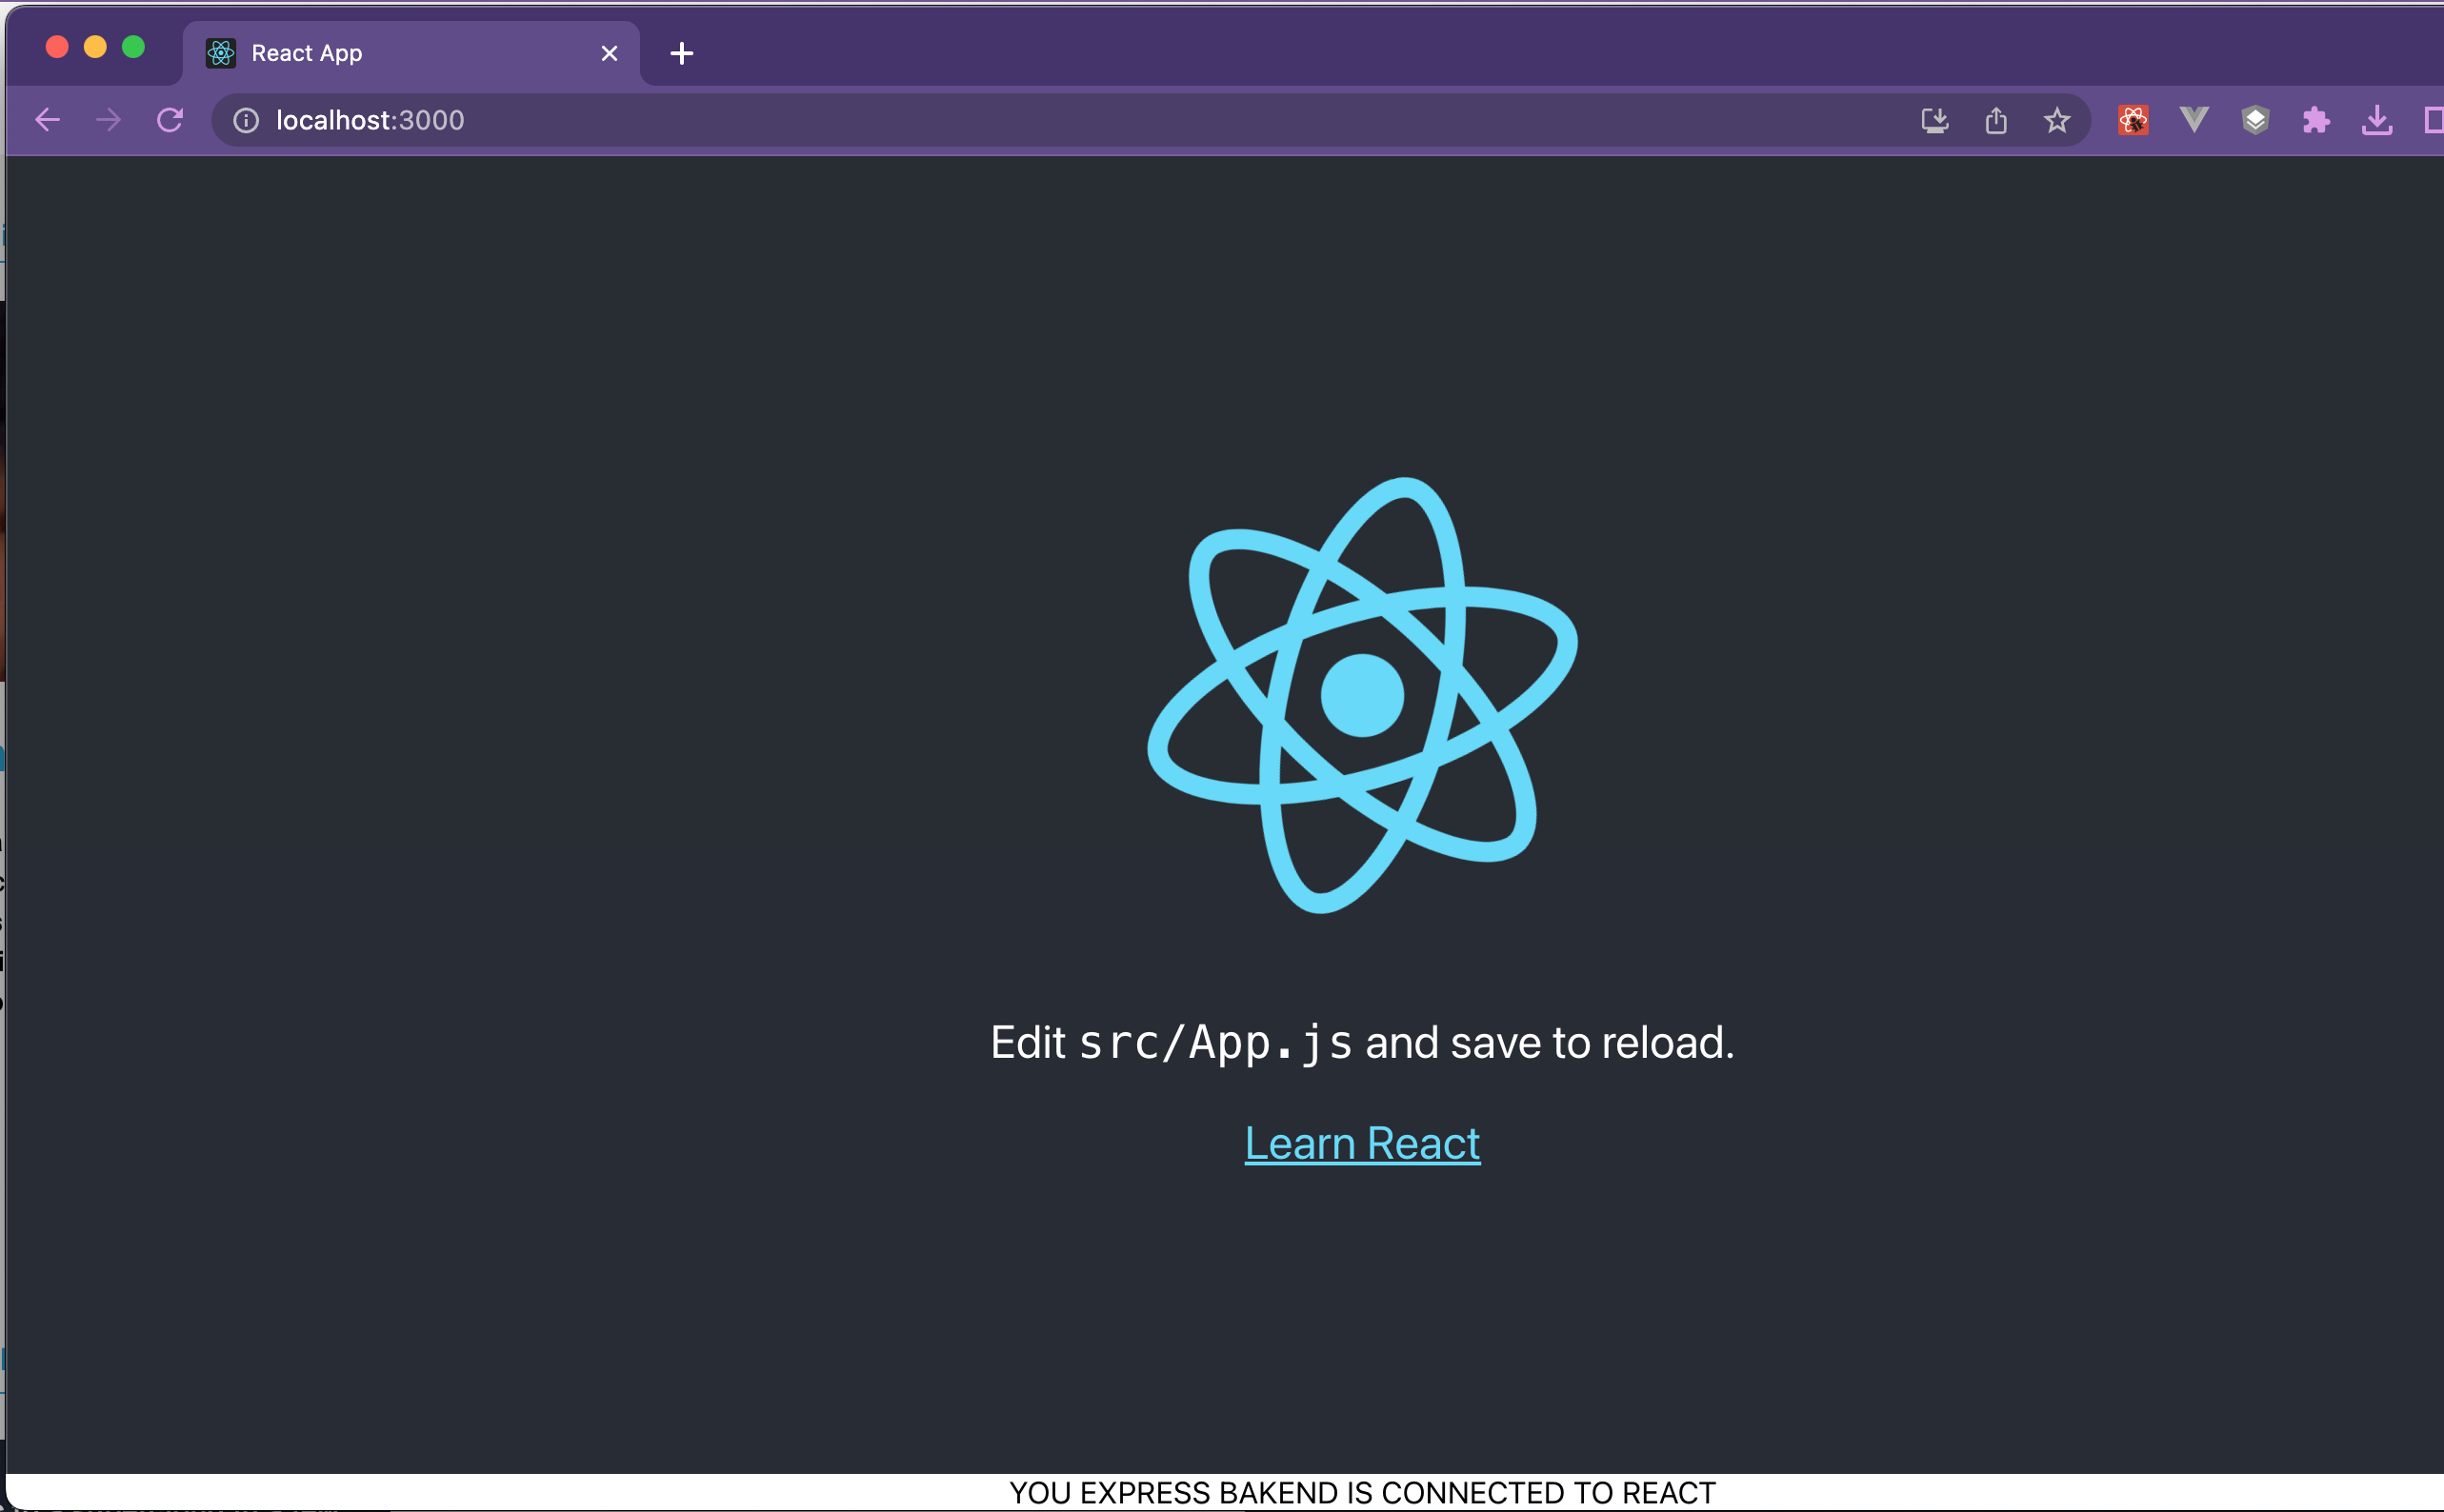
Наконец, мы отобразили данные, полученные с маршрута GET в server.js , в нашем фронтенд React приложении, как было показано выше.
Если сервер Express отключен, сервер React всё равно будет продолжать работать. Однако связь с бэкендом будет потеряна, и ничего не будет отображаться.
Заключение
С помощью сервера Express можно сделать многое, например, осуществлять вызовы к базе данных. Однако в этом руководстве мы сосредоточились на том, как быстро подключить клиентское React приложение к серверу Express на стороне бэкенда.
Кодовые фрагменты и файлы, использованные в этом руководстве, можно найти в репозитории GitHub по этой ссылке.
Deploy a React app with Node.js
In this tutorial you will learn how to build and deploy your React app using an Express.js server.
With this setup you can deploy your React app on Heroku with little effort.
Of course with little configuration you can deploy it to other providers as well.
Here is a brief plan of how you can do it fast and easy:
Tools needed
Todo List
Installation
My version is 8.12.0
Assuming you are in the folder you want to create your project run in your terminal:
mkdir servercd servernpm init -ynpm install express --savenpm i -g create-react-app
With the above commands , you initialize your project and install the dependencies for the server and the react client.
Your project will look like this
Setup the client
Now you have everything you need to setup your react project, lets start with the client.
on your terminal run :
 create-react-app client
cd client
yarn start
Note that ‘client ’ is the name of the react app , you can pick a different name if you like.
Wait for the process to complete.
Now you can see the react app in your browser served by the development server
press Ctr + C on the terminal to close the development server
Build your project by running :
yarn build
Wait for the process to end , the react code for production lives in the build directory.
go back to your project root folder :
cd ..
Building the server
Now you will develop the production server of your react app.
You will need a production server to serve the react app over the internet, the development server included with create-react-app is only used for development purposes!
Create a new file , name it index.js and put the following:
const express = require('express');const app = express();// serve up production assetsapp.use(express.static('client/build'));// let the react app to handle any unknown routes // serve up the index.html if express does'nt recognize the routeconst path = require('path');app.get('*', (req, res) => res.sendFile(path.resolve(__dirname, 'client', 'build', 'index.html'));>);// if not in production use the port 5000const PORT = process.env.PORT || 5000;console.log('server started on port:',PORT);app.listen(PORT);
run on your terminal:
node index.js
in your browser go to
Congratulations! Now your react app is served from the production server.
Optional : Deployment to heroku
if you want to deploy to Heroku add the following on the package.json
"engines": "node": "8.1.1","npm": "5.0.3">,"scripts": "start": "node index.js","heroku-postbuild": "NPM_CONFIG_PRODUCTION=false npm install --prefix client && npm run build --prefix client">
Now you can deploy your project on Heroku!
The following commands are executed by Heroku after it installs your server dependencies from server/package.json to install your react app dependencies.
This way you avoid committing to Heroku the build folder in the client directory and simply let Heroku build the project 🙂
NPM_CONFIG_PRODUCTION=false npm install --prefix client && npm run build --prefix client
— -prefix client instructs npm to use the package.json in the client directory instead of the package.json in the server directory.
NPM_CONFIG_PRODUCTION=false sets the Heroku npm to development mode (only for this command) to allow the installation of the dev dependencies necessary for the react app (client)
Share the love!
If you liked it feel free to share and give some claps.