Linux on Lenovo Legion
Please make sure you back up everything on your computer before attempting to install Linux, even if you intend to dual boot, in case you accidentally wipe your Hard Drive.
This guide should apply to all Lenovo Legion and IdeaPad Gaming series laptops made in or after 2020, and the process should be similar for all modern laptops with Intel or AMD CPU’s.
Known Issues
NVIDIA GPU drivers do not properly support power limit changes on Linux, meaning your GPU will always act like your laptop is in quiet mode.
If you have a 3050/50Ti your GPU will be limited to 60W.
If you have a 3060, your GPU will be limited to 80W.
If you have a 3070/70Ti or 3080/80Ti, your GPU will be limited to 115W.
As a result of this the gaming experience on Linux is currently very poor compared to on windows.
This was fixed with Nvidia Driver 530.41.03 🙂
Recommended Linux Distributions:
You can use any Linux Distro you like, but here are some I recommend if you are unsure:
Beginner Distros (Use one of these if this is your first time using Linux):
Ubuntu — Forked from Debian, tried and tested, somewhat heavy but very well documented.
Official Ubuntu flavors (Kubuntu, Lubuntu, Xubuntu, Ubuntu MATE, etc.) — Ubuntu with a different Desktop Environment and preinstalled apps.
Zorin — Clean, modern, and lightweight.
Linux Mint — Lightweight, tried and tested, similar-ish look and feel to Windows 10.
Pop!_OS — Comes with NVIDIA drivers preinstalled, great for gaming or developers.
Intermediate Distros:
Fedora — Open source version of Red Hat, Rolling Release.
Manjaro — Derived from Arch, greatly simplifies and automates the installation and usage over using straight Arch.
Advanced Distros:
Arch Linux — You are on your own.
I will be using Ubuntu for the purposes of this guide, however the process should be similar on most distros, especially those under the “Beginner Distros” category.
Downloading Linux
Many Linux distros offer packages for multiple hardware architectures. Lenovo Legions use the amd64 1) architecture. As this is what most modern computers use, this will typically be the first or top download option.
You will usually see two versions available: A latest release and an LTS release. LTS stands for long-term support. I generally recommend downloading the latest release, however the long term support releases may be more stable.
The Linux operating system you choose to download will be saved to your computer as a .iso disk image file. The next step is to write this file to a USB stick.
Creating a Bootable USB
You will need a blank flash drive that has a capacity of at least 8GB. I recommend using a USB 3 stick if possible, however this will work fine with a slower USB 2 stick. It will just be slow.
We will be using BalenaEtcher to write the file to a USB stick. BalenaEtcher is a free application available for Windows, Linux, and MacOS. Download and install it if you haven’t already. When you open Etcher, you will be presented with the following user interface:
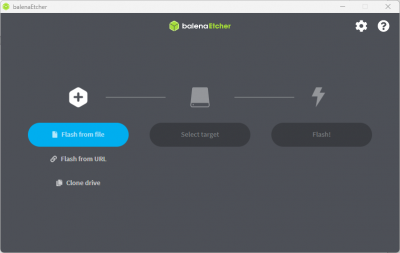
Select “Flash from File” and select the downloaded ISO file.
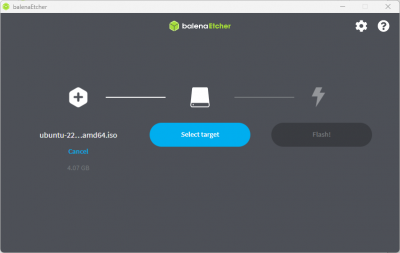
Next click “Select target” and select your USB drive.
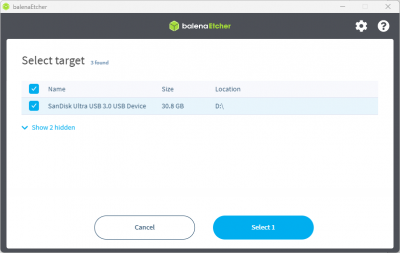
In this case, I am using a SanDisk USB Drive. Make sure your USB drive is the only drive selected.
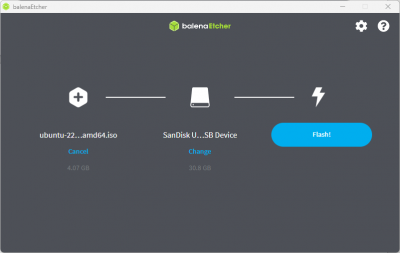
Double check that you have selected the correct ISO file and USB drive, and then click “Flash!” Etcher will now ask for administrative privileges so it can write directly to the drive, approve this request.
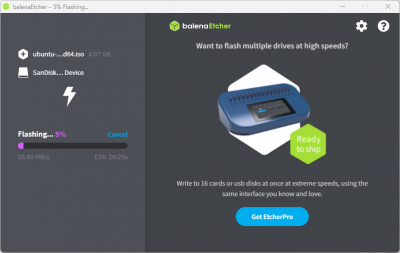
Now just wait for Etcher to do it’s thing. This can take anywhere from 5 minutes to half an hour depending on how fast your USB drive is. Be patient.
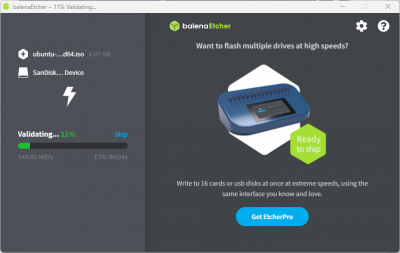
Once Etcher finishes flashing, it will validate that it has flashed the image correctly. Do not skip this. Now your Linux installer is ready to use.
Booting the Installer
Bios settings
Before you install Linux, you will need to change a few settings in your BIOS. Shut down your computer, then press the power button and immediately start spamming the F2 key until the BIOS menu appears.
We only need to do two things here:
Make sure your laptop is in Dynamic graphics mode (Hybrid mode)
Disable Secure Boot. Most Linux operating systems will not boot with secure boot enabled, and even for the ones that do, the NVIDIA drivers will not install with secure boot enabled.
Once you have checked these settings, save and exit the bios.
Booting from the USB Stick
Shut down your computer again. Make sure your Linux USB is plugged in. Then press the power button and immediately start spamming the F12 key until the boot select menu appears. Use the arrow keys to highlight your USB drive, then press enter to boot from it. If it fails to boot or starts booting Windows you probably forgot to disable secure boot.
Eventually you will be presented with the Linux installer screen. This will look different on each Distro, but the process is more or less the same.
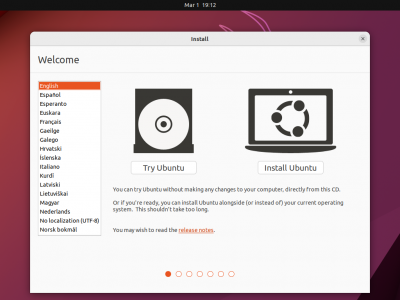
Most Distros give you the option to try the operating system before you install it. If you select this option, the installer will drop you to the desktop. You will be able to use the operating system in it’s entirety, however any changes you make or files you create will be deleted when you shut down.
When you are ready to install the OS , select the “Install” option or open the installer program if you are on the live desktop.
Installing Linux
There are three common ways to install Linux:
Overwriting Windows
This will erase windows and make Linux the only operating system on your computer (The nuclear option.)
Installing Linux on a Second SSD
This is the method you should use if you have two SSD’s in your computer and wish to dedicate one to Linux while leaving the other for windows (I recommend using this method for dual booting, if possible)
Installing Linux on the same SSD as Windows
While you can install Linux and Windows on the same drive, I do not recommend it because the installation process can easily result in data loss, and because windows has a tendency to overwrite the Linux bootloader whenever it recieves a major update, bricking your Linux install. If you want Linux and Windows on the same drive I would suggest using a Virtual Machine for Linux instead.
The Install Process
Open the Linux installer program.
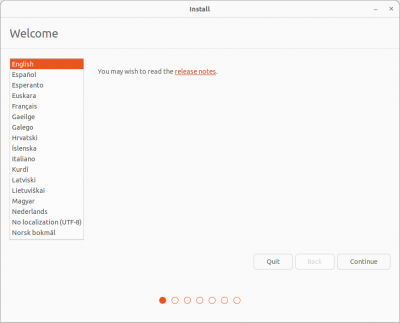
The first window you will see will ask you to select your language.
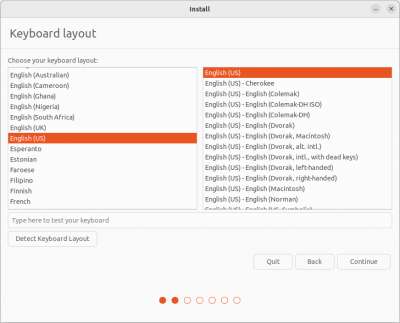
The next will ask you to select your keyboard layout. Then you will be asked to connect to a Wi-Fi network so the installer can download and install updates and drivers. You can skip this if you wish, though I don’t recommend doing so.
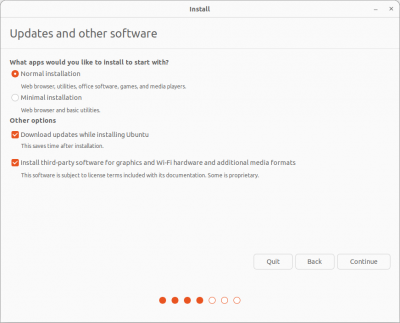
Then you will be asked what type of installation you wish to do. I recommend selecting “Normal Installation”, and checking the boxes for installing updates and third-party software.
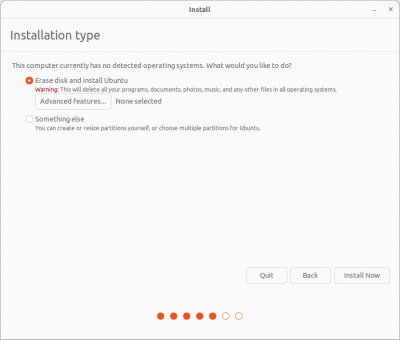
If you have multiple SSD’s, it will ask which one you wish to install Linux on. For Method 1, choose the one with windows on it. For Method 2, choose the SSD without windows on it.
Next make sure you have everything backed up, then choose “Erase disk and install Ubuntu” and then click “Install Now.”
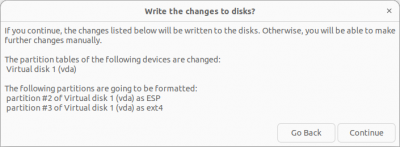
You will be presented with a window like this showing the changes that will be made to the disk. This is your last chance to abort the installation. Once you click “Continue”, any files that were contained on that SSD, including the windows operating system, will be permanently erased. If you aren’t sure you have everything backed up that you want backed up, click “Go Back” and reboot back into windows to back everything up. Otherwise click “Continue” and Linux will begin installing.
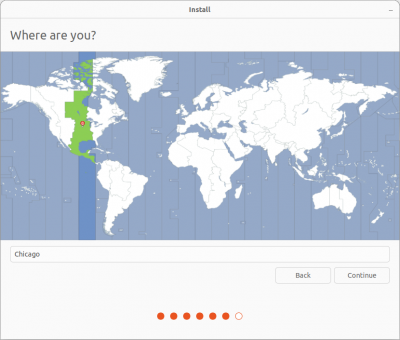
You will then be asked to click on your approximate location. This is used exclusively to set your time zone, and does not need to be exact.
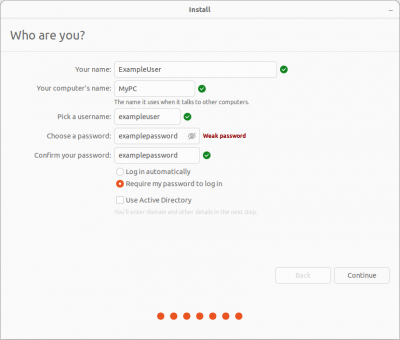
Finally, you will be asked to create your user account. Once you click continue, Linux will begin installing.
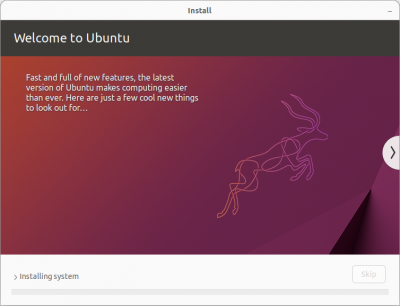
Once again, this can take anywhere from 5 minutes to an hour or more depending on how fast your USB drive is, and how fast your internet connection is. Once the installer is done, it will ask you to reboot your computer. Once you click reboot your computer will boot into your new Linux operating system. You may remove your Linux install USB at that point.
First Boot
You will be greeted with the login screen for your OS . Login with your user account. You will then be greeted by a short on-boarding experience that will take you through the basic features of your new OS , allow you to connect your online accounts, and set some personal preferences. Once you finish the on-boarding experience you will be greeted by the desktop. We are almost done installing, we just need to install the NVIDIA drivers. First make sure your computer is up-to-date. Open the terminal app and execute the following two commands:
sudo apt update sudo apt upgrade
You will need to type your password for each of these. You will notice that the terminal does not give any sort of white dots or indication as you type your password, this is normal. Just type your password and then press Enter.
Once both are done, open your Distro’s application menu and search for “Drivers”. An app should appear called “Additional Drivers” or something similar. Open this app. You should be greeted by something like this:
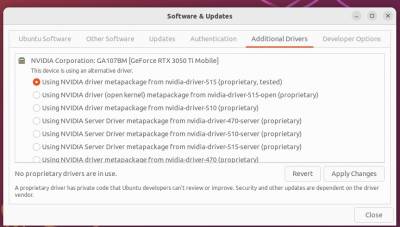
Click the dot for the newest NVIDIA driver available 2) and click “Apply Changes.” Note that the exact driver version may be different than I have shown here. Once this finishes, reboot. Congratulations, you have successfully installed Linux on your Legion!
Installing Apps
On Linux, apps are rarely downloaded from a web browser. Instead, they are installed via a package manager, basically an App Store. To install an app, simply open Ubuntu Software (Or your Distro’s equivalent).
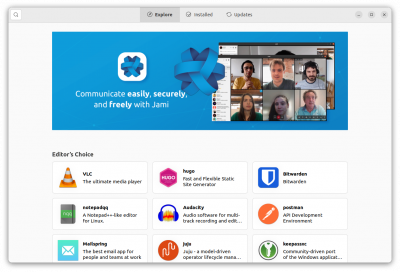
Search for the app you want to install, then click “Install” and wait until it finishes. Be patient.
To uninstall an app, click the installed apps tab and find the app you don’t want anymore, then click “Uninstall”.
To Update your computer, use the updates tab.
You may have noticed by this point that many of your favorite apps are not here. Fortunately, you can fix this by installing the Flathub repository which contains apps such as Discord, Google Chrome, Steam, and Microsoft Edge. Instructions are on their website.
Legion-Specific Software
If you have a Legion 5/5 Pro with an RGB keyboard, you can use 4JX’s Legion-KB-RGB to control it.
If you have a Legion 7, you can use OpenRGB to control it.
And that’s it! You have successfully installed Linux! Enjoy!
also known as x86-64, both Intel and AMD use this
Unlike on Windows, new NVIDIA drivers on Linux almost always fix major problems and improve performance
- laptopwiki/guides/lenovo/legion5_2021_linux.txt
- Last modified: 03/05/2023 16:17
- by shadow_dragon
Installing Ubuntu on Lenovo Legion
This blog will walk you through steps involved in installing Ubuntu 18.04 on Lenovo Legion laptop which come pre-loaded with Windows 10, other models should be similar but there could be difference based on hardware
I recently purchased Lenovo Legion Y540 which comes preloaded with Windows 10. The first question before purchasing laptop was will this support Linux? So I found the best place to check this was in lenovo site itself. But I didn’t find Legion in this. I thought a lot to decide if I should buy this itself. I have good experience in installing Linux systems in the past for my personal usage but I haven’t done anything recently. I was prepared to go through the pain if I get stuck with the issues since I had liked the Legion config and its performance over other alternatives available.
Now let’s see the steps involved in installing Ubuntu 18.04
Pre-requisites before installing Ubuntu
The basic pre-requisites are 2 GHz dual core processor or better, 4 GB system memory, 25 GB of free hard drive space, a DVD drive or a USB port for the installer media.
Since the machine came with pre-loaded Windows 10 using the entire disk space, I needed to create room for Ubuntu.
Step 1: Shrink volume to get free space
From Windows Start -> Control Panel -> Computer Management -> Disk Management-> Right Click Windows Partition -> Shrink Volume
Give amount of space you need to free in the highlighted portion. I gave 716800 to get 700 GB free.
Now create volumes you need to store different things in your laptop like data
Follow the wizard to create the new volume one by one. My partition table looks like this. I left 300 GB for installing Ubuntu. You may choose the size based on your usage.
Step 2: Disable Fast Startup
From Control Panel -> Power Options -> Power Settings
You can read more about this option here.
Step 3: Check BIOS mode of the system
From Control Panel -> System -> System Information
Check what is given for the BIOS Mode. It should be UEFI for most of the new machines.
Step 4: Create Bootable USB Stick
Download Ubuntu 18.04 from official website and keep the ISO file ready
Use rufus, to create the bootable disk selecting MBR as Partition scheme and BIOS or UEFI for Target system
Step 5: Change boot order and disable secure booting
Reboot your system and keep pressing F2 till you get the Setup Utility options. Disable Secure Boot under Security tab and under Boot menu change to load from USB. Without disabling secure boot, you won’t be able to boot Linux
Step 6: Follow Ubuntu’s official guide to install Ubuntu on free disk space
Official guide to install Ubuntu can be found here
Step 7: Reboot the system
Once you get the grub menu select Ubuntu. If you are able to load Ubuntu then you are good. But if you get something like ACPI Error: AE_ALREADY_EXISTS, follow this blog
That’s it, your Lenovo Legion is a dual boot machine now. Happy Learning!
Ubuntu on the Legion 5 Pro (2021)
Heads up: I’m not a gamer. A combination of specs, pricing, availability and urgency led me to purchase this laptop for productivity reasons. My run-through may not cover all aspects needed for gaming.
As my work depends on this laptop, I did purchase the additional on-site support.
Keyboard Shortcuts
If the RGB show on the keyboard annoys you, use Fn+SPACE to select a less annoying mode for now.
Also: Fn+L to toggle the Legion logo, Fn+Q to toggle thermal profile. These shortcuts work on both Windows and Linux.
Windows
I expect support to want to deal with Windows only, so I left Windows installed.
Even if you decide to remove Windows, I recommend you set it up first and use it to apply any BIOS or firmware updates prior to installing Ubuntu. (As it turns out, my laptop already shipped with the latest BIOS version.)
The factory Windows install uses about 60GB, so I shrunk the Windows-SSD down to 75GB. You can use the Disk Management tool to do so.
BIOS
Shutdown the laptop and restart it while pressing F2. This gets you into the BIOS. I made the following changes:
- Graphic Device: Dynamic Graphics (you will need to use nomodeset in GRUB if you don’t do this)
- Boot > PXE Boot to LAN: Disabled;
That’s it. I left Secure Boot enabled. Ubuntu and Ubuntu based Linux distributions have no problem with it.
Ubuntu
Install Ubuntu. How to install Ubuntu has been well documented, I won’t repeat it here.
You’ll notice that while the brightness function keys appear to work they do not actually change the brightness. You can fix this by editing /etc/default/grub and adding the amdgpu.backlight parameter:
GRUB_CMDLINE_LINUX="amdgpu.backlight=0" Run update-grub, reboot, and things will work.
Battery Conservation Mode
Battery conservation mode prevents your laptop battery from charging fully and keeps it around 60% instead. This should aid the longevity of the battery.
For convenience I created a systemd unit called /etc/systemd/system/battery-conservation-mode.service
with the following content:
[Unit] Description=Battery Conservation Mode [Service] Type=oneshot ExecStart=/usr/bin/bash -c 'echo 1 > "/sys/devices/pci0000:00/0000:00:14.3/PNP0C09:00/VPC2004:00/conservation_mode"' ExecStop=/usr/bin/bash -c 'echo 0 > "/sys/devices/pci0000:00/0000:00:14.3/PNP0C09:00/VPC2004:00/conservation_mode"' RemainAfterExit=yes [Install] WantedBy=multi-user.target Which we then activate using:
systemctl daemon-reload systemctl start battery-conservation-mode systemctl stop battery-conservation-mode systemctl enable battery-conservation-mode Function Lock
Maybe you never use the F1, F2. keys and just want them to function them as permanent media keys (for volume control, etc.) instead. You can do this by enabling the Fn Lock:
echo 1 > "/sys/devices/pci0000:00/0000:00:14.3/PNP0C09:00/VPC2004:00/fn_lock" Just like the battery conservation mode, you could put this in a systemd unit to enable it automatically at start-up.
File System
Ubuntu comes with periodic SSD trimming out of the box. No need to enable that yourself. If you use encrypted partitions like I do, Ubuntu also enabled discard in crypttab automatically. Some changes I made to fstab:
- Added the ssd option for my btrfs file systems.
- Added the noatime option to both btrfs and ext4 file systems.
Recent
- Embedding Laravel Passport keys in .env
- Redis Sentinel with Laravel
- Auto-reloading Filament (v3) panels using Vite
- Removing LUKS full-disk encryption
- Markdown Editor for ClassicPress
Saved searches
Use saved searches to filter your results more quickly
Cancel Create saved search
You signed in with another tab or window. Reload to refresh your session. You signed out in another tab or window. Reload to refresh your session. You switched accounts on another tab or window. Reload to refresh your session.
how to install Linux Mint on Lenovo Legion 5 to have proper hardware drivers and screen brightness control
License
wottreng/Linux-Mint-on-Lenovo-Legion-5
This commit does not belong to any branch on this repository, and may belong to a fork outside of the repository.
Switch branches/tags
Branches Tags
Could not load branches
Nothing to show
Could not load tags
Nothing to show
Name already in use
A tag already exists with the provided branch name. Many Git commands accept both tag and branch names, so creating this branch may cause unexpected behavior. Are you sure you want to create this branch?
Cancel Create
- Local
- Codespaces
HTTPS GitHub CLI
Use Git or checkout with SVN using the web URL.
Work fast with our official CLI. Learn more about the CLI.
Sign In Required
Please sign in to use Codespaces.
Launching GitHub Desktop
If nothing happens, download GitHub Desktop and try again.
Launching GitHub Desktop
If nothing happens, download GitHub Desktop and try again.
Launching Xcode
If nothing happens, download Xcode and try again.
Launching Visual Studio Code
Your codespace will open once ready.
There was a problem preparing your codespace, please try again.
Latest commit
Git stats
Files
Failed to load latest commit information.
Latest commit message
Commit time
February 10, 2022 13:57
September 13, 2021 14:31
February 26, 2023 12:54
April 27, 2022 21:38
April 15, 2022 16:35
February 10, 2022 09:55
February 10, 2022 09:55
README.md
timeStamp: 12 March 2022
** updated for Linux Mint 20.3 Cinnamon**
** updated for power consumption issue fix **
How to install Linux Mint on Legion 5 to have proper hardware drivers and screen brightness control
Linux Mint is forked from Debian and similar to Ubuntu so this may work for Ubuntu OS as well.
I did try to install Ubuntu 21.xx OS and it created a custom NVIDIA driver that didnt quite work properly so be warned.
I hope this will help someone else that might be going down this same path.
It took me a while to figure it out so hopefully I can same you some time.
Laptop: Lenovo Legion 5 15 Gaming Laptop, 15.6″ FHD (1920 x 1080) Display, AMD Ryzen 7 5800H Processor, 16GB DDR4 RAM, 512GB NVMe SSD, NVIDIA GeForce RTX 3050Ti
Amazon link: https://amzn.to/3s9NQcC
these are the steps I took to get Linux Mint 20.3 Cinnamon on a Lenovo Legion 5 gaming laptop
- (text in perenthesis is what worked for me at the time of writing this)
- READ THE DOCS: https://linuxmint-installation-guide.readthedocs.io/en/latest/
- install linux mint OS onto thumb drive
- insert thumbdrive into laptop
- boot laptop while pressing F12 — this will let you choose boot device
- select thumbdrive to boot OS installer
- select install Linux Mint on live media Desktop
STEPS to get Hardware operating properly:
[NOTE: hybrid graphics started working in Mint 20.3. For older versions, see older commits for discrete graphics only setup]
1: select hybrid graphics [NOTE: you can select Discrete Graphics if you want]
- boot laptop while pressing F2 on keyboard
- once in UEFI firmware settings, select hybrid graphics
- select Exit and save settings
2: install latest linux kernel (kernel: 5.13.0-21-generic)
- cli cmd: sudo mintupdate ➡ Mint Update Manager GUI
- write up for ‘Update Manager’ gui : credit: https://www.makeuseof.com/upgrade-kernel-linux-mint/
- GUI steps: Update Manager ➡ View ➡ Linux Kernels ➡ (5.13) ➡ install
- reboot laptop ➡ cli cmd: reboot
3: install latest nvidia graphics drivers (510.47.03)
using «driver manager» gui update graphics drivers to latest nvidia driver version
- cli cmd: sudo mintdrivers ➡ Mint Driver Update GUI
- then install latest NVIDIA proprietary driver
- reboot laptop ➡ cli cmd: reboot
- [—NOTE: if you selected DISCRETE graphics, stop here—]
- after reboot and login, click on NVIDIA On-Demand icon in lower right applet panel
- click NVIDIA Settings
- click PRIME Profiles
- click NVIDIA On-Demand
- after authentication and changes made, select Quit
- reboot laptop ➡ cli cmd: reboot
4: update all packages to latest versions
- GUI: select Update Manager in App Menu
- cli cmd: sudo apt update && sudo apt full-upgrade -y
- clean out garbage and fix links: sudo apt autoremove && sudo apt autoclean
STEPS to get screen brightness to work correctly and brightness keys to actually change screen brightness:
** update for Mint 20.3 Cinnamon, script updated to fix device name convention bug **
NOTE: brightness keys still not working so use this repository to control brightness in software
TLDR cli magic (copy and paste into your cmd line):
wget https://github.com/wottreng/Linux-Mint-on-Lenovo-Legion-5/archive/refs/heads/main.zip && unzip main.zip && cd Linux-Mint-on-Lenovo-Legion-5-main && chmod 777 setupBrightnessControlKeys.sh && ./setupBrightnessControlKeys.sh
1: download this repository ➡ cli cmd:
git clone https://github.com/wottreng/Linux-Mint-on-Lenovo-Legion-5.git
2: change directory ➡ cli cmd:
cd Linux-Mint-on-Lenovo-Legion-5/
3: make setupBrightnessControlKeys.sh excutable ➡ cli cmd:
chmod 777 setupBrightnessControlKeys.sh
4: run setup script ➡ cli cmd:
./setupBrightnessControlKeys.sh
5: test your brightness keys, they should work properly now! If not see trouble shooting below
- Read setupBrightnessControlKeys.sh for comments on how this works and how to remove key bindings if needed
- run brightnessControl.py -h for help output and supported arguments
- for TROUBLE SHOOTING or changes see Keyboard in App Menu ➡ Shortcuts ➡ Custom Shortcuts
- Common issue with script is it finding the wrong device name. Run brightnessControl.py -v to see what device names its finding and you may need to set default in your key bindings like so: brightnessControl.py -d DEVICE-NAME -c 5
Realtek wifi 6 working with proper drivers:
⚠ NOTE: wifi driver is now included in Mint 20.3. If you still need drivers then look at older commits for manual install process ⚠
Battery Saver mode
- batterySaverMode.py puts laptop into battery saver mode when plugged in
- limits charging above 60% capacity
TLDR cli magic (copy and paste into your cmd line):
wget https://github.com/wottreng/Linux-Mint-on-Lenovo-Legion-5/archive/refs/heads/main.zip && unzip main.zip && cd Linux-Mint-on-Lenovo-Legion-5-main && chmod 777 batterySaverMode.py && sudo mv ./batterySaverMode.py /bin/
1: make it excutable ➡ cli cmd:
chmod 777 ./batterySaverMode.py
2: add script to $PATH (ie. your /bin folder) ➡ /bin/batterySaverMode.py
sudo mv ./batterySaverMode.py /bin/batterySaverMode.py
3: call it from a command line ➡ cli cmd:
batterySaverMode.py
Power Consumption Configuration
(credit goes to O491dogan)
Higher than normal power consumption has been reported after proper drivers and updates.
The issue seems to be the dGPU not being turned off when not in use.
- check power consumption with powertop
- sudo apt install powertop
- optimize system consumption with sudo powertop —auto-tune
- launch with sudo powertop with power cable unplugged
- with nothing running, power consumption should be about 10w.
- if dGPU is running, power consumption is about 25w.
- set dGPU to adaptive in BIOS
- set dGPU to On-Demand in NVIDIA settings
- nvidia-settings then select PRIME Profiles, then select NVIDIA On-Demand
- cmd: cat /sys/bus/pci/devices/0000:01:00.0/power/control
- should output auto for dGPU on-demand
- on your dGPU is always on
- with dGPU always on, about 2 hours
- with dGPU on-demand, about 4 to 5 hours
Other helpful tips
- F2 : open BIOS during boot
- Ctrl + Alt + F1 or Ctrl + Alt + F2 : change to basic command line interface
- Ctrl + Alt + F7 : change back to GUI ‘desktop’ interface
- hold Shift during boot to open up grub for advanced options like recovery mode
- open cli: CTRL + ALT + T
Please contribute �� or message me if there is a better way! Lets help the Linux Community! ��
- check Issues tab