Maple 2020

Maple (Мапле) – система компьютерной математики, предназначенная для символьных вычислений. Позволяет находить интегралы, решать дифференциальные уравнения и алгебраические задачи, а также моделировать и визуализировать данные.
Похожие программы
Maple
Maple (https://www.maplesoft.com/products/Maple/) — коммерческая программа, система компьютерной математики. Это программное обеспечение надо купить у http://www.maplesoft.com/, а потом зарегистрироваться там для получения файла лицензии. Также есть возможность загрузить ознакомительную версию на 15 дней.
Установка
На примере ознакомительной версии Maple
Загрузка
Загрузить Maple с сайта разработчика:
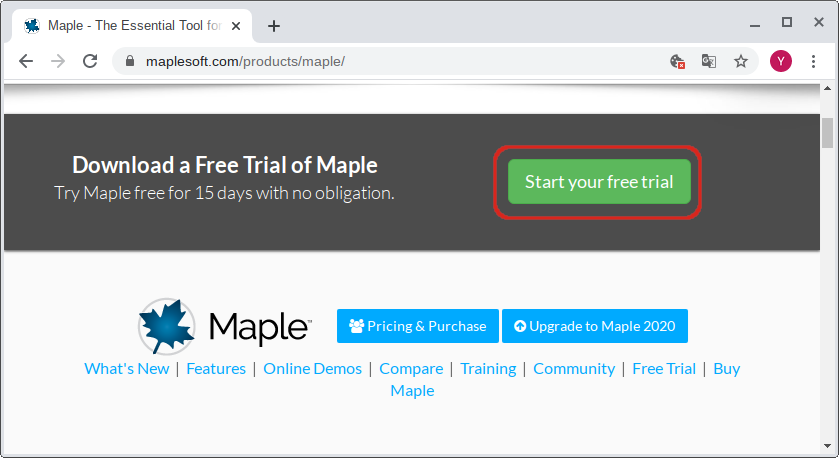
- На странице https://www.maplesoft.com/products/maple/ нажать кнопку «Start your free trial»:
- В открывшемся окне заполнить обязательные поля и нажать кнопку «Go!»:
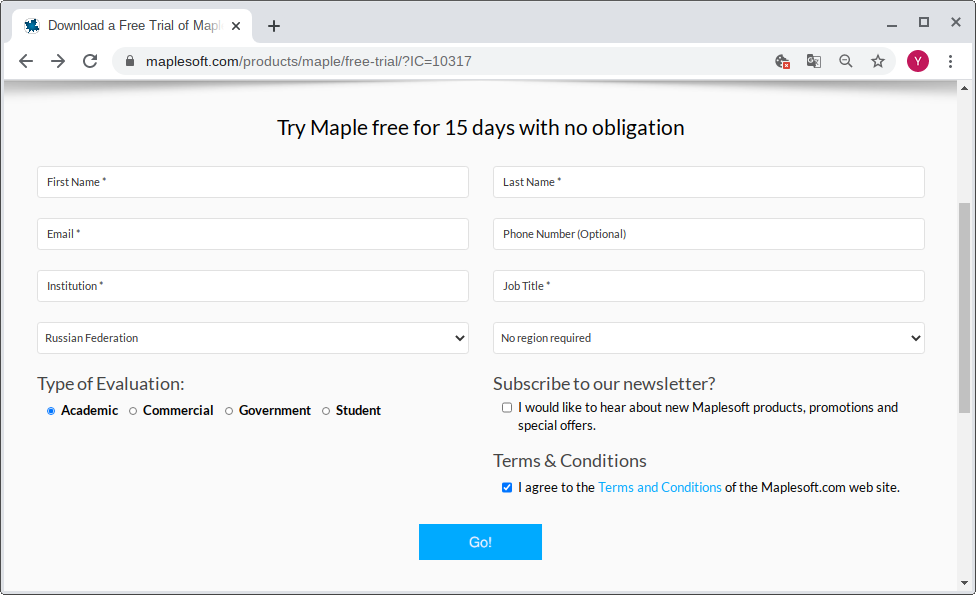 На почту, указанную в форме, должно прийти письмо со ссылками на скачивание дистрибутива, документацию, лицензионный ключ.
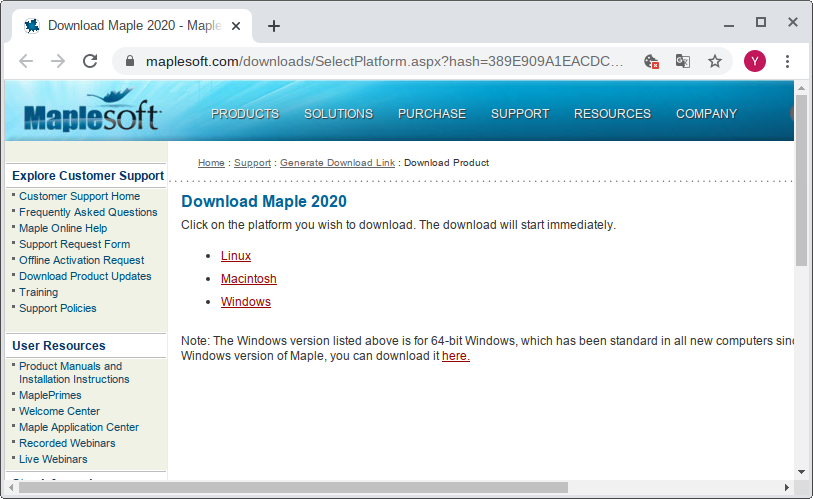
- Перейти на страницу скачивания и выбрать версию для Линукс:
Установка
Сделать скаченный файл исполняемым и запустить установку, например так:
-
Перейти в папку с загруженным файлом Maple2020.1LinuxX64Installer.run:
$ cd /home/user/Загрузки/
$ chmod +x Maple2020.1LinuxX64Installer.run
./Maple2020.1LinuxX64Installer.run
Процесс установки разделён на шаги:
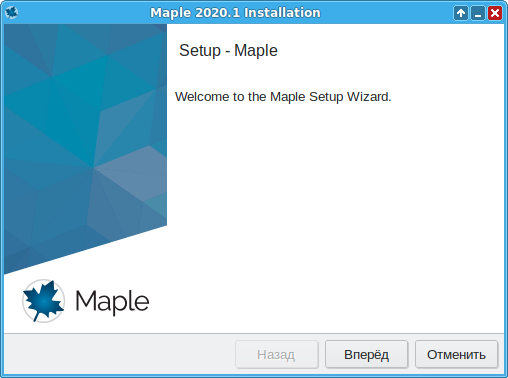
- Старт установки:
- Для установки необходимо принять пользовательское соглашение.
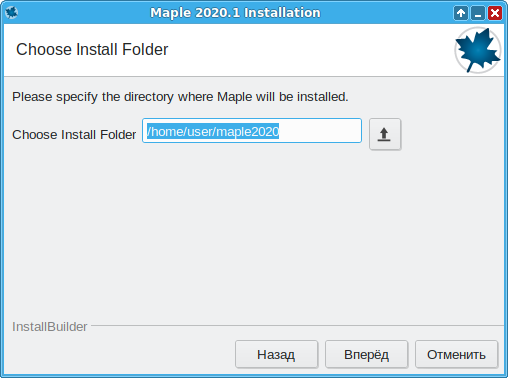
- Выбор папки установки:
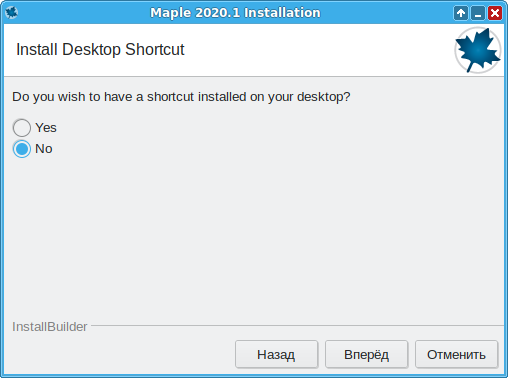
- На этом шаге необходимо указать, нужно ли создавать ярлык на рабочем столе:
- Выбор типа лицензии.
- Проверка наличия обновлений.
- Проверка достаточно ли свободного места для установки программы.
- Установка.
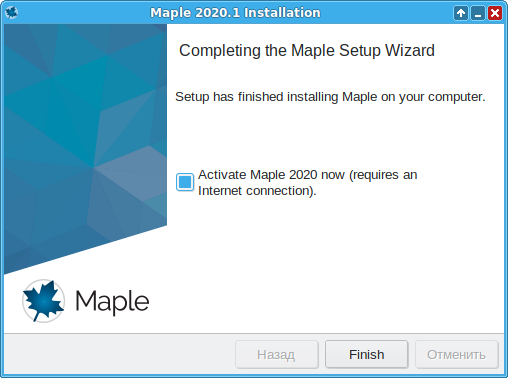
- Завершение установки, можно сразу активировать Maple:
Активация
Для активации Maple необходимо ввести ключ и нажать кнопку «Next»:
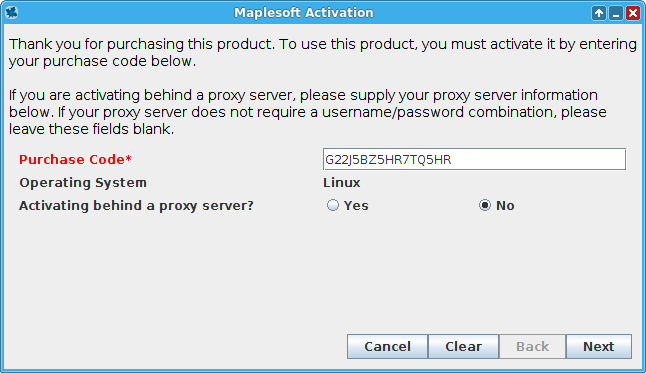
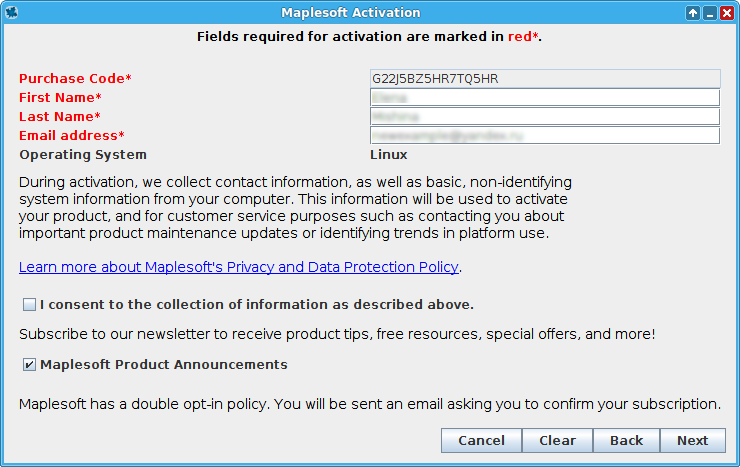
На следующем шаге следует заполнить обязательные поля и нажать кнопку «Next»:
Примечание: Если при вводе ключа активации, появляется ошибка «Missing host ID for license server» [1] :
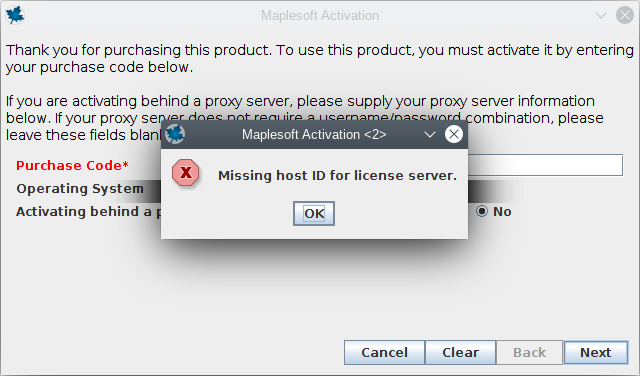
необходимо установить пакет lsb , перезапустить Maple и активировать продукт.
Запуск
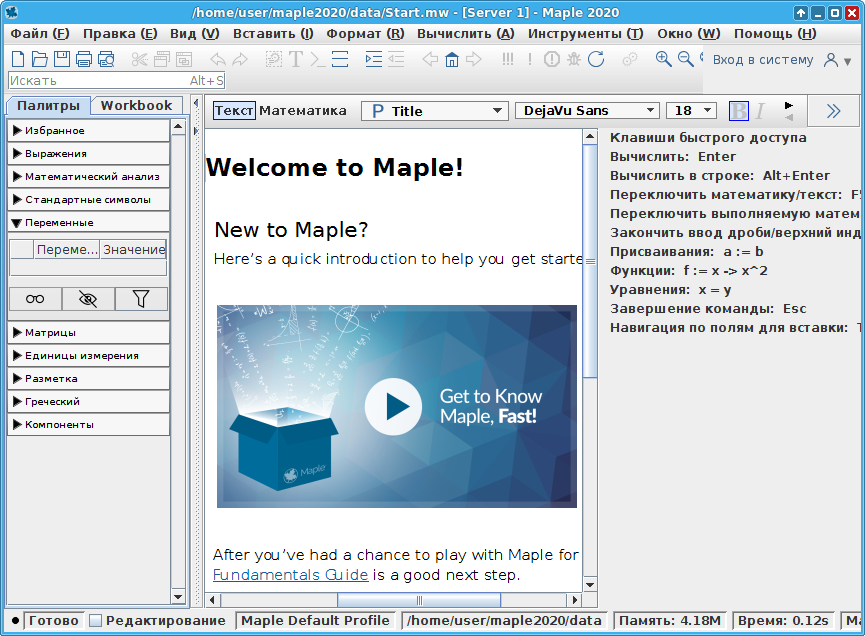
Запуск Maple ( Образовательные ▷ Maple ):
Примечания
Maple 2020 Installation and Licensing Guide
Copyright © 2020 Maplesoft, a division of Waterloo Maple Inc.
Maple 2020 Installation and Licensing Guide
Maple 2020 Installation Using a Single User License
32-bit Windows Single User Installation
For 32-bit Windows® 7, Windows® 8.1, and Windows® 10 single user installation, read this section. For 64-bit Windows 7, Windows Server® 2012, Windows 8.1, Windows 10, and Windows Server® 2016 single user installation, see 64-bit Windows Single User Installation .
During the installation, you will need your purchase code , generally sent to you in an email.
To install Maple 2020 on your Windows operating system, read and complete the following tasks
Pre-Installation Instructions
- Check the System Requirements for your operating system.
- Log on as an administrator or log on to an account, with appropriate read and write privileges, that will own the Maple files.
- Ensure that you are connected to the Internet. If your computer does not have an Internet connection, please contact your distributor or Maplesoft customer service.
- Check your video card driver requirements. For more information, see Verifying Video Card Driver Requirements .
- Close all programs.
- Ensure that you have reviewed the Pre-installation Instructions.
- Choose one of the following two options to launch the installer:
Double-click Maple2020WindowsX64Installer.exe from where you downloaded the file.
- Place the install disc in the DVD-ROM drive.
- Locate and double-click Maple2020WindowsX64Installer.exe from the install disc.
- Follow the on-screen instructions.
- In the Choose The Type of Licensing screen, select Single User License .
- When prompted, enter the purchase code and the required information to complete activation.
- If you activated successfully, you are ready to use Maple 2020. If you had problems activating or chose not to activate during the installation, see Activating Single User Versions .
Install Maple 2020
- Ensure that you have reviewed the Pre-installation Instructions.
- Choose one of the following two options to launch the installer:
Double-click Maple2020WindowsX64Installer.exe from where you downloaded the file.
- Place the install disc in the DVD-ROM drive.
- Locate and double-click Maple2020WindowsX64Installer.exe from the install disc.
- Follow the on-screen instructions.
- In the Choose The Type of Licensing screen, select Single User License .
- When prompted, enter the purchase code and the required information to complete activation.
- If you activated successfully, you are ready to use Maple 2020. If you had problems activating or chose not to activate during the installation, see Activating Single User Versions .
64-bit Windows Single User Installation
During the installation, you will need your purchase code , generally sent to you in an email.
To install Maple 2020 on your Windows operating system, read and complete the following tasks.
Pre-Installation Instructions
- Check the System Requirements for your operating system.
- Log on as an administrator or log on to an account, with appropriate read and write privileges, that will own the Maple files.
- Ensure that you are connected to the Internet. If your computer does not have an Internet connection, please contact your distributor or Maplesoft customer service.
- Check your video card driver requirements. For more information, see Verifying Video Card Driver Requirements .
- Close all programs.
Install Maple 2020
- Ensure that you have reviewed the Pre-installation Instructions.
- Choose one of the following two options to launch the installer:
Double-click Maple2020WindowsX64Installer.exe from where you downloaded the file.
- Place the install disc in the DVD-ROM drive.
- Locate and double-click Maple2020WindowsX64Installer.exe from the install disc.
- Follow the on-screen instructions.
Note: If you have MATLAB® 2018a, 2018b, or 2019a installed and would like to install a toolbox that connects Maple with MATLAB®, see Maple Toolbox Installation .
- In the Choose The Type of Licensing screen, select Single User License .
- When prompted, enter the purchase code and the required information to complete activation.
- If you activated successfully, you are ready to use Maple 2020. If you had problems activating or chose not to activate during the installation, see Activating Single User Versions .
Macintosh Single User Installation
For Macintosh® installation instructions, read this section.
During the installation, you will need your purchase code , generally sent to you in an email.
To install Maple 2020 on your Macintosh operating system, read and complete the following tasks:
Pre-Installation Instructions
- Check the System Requirements for your operating system.
- Log on as an administrator or log on to an account, with appropriate read and write privileges, that will own the Maple files.
- Ensure that you are connected to the Internet. If your computer does not have an Internet connection, please contact your distributor or Maplesoft customer service.
- Check your video card driver requirements. For more information, see Verifying Video Card Driver Requirements .
- Close all programs.
Install Maple 2020
- Ensure that you have reviewed the Pre-installation Instructions.
- Choose one of the following two options to launch the installer:
Double-click Maple2020MacInstaller.dmg from where you downloaded the file, then double-click Maple2020MacInstaller .
- Place the install disc in the DVD-ROM drive.
- Locate and double-click Maple2020MacInstaller.dmg from the install disc, then double-click Maple2020MacInstaller .
- Follow the on-screen instructions.
Note: If you have MATLAB® 2018a, 2018b, or 2019a installed and would like to install a toolbox that connects Maple with MATLAB®, see Maple Toolbox Installation .
- In the Choose The Type of Licensing screen, select Single User License .
- When prompted, enter the purchase code and the required information to complete activation.
- If you activated successfully, you are ready to use Maple 2020. If you had problems activating or chose not to activate during the installation, see Activating Single User Versions .
64-bit Linux Single User Installation
During the installation, you will need your purchase code , generally sent to you in an email.
To install Maple 2020 on your 64-bit Linux® operating system, read and complete the following tasks.
Pre-Installation Instructions
- Check the System Requirements for your operating system.
- Log on as an administrator or log on to an account, with appropriate read and write privileges, that will own the Maple files.
- Ensure that you are connected to the Internet. If your computer does not have an Internet connection, please contact your distributor or Maplesoft customer service.
- Check your video card driver requirements. For more information, see Verifying Video Card Driver Requirements .
- Close all programs.
Install Maple 2020
- Ensure that you have reviewed the Pre-installation Instructions.
- Choose one of the following two options to launch the installer:
Run Maple2020LinuxX64Installer.run from where you downloaded the file.
- Place the install disc in the DVD-ROM drive.
- Locate and run Maple2020LinuxX64Installer.run from the install disc.
- Follow the on-screen instructions.
Note: If you have MATLAB® 2018a, 2018b, or 2019a installed and would like to install a toolbox that connects Maple with MATLAB®, see Maple Toolbox Installation .
- In the Choose The Type of Licensing screen, select Single User License .
- When prompted, enter the purchase code and the required information to complete activation.
- If you activated successfully, you are ready to use Maple 2020. If you had problems activating or chose not to activate during the installation, see Activating Single User Versions .
Shortcuts for Desktop and Applications menus
During installation, a maple2020.desktop file is created in the bin directory of your Maple 2020 installation. If you request the installer to have a shortcut placed on your desktop, this file is also created in the ~/Desktop directory. If you wish to have a shortcut placed in your Applications menu, the maple2020.desktop file can be copied to /usr/share/applications (which may require root access) or ~/.local/share/applications .
Activating Single User Versions
Starting Maple 2020 requires a Maple 2020 license file to operate. License files for earlier releases of Maple will not work with Maple 2020. You must activate the single user version of Maple 2020 to obtain your license file. If you are running a single user installer, you can activate during the installation process. If you do not activate during the installation process, follow the steps below.
- Activation requires an Internet connection. If your computer does not have an Internet connection, please contact your distributor or Maplesoft customer service.
- Start Standard Worksheet Maple 2020.
- When prompted to activate, click Activate .
- You will be prompted to enter your purchase code. If you are activating behind a proxy server, make sure to enter this information before clicking Next.
- You will be prompted to enter additional information. Click Next when this is complete.
On Windows, from the Start menu, under Maple 2020 , select Activate Maple 2020 .
Depending on the version of your Windows operating system, either run as administrator, or click yes to allow Maple 2020 activation to proceed.
- On Linux, you can also activate by running the activation script located in the bin directory of your Maple 2020 installation.
- On Macintosh, you can also activate by running the activation script located in the bin folder of your Maple 2020 installation. By default, /Library/Frameworks/Maple.framework/Versions/2020/bin .
A Maple 2020 license file ( license.dat ) will be saved in the license folder of your Maple 2020 installation. If you experience difficulties with activation, check our FAQs page at http://www.maplesoft.com/support/Faqs/Activation .
Note: Starting from Maple 14, FlexNet, the license management software used in Maple, requires Linux systems to be LSB 3.0 compatible, which may require the additional installation of some additional packages. If you are receiving the «Error detecting HostID» error message when trying to activate Maple on Linux, please ensure that the appropriate packages are installed.
- On Ubuntu, ensure that the lsb-base and lsb-core packages are installed. The lsb-core package is not installed by default.
- On Red Hat, ensure that the redhat-lsb package is installed.
- On SUSE, ensure that the lsb package is installed. This package is not installed by default.
How to Reactivate a Single User Maple License
Once installed, you can re-activate a single user Maple license in the About Maple window:
- In the About Maple window, select Re-activate License .
- Enter your Purchase Code ,and if you are activating behind a proxy server.
Maple 2020 Installation Using a Network License
32-bit Windows Installation Using a Network License
For 32-bit Windows 7, Windows 8.1, and Windows 10 installation using a network license, read this section. For 64-bit Windows 7, Windows Server 2012, Windows 8.1, Windows 10, and Windows Server 2016 installation using a network license, see 64-bit Windows Installation Using a Network License .
To install Maple 2020 on your Windows operating system using a network license, read and complete the following tasks.
Pre-Installation Instructions
- Check the System Requirements for your operating system.
- Log on as an administrator or log on to an account, with appropriate read and write privileges, that will own the Maple files.
- Ensure that you are connected to the Internet. If your computer does not have an Internet connection, please contact your distributor or Maplesoft customer service.
- Check your video card driver requirements. For more information, see Verifying Video Card Driver Requirements .
- Close all programs.
Install Maple 2020
- Ensure that you have reviewed the Pre-installation Instructions.
- Choose one of the following two options to launch the installer:
Double-click Maple2020WindowsX86Installer.exe from where you downloaded the file.
- Place the install disc in the DVD-ROM drive.
- Locate and double-click Maple2020WindowsX86Installer.exe from the install disc.
- Follow the on-screen instructions.
- In the Choose The Type of Licensing screen, select Network License .
- Do one of the following, depending on whether you have a single or redundant license server setup.
- If you have a single license server setup:
- Select Single Server , and then click Next .
- Enter the name or IP address of the license server in License server .
- Enter the port number of the license server in Port number .
- If you have a redundant license server setup:
- Select Redundant Server , and then click Next .
- Enter the names or IP addresses of the license servers in License server 1 , License server 2 , and License server 3 .
- Enter the port numbers of the license servers in Port number 1 , Port number 2 , and Port number 3 .
- Maple 2020 is now installed. Prior to using Maple 2020, you need to Configure the License Manager .
64-bit Windows Installation Using a Network License
To install Maple 2020 on your Windows operating system using a network license, read and complete the following tasks.
Pre-Installation Instructions
- Check the System Requirements for your operating system.
- Log on as an administrator or log on to an account, with appropriate read and write privileges, that will own the Maple files.
- Ensure that you are connected to the Internet. If your computer does not have an Internet connection, please contact your distributor or Maplesoft customer service.
- Check your video card driver requirements. For more information, see Verifying Video Card Driver Requirements .
- Close all programs.
Install Maple 2020
- Ensure that you have reviewed the Pre-installation Instructions.
- Choose one of the following two options to launch the installer:
Double-click Maple2020WindowsX64Installer.exe from where you downloaded the file.
- Place the install disc in the DVD-ROM drive.
- Locate and double-click Maple2020WindowsX64Installer.exe from the install disc.
- Follow the on-screen instructions.
Note: If you have MATLAB® 2018a, 2018b, or 2019a installed and would like to install a toolbox that connects Maple with MATLAB®, see Maple Toolbox Installation .
- In the Choose The Type of Licensing screen, select Network License .
- Do one of the following, depending on whether you have a single or redundant license server setup.
- If you have a single license server setup:
- Select Single Server , and then click Next .
- Enter the name or IP address of the license server in License server .
- Enter the port number of the license server in Port number .
- If you have a redundant license server setup:
- Select Redundant Server , and then click Next .
- Enter the names or IP addresses of the license servers in License server 1 , License server 2 , and License server 3 .
- Enter the port numbers of the license servers in Port number 1 , Port number 2 , and Port number 3 .
- Maple 2020 is now installed. Prior to using Maple 2020, you need to Configure the License Manager .
Macintosh Installation Using a Network License
For Macintosh® installation instructions, read this section.
To install Maple 2020 on your Macintosh operating system, read and complete the following tasks:
Pre-Installation Instructions
- Check the System Requirements for your operating system.
- Log on as an administrator or log on to an account, with appropriate read and write privileges, that will own the Maple files.
- Ensure that you are connected to the Internet. If your computer does not have an Internet connection, please contact your distributor or Maplesoft customer service.
- Check your video card driver requirements. For more information, see Verifying Video Card Driver Requirements .
- Close all programs.
Install Maple 2020
- Ensure that you have reviewed the Pre-installation Instructions.
- Choose one of the following two options to launch the installer:
Double-click Maple2020MacInstaller.dmg from where you downloaded the file, then double-click Maple2020MacInstaller .
- Place the install disc in the DVD-ROM drive.
- Locate and double-click Maple2020MacInstaller.dmg from the install disc, then double-click Maple2020MacInstaller .
- Follow the on-screen instructions.
Note: If you have MATLAB® 2018a, 2018b, or 2019a installed and would like to install a toolbox that connects Maple with MATLAB®, see Maple Toolbox Installation .
- In the Choose The Type of Licensing screen, select Network License .
- Do one of the following, depending on whether you have a single or redundant license server setup.
- If you have a single license server setup:
- Select Single Server , and then click Next .
- Enter the name or IP address of the license server in License server .
- Enter the port number of the license server in Port number .
- If you have a redundant license server setup:
- Select Redundant Server , and then click Next .
- Enter the names or IP addresses of the license servers in License server 1 , License server 2 , and License server 3 .
- Enter the port numbers of the license servers in Port number 1 , Port number 2 , and Port number 3 .
- Maple 2020 is now installed. Prior to using Maple 2020, you need to Configure the License Manager .
64-bit Linux Installation Using a Network License
To install Maple 2020 on your 64-bit Linux® operating system, read and complete the following tasks.
Pre-Installation Instructions
- Check the System Requirements for your operating system.
- Log on as an administrator or log on to an account, with appropriate read and write privileges, that will own the Maple files.
- Ensure that you are connected to the Internet. If your computer does not have an Internet connection, please contact your distributor or Maplesoft customer service.
- Check your video card driver requirements. For more information, see Verifying Video Card Driver Requirements .
- Close all programs.
Install Maple 2020
- Ensure that you have reviewed the Pre-installation Instructions.
- Choose one of the following two options to launch the installer:
Run Maple2020LinuxX64Installer.run from where you downloaded the file.
- Place the install disc in the DVD-ROM drive.
- Locate and run Maple2020LinuxX64Installer.run from the install disc.
- Follow the on-screen instructions.
Note: If you have MATLAB® 2018a, 2018b, or 2019a installed and would like to install a toolbox that connects Maple with MATLAB®, see Maple Toolbox Installation .
- In the Choose The Type of Licensing screen, select Network License .
- Do one of the following, depending on whether you have a single or redundant license server setup.
- If you have a single license server setup:
- Select Single Server , and then click Next .
- Enter the name or IP address of the license server in License server .
- Enter the port number of the license server in Port number .
- If you have a redundant license server setup:
- Select Redundant Server , and then click Next .
- Enter the names or IP addresses of the license servers in License server 1 , License server 2 , and License server 3 .
- Enter the port numbers of the license servers in Port number 1 , Port number 2 , and Port number 3 .
- Maple 2020 is now installed. Prior to using Maple 2020, you need to Configure the License Manager .
Note: Starting from Maple 14, FlexNet, the license management software used in Maple, requires Linux systems to be LSB 3.0 compatible, which may require the additional installation of some additional packages. If you are receiving the «Error detecting HostID» error message when trying to activate Maple on Linux, please ensure that the appropriate packages are installed.
- On Ubuntu, ensure that the lsb-base and lsb-core packages are installed. The lsb-core package is not installed by default.
- On Red Hat, ensure that the redhat-lsb package is installed.
- On SUSE, ensure that the lsb package is installed. This package is not installed by default.
Shortcuts for Desktop and Applications menus
During installation, a maple2020.desktop file is created in the bin directory of your Maple 2020 installation. If you request the installer to have a shortcut placed on your desktop, this file is also created in the ~/Desktop directory. If you wish to have a shortcut placed in your Applications menu, the maple2020.desktop file can be copied to /usr/share/applications (which may require root access) or ~/.local/share/applications .
Silent (Unattended) Installation
It is possible to install the network version of Maple using an unattended mode option. There are two ways to perform an unattended installation of Maple:
- Using options specified directly in the command line
- Using an option file.
Using options specified directly in the command line
You can run an unattended installation without an option file by specifying the installation options directly in the command line. To run the unatttended installation this way, do the following:
32-Bit and 64-Bit Windows
- Open a command prompt window.
- Browse to the directory in which your Maple install file is located.
- Run the unattended installation process with the appropriate command for your platform. For 32-bit Windows use the following syntax Maple2020WindowsX86Installer.exe —option optionvalue . For 64-bit Windows use Maple2020WindowsX64Installer.exe —option optionvalue . For example, on 32-bit Windows, use the command Maple2020WindowsX86Installer.exe —mode unattended to install Maple in unattended mode.
Linux
- Browse to the directory where your Maple install file is located.
- Run the unattended installation process with the appropriate command with the following syntax: ./Maple2020LinuxX64Installer.run —option optionvalue . For example, use the command Maple2020LinuxX64Installer.run —mode unattended to install Maple in unattended mode.
Mac OSX
- Unpack Maple2020MacInstaller.dmg to get the Maple2020MacInstaller.app file.
- Open a command terminal.
- Browse to the MacOS folder inside the .app file (this is usually /Volumes/Maple2020MacInstaller/Maple2020MacInstaller.app/Contents/MacOS ).
- Run the following command ./installbuilder.sh —option optionvalue . For example, on Mac OSX, use the command ./installbuilder.sh —mode unattended to install Maple in unattended mode.
Using an Option File
32-Bit and 64-Bit Windows
- Check the System Requirements for your operating system.
- Close all programs, particularly any previous release of Maple.
- Log on as administrator or ensure that you have administrator privileges.
- Create an option file.
You can create your own installer.properties file using the following example as a template:
installdir=C:\Program Files\Maple 2020
- Open a command prompt window.
- Browse to the directory in which your Maple2020WindowsX86Installer.exe or Maple2020WindowsX64Installer.exe file is located.
- Run the silent installation process with the command Maple2020WindowsX86Installer.exe —optionfile (32-bit Windows) or Maple2020WindowsX64Installer.exe —optionfile (64-bit Windows), where is the name of the option file.
Note: If you created your option file in a directory other than the directory in which the Maple2020WindowsX86Installer.exe or Maple2020WindowsX64Installer.exe file is located, you must specify the path to the option file when you run this command.
Linux
- Check the System Requirements for your operating system.
- Close all programs, particularly any previous release of Maple.
- Log on as administrator or ensure that you have administrator privileges.
- Create an option file.
You can create your own installer.properties file using the following example as a template:
Note: In the preceding example, replace with the full path to the directory that you want to install Maple 2020 in.
- Open a command prompt window.
- Browse to the directory in which your Maple2020LinuxX64Installer.run file is located.
- Run the silent installation process with the command Maple2020LinuxX64Installer.run —optionfile , where is the name of the option file.
Note: If you created your option file in a directory other than the directory in which the Maple2020LinuxX64Installer.run file is located, you must specify the path to the option file when you run this command.
Mac OSX
- Check the System Requirements for your operating system.
- Close all programs, particularly any previous release of Maple
- Log on as administrator or ensure that you have administrator privileges.
- Create an option file.
You can create your own installer.properties file using the following example as a template:
- Unpack Maple2020MacInstaller.dmg to get the Maple2020MacInstaller.app file.
- Open a command terminal.
- Browse to the MacOS folder inside the .app file (this is usually /Volumes/Maple2020MacInstaller/Maple2020MacInstaller.app/Contents/MacOS ).
- Run the silent installation process with the command ./installbuilder.sh —optionfile where is the name of the option file.
Note: If you created your option file in a directory other than the directory in which installbuilder.sh is located, you must specify the path to the option file when you run this command.
Available Installation Options
Option Name
Description
Allowed Values
Default Value
Platform Availability
Display the list of valid options
Display product information
Unattended Mode UI
none minimal minimalWithDialogs
Name of option file
Mac; Linux; Windows
Debug information level of verbosity
win32 unattended (Windows); osx text unattended (Mac); gtk xwindow text unattended (Linux)
Windows; Mac; Linux
Mac; Linux; Windows
C:\Program Files(x86)\Maple 2020
It has been determined that you currently have Maple 2020 installed at this location. Please choose whether to upgrade the installation or to uninstall the old installation first before reinstalling. You may also click the Back button to choose a new Maple installation pathname.
Mac; Linux; Windows
Custom label for desktop shortcuts
Make Maple 2020 the default application for Maple worksheet (.mw and .mws) and workbook (.maple) files
Install desktop shortcuts
MATLAB® Configuration. If enabled (1), you must also set the matlabpath option.
Mac; Linux; Windows
Path to MATLAB® installation
Mac; Linux; Windows
Default toolbox is either Maple or MATLAB® (only valid if the MATLAB® installation contains the MATLAB® Symbolic Toolbox™)
Mac; Linux; Windows
Type of Licensing
Mac; Linux; Windows
Single or redundant server setup
Mac; Linux; Windows
Name of license server
Mac; Linux; Windows
Port number on license server
Mac; Linux; Windows
Name of license server 1
Mac; Linux; Windows
Port number on license server 1
Mac; Linux; Windows
Name of license server 2
Mac; Linux; Windows
Port number on license server 2
Mac; Linux; Windows
Name of license server 3
Mac; Linux; Windows
Port number on license server 3
Mac; Linux; Windows
Enable periodic checking for Maple 2020 updates after installation
Mac; Linux; Windows
Check for updates now
Mac; Linux; Windows
Name of the proxy server. To use the system’s proxy server, leave blank
Mac; Linux; Windows
Port number on proxy server. To use the system’s proxy port, leave blank
Mac; Linux; Windows
User name for proxy server (if required)
Mac; Linux; Windows
Password for proxy server (if required)
Mac; Linux; Windows
Activate Maplesoft product license
Mac; Linux; Windows
Name of license server
Mac; Linux; Windows
Port number on license server
Mac; Linux; Windows
Additional Information
- You are not provided with any feedback when you run the installer in this mode
- While you can install the single-user version of Maple silently, it is not possible to activate the product at this time. After the silent installation of the single user version of Maple 2020 is complete, from the Start menu, select All Programs , then Maple 2020 , then Tools and then Activate Maple 2020 .
Silently Uninstalling Maple
- To perform a silent uninstallation of Maple, at a command prompt, run the uninstall command, located in the /uninstall directory, as follows:
/uninstall/uninstall —mode unattended
Maple Toolbox Installation
If you have a 64-bit version of Maple and MATLAB® installed, you can install a toolbox that provides an integration between Maple and MATLAB®, where you can directly access all of the commands, variables and functions of Maple and MATLAB® while working in either environment.
MATLAB® Version Requirements
Maple 2020 connectivity with MATLAB® is supported for MATLAB® 2018a, 2018b, or 2019a. For the latest information on which MATLAB® versions are compatible with Maple 2020, visit http://www.maplesoft.com/products/system_requirements.aspx . Note that older and newer versions of MATLAB® may work, but may not be tested by Maplesoft.
Install the Maple Toolbox during the Maple Installation Process
During the Maple installation process, the Maple installer will display a panel indicating that the installer has detected that MATLAB® is installed. At this point, you can install a toolbox which will connect Maple with MATLAB® by selecting the MATLAB® version that you want to use from the list of available MATLAB® versions. You can also skip the Maple Toolbox installation by selecting Do not configure at this time.
If the MATLAB® Symbolic Math Toolbox™ is installed, another panel will prompt you to select either the Maple Toolbox or MATLAB® Symbolic Math Toolbox™ as the default.
Install the Maple Toolbox after Installing Maple
To install the Maple Toolbox after Maple is installed, do the following:
- On Windows, run the Maple toolbox installation file in the Maple install root directory, which is C:\Program Files\Maple 2020 by default. Follow the on-screen instructions.
- On Linux, run the Maple toolbox installation file in the Maple install root directory, which is $HOME/Maple2020/ by default, where $HOME is your home directory. Follow the on-screen instructions.
- On Macintosh, run the Maple toolbox installation file in the Maple install root directory, which is /Applications/Maple 2020 by default. Follow the on-screen instructions.
Getting Started with the Maple Toolbox
Start MATLAB® and then open the MATLAB® help system. To open the main Maple Toolbox help page, click Supplemental Software and select Maple Toolbox from the table of contents.
Graphics Issues for Linux Users
Installing the Maple Toolbox can cause issues with graphics in Maple and associated programs (for example, MapleSim). This is due to a graphics library conflict. To fix this, you need to delete some library files that come with MATLAB®.
To configure Maple Toolbox on Linux:
- Open a command-line terminal.
- Execute the following command to change to the library directory:
cd $MATLAB/sys/os/glnxa64/
Where $MATLAB is your MATLAB® installation directory.
- Execute the following command to delete the libraries:
rm libstdc++*
OpenWatcom (Windows 32-bit only)
For the 32-bit Windows version, Maple 2020 includes the OpenWatcom C compiler. This compiler is used for the Maple compiler feature, which allows you to compile some types of user-written Maple routines to speed up the performance of your code.
To use this feature, you must install the OpenWatcom C compiler when you install Maple 2020. The OpenWatcom compiler requires that it be installed in a location whose name contains no spaces (the default is C:\watcom-1.3 ). During installation, you will have the opportunity to change this default location.
To remove the OpenWatcom C compiler after installation, follow these steps.
- Delete the directory in which Watcom was installed.
- Delete the WATCOM environment variable.
- (Optional) Delete the Watcom paths from the INCLUDE environment variable.
- (Optional) Delete the Watcom paths from the PATH environment variable.
Note: If you have installed the OpenWatcom compiler with a previous release of Maple, please install again to the same location.
Verifying Video Card Driver Requirements
To optimize the performance of graphics in Maple 2020, it is strongly recommended that you install the latest driver software available for your video card. Before using Maple 2020, follow the steps in this section to verify and, if necessary, upgrade your video card driver software.
Identifying Your Video Card Type
32-bit and 64-bit Windows
- Do the following to open the Device Manager window:
- Open the Start menu. In the Start Search field, search for devmgmt.msc. From the search results, click Device Manager.
- In the Device Manager window, expand the Display adapters section. Your video card type is listed in this section (for example, RADEON X600 Series).
Linux
Note: This step requires that you are logged into your computer as a root user or have sudo access. If you are using a network or shared computer, you may need to contact your system administrator.
- At a command prompt, run the lspci command (the lspci command might be located in /sbin or /usr/sbin directories ).
- In the output, search for a line that contains «VGA» or «Display controller». For example,
01:00.0 VGA compatible controller: ATI Technologies Inc RV280 [Radeon 9200] (rev 01)
01:00.1 Display controller: ATI Technologies Inc RV280 [Radeon 9200] (rev 01)
Macintosh
- From the Apple menu, select About this Mac .
- In the System Profiler, expand the Hardware section in the left pane and click Graphics/Displays . Your video card is displayed beside Chipset Model in the panel at the right of the window (for example, Chipset Model: ATI Radeon HD 2600Pro ).
Verifying and Upgrading Your Driver Software
32-bit and 64-bit Windows
- In the Device Manager window, in the Display adapters section, right-click the entry for the video card used by your computer and select Update Driver. The Hardware Update Wizard is displayed.
- When prompted to connect to Windows Update, select Yes, this time only and click Next .
- Select Install the software automatically (Recommended) and click Next . The wizard checks whether a more current version of the driver software is available.
If the wizard indicates that the latest driver software is installed, click Finish to close the wizard. Your computer is configured to display graphics in Maple 2020.
If the wizard indicates that a more current version of the driver software is available, follow the on-screen instructions to install the update.
Linux
- Identify the driver version used by your video card. See Identifying the Driver Version Used by Your Video Card for instructions.
- Visit your video card vendor’s web site to check whether a more current version of the driver software is available. See Obtaining the Latest Driver Software for instructions.
If the version number of the latest driver software available from the vendor matches the version number of the driver software installed on your computer, your computer is configured to display graphics in Maple 2020. If a more current version is available, download the driver software from the web site and install it on your computer.
Note: It is not recommended that you use driver software updates automatically detected by Linux software upgrade utilities
Macintosh
- From the Apple menu, select Software Update.
If no driver software update is listed for your video card in the Software Update window, the latest version is installed on your computer. Your computer is configured to display graphics in Maple 2020.
If a driver software update is listed, select the entry from the list and click Install . Follow the on-screen instructions to complete the installation.
Downloading and Installing Driver Updates From a Vendor’s Web Site
If you are using a Linux operating system, or if you are using a Windows or Macintosh operating system and the driver software that was automatically detected does not function as expected, download and install the latest driver from the web site of the video card vendor.
Identifying the Driver Version Used by Your Video Card
32-bit and 64-bit Windows
- In the Device Manager window, expand the Display adapters section.
- Right-click the entry for the video card used by your computer and select Properties . A dialog box that contains information related to your video card is displayed.
- Click the Driver tab. The driver version used by your video card is listed beside Driver Version at the top of the window.
Linux
First, determine whether hardware accelerated graphics are turned on.
- In the root of your Linux installation, run the glxinfo | head command.
If hardware accelerated graphics are turned on, you will see a line that reads direct rendering: Yes . If this line reads direct rendering: No , hardware accelerated graphics are not turned on.
You can search the package management system of your Linux installation for drivers installed on your computer. Linux distributions use different package management systems; the instructions below are provided for the two most common Linux distributions.
dpkg-based Linux distributions such as Ubuntu
To query which packages are installed on your system, run the dpkg -l command. (Note that this is a lower-case letter L.) This command will display several lines of output, so it is useful to limit the output using the grep command. Continuing with the example above, enter the following command to search for NVIDIA® drivers.
dpkg -1 | grep -i nvidia
If you have a hardware accelerated driver installed, you will see an output line such as nvidia-glx-177 . In this example, 177 is the major version number of the driver. The full driver version number is displayed in the second column. For example, it will look like 177.82-0ubuntu0.1 on a Ubuntu system.
Hardware accelerated AMD® and ATI™ drivers are named fglrx on Linux. For example, the package name could be fglrx-amdcccle and the version number may look like 2:8.543-0ubuntu4.1 on a Ubuntu system.
Intel® integrated accelerated graphics hardware may contain intel in the package name or just the chipset information, such as i810.
rpm-based Linux distributions such as SuSE and Red Hat Enterprise Linux
To query which packages are installed on an rpm-based Linux system, run the rpm -qa command. This command will list every package installed on your computer, so you can limit the search by using the grep command. For example,