Создание аудита сервера и спецификации аудита сервера
В этом разделе описывается создание спецификации аудита сервера и аудита сервера в SQL Server с помощью SQL Server Management Studio или Transact-SQL. Аудит экземпляра SQL Server или базы данных SQL Server включает отслеживание и ведение журнала событий, происходящих в системе. Объект Подсистема аудита SQL Server объединяет отдельные экземпляры действий или групп действий уровня сервера или базы данных, за которыми нужно проводить наблюдение. Аудит выполняется на уровне экземпляра SQL Server. Для каждого экземпляра SQL Server можно выполнить несколько аудитов. Объект Спецификация аудита сервера принадлежит аудиту. Вы можете создать одну спецификацию аудита сервера для каждого аудита, так как оба создаются в области экземпляра SQL Server. Дополнительные сведения см. в статье Аудит SQL Server (ядро СУБД).
В этом разделе
- Перед началом: ОграниченияБезопасность
- Создание аудита сервера и спецификации аудита сервера с помощью:Среда SQL Server Management StudioTransact-SQL
Перед началом
Ограничения
- Аудит должен существовать, прежде чем для него будет создана спецификация аудита сервера. Спецификация аудита сервера после создания находится в отключенном состоянии.
- Инструкция CREATE SERVER AUDIT относится к области транзакции. Если выполняется откат транзакции, происходит также откат этой инструкции.
Безопасность
Разрешения
- Чтобы создать, изменить или удалить аудит сервера, участникам требуется разрешение ALTER ANY SERVER AUDIT или CONTROL SERVER.
- Пользователи с разрешением ALTER ANY SERVER AUDIT могут создавать спецификации аудита сервера и привязывать их к любому аудиту.
- После того как создана спецификация аудита сервера, ее могут просмотреть участники с разрешениями CONTROL SERVER или ALTER ANY SERVER AUDIT, учетная запись sysadmin или участники, имеющие явный доступ к аудиту.
Использование среды SQL Server Management Studio
Создание аудита сервера
- В обозревателе объектов раскройте папку Безопасность .
- Щелкните правой кнопкой мыши папку Аудиты и выберите пункт Создать аудит. . На странице Общие диалогового окна Создание аудита доступны следующие параметры. Имя аудита
Имя аудита. Формируется автоматически при создании нового аудита, но может быть изменено. Задержка очереди (в миллисекундах)
Определяет задержку в миллисекундах, после которой продолжается выполнение действий аудита. Значение 0 соответствует синхронной доставке. Минимальное значение по умолчанию — 1000 (1 секунда). Максимальное значение составляет 2 147 483 647 (2 147 483,647 секунд или 24 дня, 20 часов, 31 минута и 23,647 секунд). При сбое журнала аудита:
Продолжить
Операции SQL Server продолжаются. Записи аудита не сохраняются. Аудит продолжает попытки регистрации событий и будет возобновлен, если причина сбоя будет устранена. Выбор варианта Продолжить разрешает непроверенные действия, которые могут нарушать политики безопасности. Выберите этот параметр при продолжении работы ядра СУБД, чем обслуживание полного аудита. Это параметр выбирается по умолчанию. Завершение работы сервера
Приводит к остановке сервера, когда экземпляр сервера, который выполняет запись по назначению, не может записать данные в цель аудита. Имя входа, выполняющее эту команду, должно иметь разрешение SHUTDOWN . Если учетная запись не имеет этого разрешения, то функция завершится неуспешно и будет выдано сообщение об ошибке. Отсутствуют события аудита. Выберите этот параметр, если сбой аудита может нанести ущерб безопасности или целостности системы. Ошибка операции
В случаях, когда аудит SQL Server не может записываться в журнал аудита, этот параметр приводит к сбою действий базы данных, если они в противном случае вызывают аудит событий. Отсутствуют события аудита. Действия, которые не вызывают события аудита, можно продолжить. Аудит продолжает попытки регистрации событий и будет возобновлен, если причина сбоя будет устранена. Выберите этот параметр при сохранении полного аудита, чем полный доступ к ядру СУБД.
Внимание Когда аудит находится в состоянии сбоя, выделенное административное соединение может продолжать выполнять подвергающиеся аудиту события.
Создание спецификации аудита сервера
- В обозревателе объектов щелкните знак «плюс», чтобы развернуть папку Безопасность .
- Щелкните правой кнопкой мыши папку Спецификации аудита сервера и выберите пункт Создать спецификацию аудита сервера. . В диалоговом окне Создание спецификации аудита сервера доступны следующие параметры. Наименование
Имя спецификации аудита сервера. Этот текст формируется автоматически во время создания новой спецификации аудита сервера, однако он доступен для изменения. Аудит
Имя существующего аудита сервера. Введите имя аудита или выберите его из списка. Тип действия аудита
Указывает группы действий аудита на уровне сервера и действия аудита для захвата. Список групп действий аудита на уровне сервера и действий аудита, а также описание содержащихся в них событий см. в статье Действия и группы действий подсистемы аудита SQL Server. Схема объекта
Отображает схему для указанного Имени объекта. Имени объекта
Имя объекта для аудита. Доступно только для действий аудита и неприменимо к группам аудита. Кнопка с многоточием (. )
Открывает диалоговое окно Выбор объектов для просмотра и выбора доступного объекта на основе указанного Типа действия аудита. Имя участника
Учетная запись для фильтрации аудита для объекта, подвергнутого аудиту. Кнопка с многоточием (. )
Открывает диалоговое окно Выбор объектов для просмотра и выбора доступного объекта с учетом указанного параметра Имя объекта. - Закончив, нажмите ОК.
Использование Transact-SQL
Создание аудита сервера
- В обозревателе объектов подключитесь к экземпляру ядра СУБД.
- На стандартной панели выберите пункт Создать запрос.
- Скопируйте следующий пример в окно запроса и нажмите кнопку Выполнить.
-- Creates a server audit called "HIPAA_Audit" with a binary file as the target and no options. CREATE SERVER AUDIT HIPAA_Audit TO FILE ( FILEPATH ='E:\SQLAudit\' ); Несмотря на то, что в качестве цели файла аудита можно использовать UNC-путь, следует соблюдать осторожность. При наличии задержки в сети на пути к этой общей папке может возникнуть замедление в SQL Server, так как потоки ожидают записи аудита, прежде чем продолжить. В журнале ошибок SQL Server можно наблюдать различные сообщения об ошибках, например 17894:
2020-02-07 12:21:35.100 Server Dispatcher (0x7954) из пула диспетчеров «Основной пул диспетчеров XE Engine «, рабочая роль 0x00000058E7300000 не возвращает результат на узле 0.
Создание спецификации аудита сервера
- В обозревателе объектов подключитесь к экземпляру ядра СУБД.
- На стандартной панели выберите пункт Создать запрос.
- Скопируйте следующий пример в окно запроса и нажмите кнопку Выполнить.
/*Creates a server audit specification called "HIPAA_Audit_Specification" that audits failed logins for the SQL Server audit "HIPAA_Audit" created above. */ CREATE SERVER AUDIT SPECIFICATION HIPAA_Audit_Specification FOR SERVER AUDIT HIPAA_Audit ADD (FAILED_LOGIN_GROUP); GO -- Enables the audit. ALTER SERVER AUDIT HIPAA_Audit WITH (STATE = ON); GO SQL Server Audit
In Amazon RDS, you can audit Microsoft SQL Server databases by using the built-in SQL Server auditing mechanism. You can create audits and audit specifications in the same way that you create them for on-premises database servers.
RDS uploads the completed audit logs to your S3 bucket, using the IAM role that you provide. If you enable retention, RDS keeps your audit logs on your DB instance for the configured period of time.
For more information, see SQL Server Audit (database engine) in the Microsoft SQL Server documentation.
SQL Server Audit with Database Activity Streams
You can use Database Activity Streams for RDS to integrate SQL Server Audit events with database activity monitoring tools from Imperva, McAfee, and IBM. For more information about auditing with Database Activity Streams for RDS SQL Server, see Auditing in Microsoft SQL Server
Topics
- Support for SQL Server Audit
- Adding SQL Server Audit to the DB instance options
- Using SQL Server Audit
- Viewing audit logs
- Using SQL Server Audit with Multi-AZ instances
- Configuring an S3 bucket
- Manually creating an IAM role for SQL Server Audit
Support for SQL Server Audit
In Amazon RDS, starting with SQL Server 2014, all editions of SQL Server support server-level audits, and the Enterprise edition also supports database-level audits. Starting with SQL Server 2016 (13.x) SP1, all editions support both server-level and database-level audits. For more information, see SQL Server Audit (database engine) in the SQL Server documentation.
RDS supports configuring the following option settings for SQL Server Audit.
| Option setting | Valid values | Description |
|---|---|---|
| IAM_ROLE_ARN | A valid Amazon Resource Name (ARN) in the format arn:aws:iam:: account-id :role/ role-name . | The ARN of the IAM role that grants access to the S3 bucket where you want to store your audit logs. For more information, see Amazon Resource Names (ARNs) in the AWS General Reference. |
| S3_BUCKET_ARN | A valid ARN in the format arn:aws:s3. bucket-name or arn:aws:s3. bucket-name/key-prefix | The ARN for the S3 bucket where you want to store your audit logs. |
| ENABLE_COMPRESSION | true or false | Controls audit log compression. By default, compression is enabled (set to true ). |
| RETENTION_TIME | 0 to 840 | The retention time (in hours) that SQL Server audit records are kept on your RDS instance. By default, retention is disabled. |
RDS supports SQL Server Audit in all AWS Regions except Middle East (Bahrain).
Adding SQL Server Audit to the DB instance options
Enabling SQL Server Audit requires two steps: enabling the option on the DB instance, and enabling the feature inside SQL Server. The process for adding the SQL Server Audit option to a DB instance is as follows:
- Create a new option group, or copy or modify an existing option group.
- Add and configure all required options.
- Associate the option group with the DB instance.
After you add the SQL Server Audit option, you don’t need to restart your DB instance. As soon as the option group is active, you can create audits and store audit logs in your S3 bucket.
To add and configure SQL Server Audit on a DB instance’s option group
- Choose one of the following:
- Use an existing option group.
- Create a custom DB option group and use that option group. For more information, see Creating an option group.
- For IAM role, if you already have an IAM role with the required policies, you can choose that role. To create a new IAM role, choose Create a New Role. For information about the required policies, see Manually creating an IAM role for SQL Server Audit.
- For Select S3 destination, if you already have an S3 bucket that you want to use, choose it. To create an S3 bucket, choose Create a New S3 Bucket.
- For Enable Compression, leave this option chosen to compress audit files. Compression is enabled by default. To disable compression, clear Enable Compression.
- For Audit log retention, to keep audit records on the DB instance, choose this option. Specify a retention time in hours. The maximum retention time is 35 days.
- If you are creating a new DB instance, apply the option group when you launch the instance.
- On an existing DB instance, apply the option group by modifying the instance and then attaching the new option group. For more information, see Modifying an Amazon RDS DB instance.
Modifying the SQL Server Audit option
After you enable the SQL Server Audit option, you can modify the settings. For information about how to modify option settings, see Modifying an option setting.
Removing SQL Server Audit from the DB instance options
You can turn off the SQL Server Audit feature by disabling audits and then deleting the option.
To remove auditing
- Disable all of the audit settings inside SQL Server. To learn where audits are running, query the SQL Server security catalog views. For more information, see Security catalog views in the Microsoft SQL Server documentation.
- Delete the SQL Server Audit option from the DB instance. Choose one of the following:
- Delete the SQL Server Audit option from the option group that the DB instance uses. This change affects all DB instances that use the same option group. For more information, see Removing an option from an option group.
- Modify the DB instance, and then choose an option group without the SQL Server Audit option. This change affects only the DB instance that you modify. You can specify the default (empty) option group, or a different custom option group. For more information, see Modifying an Amazon RDS DB instance.
Using SQL Server Audit
You can control server audits, server audit specifications, and database audit specifications the same way that you control them for on-premises database servers.
Creating audits
You create server audits in the same way that you create them for on-premises database servers. For information about how to create server audits, see CREATE SERVER AUDIT in the Microsoft SQL Server documentation.
To avoid errors, adhere to the following limitations:
- Don’t exceed the maximum number of supported server audits per instance of 50.
- Instruct SQL Server to write data to a binary file.
- Don’t use RDS_ as a prefix in the server audit name.
- For FILEPATH , specify D:\rdsdbdata\SQLAudit .
- For MAXSIZE , specify a size between 2 MB and 50 MB.
- Don’t configure MAX_ROLLOVER_FILES or MAX_FILES .
- Don’t configure SQL Server to shut down the DB instance if it fails to write the audit record.
Creating audit specifications
You create server audit specifications and database audit specifications the same way that you create them for on-premises database servers. For information about creating audit specifications, see CREATE SERVER AUDIT SPECIFICATION and CREATE DATABASE AUDIT SPECIFICATION in the Microsoft SQL Server documentation.
To avoid errors, don’t use RDS_ as a prefix in the name of the database audit specification or server audit specification.
Viewing audit logs
Your audit logs are stored in D:\rdsdbdata\SQLAudit .
After SQL Server finishes writing to an audit log file—when the file reaches its size limit—Amazon RDS uploads the file to your S3 bucket. If retention is enabled, Amazon RDS moves the file into the retention folder: D:\rdsdbdata\SQLAudit\transmitted .
For information about configuring retention, see Adding SQL Server Audit to the DB instance options.
Audit records are kept on the DB instance until the audit log file is uploaded. You can view the audit records by running the following command.
SELECT * FROM msdb.dbo.rds_fn_get_audit_file ('D:\rdsdbdata\SQLAudit\*.sqlaudit' , default , default )You can use the same command to view audit records in your retention folder by changing the filter to D:\rdsdbdata\SQLAudit\transmitted\*.sqlaudit .
SELECT * FROM msdb.dbo.rds_fn_get_audit_file ('D:\rdsdbdata\SQLAudit\transmitted\*.sqlaudit' , default , default )Using SQL Server Audit with Multi-AZ instances
For Multi-AZ instances, the process for sending audit log files to Amazon S3 is similar to the process for Single-AZ instances. However, there are some important differences:
- Database audit specification objects are replicated to all nodes.
- Server audits and server audit specifications aren’t replicated to secondary nodes. Instead, you have to create or modify them manually.
To capture server audits or a server audit specification from both nodes:
- Create a server audit or a server audit specification on the primary node.
- Fail over to the secondary node and create a server audit or a server audit specification with the same name and GUID on the secondary node. Use the AUDIT_GUID parameter to specify the GUID.
Configuring an S3 bucket
The audit log files are automatically uploaded from the DB instance to your S3 bucket. The following restrictions apply to the S3 bucket that you use as a target for audit files:
- It must be in the same AWS Region as the DB instance.
- It must not be open to the public.
- It can’t use S3 Object Lock.
- The bucket owner must also be the IAM role owner.
The target key that is used to store the data follows this naming schema: bucket-name/key-prefix/instance-name/audit-name/node_file-name.ext
Note
You set both the bucket name and the key prefix values with the ( S3_BUCKET_ARN ) option setting.
The schema is composed of the following elements:
- bucket-name – The name of your S3 bucket.
- key-prefix – The custom key prefix you want to use for audit logs.
- instance-name – The name of your Amazon RDS instance.
- audit-name – The name of the audit.
- node – The identifier of the node that is the source of the audit logs ( node1 or node2 ). There is one node for a Single-AZ instance and two replication nodes for a Multi-AZ instance. These are not primary and secondary nodes, because the roles of primary and secondary change over time. Instead, the node identifier is a simple label.
- node1 – The first replication node (Single-AZ has one node only).
- node2 – The second replication node (Multi-AZ has two nodes).
- zip – If compression is enabled (default).
- sqlaudit – If compression is disabled.
Manually creating an IAM role for SQL Server Audit
Typically, when you create a new option, the AWS Management Console creates the IAM role and the IAM trust policy for you. However, you can manually create a new IAM role to use with SQL Server Audits, so that you can customize it with any additional requirements you might have. To do this, you create an IAM role and delegate permissions so that the Amazon RDS service can use your Amazon S3 bucket. When you create this IAM role, you attach trust and permissions policies. The trust policy allows Amazon RDS to assume this role. The permission policy defines the actions that this role can do. For more information, see Creating a role to delegate permissions to an AWS service in the AWS Identity and Access Management User Guide.
You can use the examples in this section to create the trust relationships and permissions policies you need.
The following example shows a trust relationship for SQL Server Audit. It uses the service principal rds.amazonaws.com to allow RDS to write to the S3 bucket. A service principal is an identifier that is used to grant permissions to a service. Anytime you allow access to rds.amazonaws.com in this way, you are allowing RDS to perform an action on your behalf. For more information about service principals, see AWS JSON policy elements: Principal.
Example trust relationship for SQL Server Audit
"Version": "2012-10-17", "Statement": [ "Effect": "Allow", "Principal": "Service": "rds.amazonaws.com" >, "Action": "sts:AssumeRole" > ] >We recommend using the aws:SourceArn and aws:SourceAccount global condition context keys in resource-based trust relationships to limit the service’s permissions to a specific resource. This is the most effective way to protect against the confused deputy problem.
You might use both global condition context keys and have the aws:SourceArn value contain the account ID. In this case, the aws:SourceAccount value and the account in the aws:SourceArn value must use the same account ID when used in the same statement.
- Use aws:SourceArn if you want cross-service access for a single resource.
- Use aws:SourceAccount if you want to allow any resource in that account to be associated with the cross-service use.
In the trust relationship, make sure to use the aws:SourceArn global condition context key with the full Amazon Resource Name (ARN) of the resources accessing the role. For SQL Server Audit, make sure to include both the DB option group and the DB instances, as shown in the following example.
Example trust relationship with global condition context key for SQL Server Audit
"Version": "2012-10-17", "Statement": [ "Effect": "Allow", "Principal": "Service": "rds.amazonaws.com" >, "Action": "sts:AssumeRole", "Condition": "StringEquals": "aws:SourceArn": [ "arn:aws:rds:Region:my_account_ID:db:db_instance_identifier", "arn:aws:rds:Region:my_account_ID:og:option_group_name" ] > > > ] > In the following example of a permissions policy for SQL Server Audit, we specify an ARN for the Amazon S3 bucket. You can use ARNs to identify a specific account, user, or role that you want grant access to. For more information about using ARNs, see Amazon resource names (ARNs).
Example permissions policy for SQL Server Audit
"Version": "2012-10-17", "Statement": [ "Effect": "Allow", "Action": "s3:ListAllMyBuckets", "Resource": "*" >, "Effect": "Allow", "Action": [ "s3:ListBucket", "s3:GetBucketACL", "s3:GetBucketLocation" ], "Resource": "arn:aws:s3. bucket_name" >, "Effect": "Allow", "Action": [ "s3:PutObject", "s3:ListMultipartUploadParts", "s3:AbortMultipartUpload" ], "Resource": "arn:aws:s3. bucket_name/key_prefix/*" > ] >Note
The s3:ListAllMyBuckets action is required for verifying that the same AWS account owns both the S3 bucket and the SQL Server DB instance. The action lists the names of the buckets in the account.
S3 bucket namespaces are global. If you accidentally delete your bucket, another user can create a bucket with the same name in a different account. Then the SQL Server Audit data is written to the new bucket.
Основные функции для создания журнала аудита SQL Server в базах данных

Независимо от размера вашей организации, в системах баз данных, таких как SQL Server, всегда есть множество элементов, которые нужно отслеживать — логины пользователей, доступ к данным, средства защиты и многое другое. По словам ИТ-архитектора и автора К. Брайана Келли, сбор и ведение информации для аудита баз данных может быть непростой задачей, но SQL Server предоставляет инструменты, помогающие сделать его управляемым.
Недавно, на одном из вебинаров Келли рассказал о возможностях аудита, которые поставляются с программным обеспечением базы данных, и о том, как администраторы баз данных (DBA) могут использовать их для создания контрольного журнала SQL Server, который документирует подробности работы в системах для обеспечения безопасности, соответствия нормативным требованиям и администрирования.
Одним из многих инструментов аудита, предлагаемых SQL Server, является трассировка по умолчанию. Эта функция находится в режиме обслуживания, и Microsoft не рекомендует использовать ее в новых приложениях. Но, по словам Келли, бывшего администратора баз данных SQL Server, который в настоящее время работает в качестве архитектора данных в AgFirst Farm Credit Bank в Колумбии, S.C., она все еще может предоставить некоторую полезную информацию
Например, механизм трассировки по умолчанию можно использовать для аудита входов пользователей в систему для проверки проблем приложений или потенциальных проблем безопасности. «Установочный SQL Server позволяет легко обнаруживать неудачные входы в систему, во многом благодаря трассировке по умолчанию», — сказал Келли.
Основная задача трассировки по умолчанию состоит в том, чтобы фиксировать все изменения базовой конфигурации и схем SQL Server на временной основе. Келли отметил, что название функции немного неправильное, так как на самом деле оно состоит из четырех или пяти небольших файлов трассировки. «SQL Server переворачивает эти файлы по мере необходимости, когда их объем заполняется. В результате трассировка по умолчанию — это, по сути, непрерывный набор записей аудита», — сказал он.
Расширенные события предлагают новый трек аудита
Для аудита в новых приложениях Microsoft рекомендует использовать инструмент мониторинга производительности SQL Server Extended Events вместо функции трассировки по умолчанию. Инструмент Extended Events был введен в SQL Server 2008, чтобы уменьшить влияние обработки процессов настройки и аудита производительности базы данных. Технология стала более полезной после добавления набора графических интерфейсов в SQL Server 2012.
Так же Келли подчеркнул важность использования расширенных событий для создания настраиваемых трассировок для контрольного журнала SQL Server вместо запуска SQL Server Profiler или серверных трассировок, двух других более старых механизмов аудита.
Пользователи по-прежнему могут создавать трассировки на уровне клиента с помощью SQL Server Profiler, а трассировки на стороне сервера — с помощью SQL Trace, но Microsoft отказалась от этих инструментов. По словам Келли, трассировки, построенные с их помощью, имеют тенденцию быть довольно тяжелыми с точки зрения производительности, и они были заменены расширенными событиями в SQL Server 2012. «Если вы хотите проводить аудит вещей, которые являются новыми функциями в любой из версий после SQL Server 2008 R2 единственный способ проверить его, единственный способ обнаружить и использовать его — это Extended Events», — отметил он.
Варианты записи базы данных логинов
По словам Келли, в случае входа в систему SQL Server автоматически настраивается на запись всех неудачных попыток, но пользователи могут настроить его под свои нужды. Система может быть переконфигурирована для отслеживания всех успешных входов в систему или неудачных и успешных попыток. Если у вас есть альтернативная система отслеживания, вы даже можете отключить механизм SQL Server.
Однако Келли предупредил, что кэширование успешных входов в систему в загруженной системе будет затруднено, поскольку журнал событий быстро начнет перезаписывать данные.
По словам Келли, изменить настройки SQL Server для аудита входов в систему относительно просто. Сначала перейдите в SQL Server Management Studio и щелкните правой кнопкой мыши на Server. Выберите Properties, затем выберите Security. На вкладке « Security» можно выбрать один из четырех параметров аудита входа в систему: None, Failed logins only, Successful logins only или Both failed and successful logins. «SQL Server должен быть перезапущен после внесения любых изменений; иначе он не будет собирать данные так, как вы хотите», — сказал он.
Альтернативные инструменты аудита
Дополнительные механизмы аудита, доступные администраторам баз данных, включают управление на основе политик, которое Келли назвал «в основном групповой политикой для SQL Server». Функцию управления на основе политик можно использовать для принудительного применения параметров политики в ядре базы данных SQL Server, но он сказал, что его лучше всего использовать в качестве «системы проверки», поскольку он может проверять почти все в экземпляре SQL Server.
Келли считает, что основанное на политике управление недостаточно используется большинством организаций. Однако существуют ограничения на то, что может делать инструмент. Он предупредил, что это в первую очередь «детективный контроль», поскольку он предупреждает администраторов баз о проблемах только после того, как они уже произошли. Кроме того, управление на основе политик не может определить, кто что делал в системе SQL Server; оно предназначено для обеспечения того, чтобы конфигурация оставалась такой, какой вы хотите, и для оповещения о каких-либо изменениях.
Триггеры языка определения данных и триггеры входа в систему также можно использовать для создания контрольного журнала SQL Server в системах баз данных. Например, их можно включить, если кто-то попытается войти в систему или изменить систему. Но Келли сказал, что триггеры следует использовать с осторожностью, поскольку они могут добавить накладные расходы на обработку и неожиданно заблокировать процессы. «Часто лучше просто провести аудит для происходящего события», а затем исправить проблему, добавил он.
По словам Келли, сбор данных изменений (CDC) изначально не предназначался для аудита. Его первоначальная цель заключалась в том, чтобы записывать изменения данных в таблицах SQL Server, чтобы пользователям приходилось только обрабатывать то, что было изменено, для обновления хранилища данных. Тем не менее, по словам Келли, CDC можно использовать при аудите, поскольку он также позволяет администраторам баз данных читать файлы журнала базы данных. Однако он добавил, что это не является поддерживаемым использованием технологии и должно быть сделано только в качестве крайней меры.
Одной из ключевых вещей, которые хотят знать аудиторы базы данных, является то, какие пользователи имеют доступ к базе данных и какой доступ имеют эти пользователи. Келли сказал, что есть два основных уровня представлений каталога безопасности для основных пользователей: sys.server_principals и sys.database_principals. В частности, sys.server_principals соответствует логинам. Он описал два представления каталога как “кусок хлеба” администратора базы данных, когда пытался определить, кто на самом деле имеет доступ к наборам данных и — что более важно — кто должен иметь доступ.
How to Enable SQL Server Audit and Review the Audit Log
Auditing Microsoft SQL Server is critical to identifying security issues and breaches. In addition, auditing SQL Server is a requirement for compliance with regulations like PCI DSS and HIPAA.
Handpicked related content:
The first step is to define what to audit. For example, you might audit user logins, server configuration, schema changes and audit data modifications. Next, you have choose which security auditing features to use. Useful features include the following:
- C2 Auditing
- Common Compliance Criteria
- Login Auditing
- SQL Server Auditing
- SQL Trace
- Extended Events
- Change Data Capture
- DML, DDL, and Logon Triggers
This article is for database administrators (DBAs) who are looking at using C2 auditing, Common Compliance Criteria and SQL Server Auditing. We will not be looking at any third-party auditing tools, though they can be of great help, especially for larger environments and in regulated industries.
Enabling C2 Auditing and Common Criteria Compliance
If you aren’t currently auditing your SQL Server, the easiest place to start is by enabling C2 auditing. C2 auditing is an internationally accepted standard that can be turned on in SQL Server. It audits events like user logins, stored procedures, and the creation and removal of objects. But it is all or nothing — you can’t choose what it audits, and it can generate a lot of data. Furthermore, C2 auditing is in maintenance mode, so it will likely be removed in a future version of SQL Server.
Handpicked related content:
Common Criteria Compliance is a newer standard that supersedes C2 auditing. It was developed by the European Union and can be enabled in Enterprise and Datacenter editions of SQL Server 2008 R2 and later. But it can cause performance issues if your server isn’t sufficiently spec’d to cope with the extra overhead.
Here’s how to enable C2 auditing in SQL Server 2017:
1. Open the SQL Server Management Studio.
2. Connect to the database engine for which you want to enable C2 auditing. In the Connect to Server dialog, make sure that Server type is set to Database Engine and then click Connect.
3. In the Object Explorer panel on the left, right-click your SQL Server instance at the top and select Properties from the menu.
4. In the Server Properties window, click Security under Select a page.
5. On the Security page, you can configure login monitoring. By default, only failed logins are recorded. Alternatively, you can audit just successful logins, or both failed and successful logins.

Figure 1. Configuring access auditing
6. Check Enable C2 audit tracing under Options.
7. If you want to enable C2 Common Criteria Compliance auditing, check Enable Common Criteria compliance.
Common Criteria (CC) Compliance is a flexible standard that can be implemented with different Evaluation Assurance Levels (EALs), from 1 to 7. Higher EALs have a more demanding verification process. When you check Enable Common Criteria compliance in SQL Server, you are enabling CC Compliance EAL1. It is possible to configure SQL Server manually for EAL4+.
Enabling CC Compliance changes SQL Server behavior. For example, table-level DENY permissions will take precedence over column-level GRANTs, and both successful and failed logins will be audited. In addition, Residual Information Protection (RIP) is enabled, which over-writes memory allocations with a pattern of bits before they are used by a new resource.
Handpicked related content:
8. Click OK.
9. Based on the selected options, you might be prompted to restart SQL Server. If you get this message, click OK in the warning dialog. If you enabled C2 Common Criteria Compliance, reboot the server. Otherwise, right-click your SQL Server instance in Object Explorer again and select Restart from the menu. In the warning dialog, click Yes to confirm that you want to restart SQL Server.
Enabling SQL Server Audit
SQL Server auditing can be enabled instead of C2 auditing; you can also choose to enable both. SQL Server Audit objects can be configured to collect events at the server level or the SQL Server database level.
Create Server Audit Object
Let’s create a server-level SQL Server audit object:
1. In the Object Explorer panel on the left, expand Security.
2. Right-click Audits and select New Audit… from the menu. This will create a new SQL Server Audit object for server-level auditing.
3. In the Create Audit window, give the audit settings a name in the Audit name
4. Specify what should happen if SQL Server auditing fails using the On Audit Log Failure You can choose Continue or choose to shut down the server or stop database operations that are audited. If you select Fail operation, database operations that are not audited will continue to work.
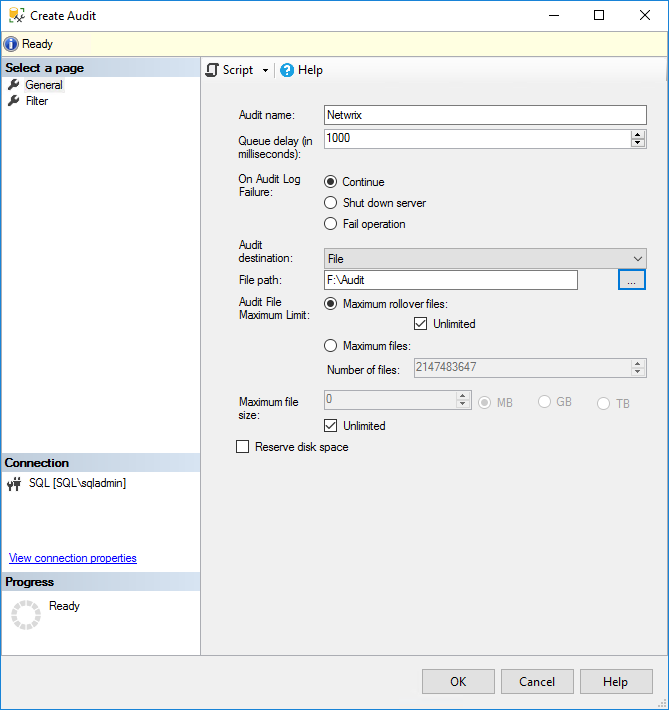
Figure 2. Creating a server-level SQL Server audit object
5. In the Audit destination dropdown menu, you can choose to write the SQL audit trail to a file or to audit events in the Windows Security log or Application event log. If you choose a file, you must specify a path for the file.
Note that if you want to write to the Windows Security event log, SQL Server will need to be given permission. For the sake of simplicity, select the Application event log. Additionally, you can include a filter as part of the audit object to provide a narrow set of results; filters must be written in Transact-SQL (T-SQL).
6. Click OK.
7. You will now find the new audit configuration in Object Explorer below Audits. Right-click the new audit configuration and select Enable Audit from the menu.
8. Click Close in the Enable Audit dialog.
Create Database Audit Object
To create a SQL Server audit object for database-level auditing, the process is a little different and you need to create at least one server-level audit object first.
1. Expand Databases in Object Explorer and expand the database on which you want to configure auditing.
2. Expand the Security folder, right click Database Audit Specifications and select New Database Audit Specification… from the menu.

Figure 3. Creating a server audit specification for database-level auditing
3. In the Properties window under Actions, use the dropdown menus to configure one or more audit action types, selecting the statements you want to audit (such as DELETE or INSERT), the object class on which the action is performed, and so on.
4. When you’re done, click OK and then enable the audit object by right-clicking it and selecting Enable Database Audit Specification.
Viewing SQL Server Audit Logs
C2 Audit SQL Server audit logs are stored in the default data directory of the SQL Server instance. Each log file can be a maximum of 200 megabytes. A new file is automatically created when the limit is reached.
A native solution that is recommended to view SQL Server audit logs called Log File Viewer. To use it, take the following steps:
1. In SQL Server Management Studio, in the Object Explorer panel, expand Security and
2. Right-click the audit object that you want to view and select View Audit Logs from the menu.
3. In the Log File Viewer, the logs will be displayed on the right side. Regardless of whether the logs are written to a file or to the Windows Event Log, Log File Viewer will display the logs.
4. At the top of Log File Viewer, you can click Filter to customize which log entries are displayed. SQL Server file logs are saved in .sqlaudit format and are not readable, so Log File Explorer allows you to click Export to save logs to a comma-delimited .log file format.
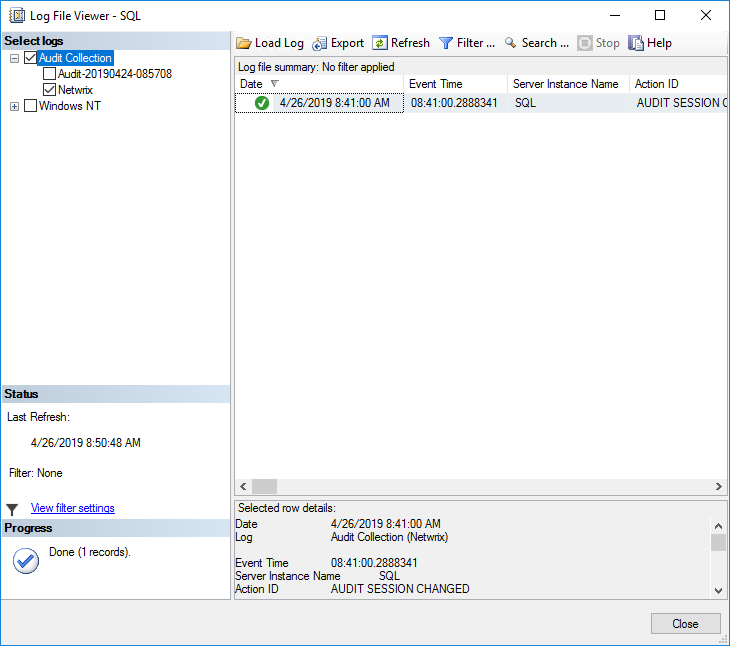
Figure 4. Reviewing SQL Server audit logging in the Log File Viewer
IT consultant and author specializing in management and security technologies. Russell has more than 15 years of experience in IT, he has written a book on Windows security, and he coauthored a text for Microsoft’s Official Academic Course (MOAC) series.