Обновление Lightroom Classic удаляет предыдущие версии Lightroom

Эта проблема была исправлена в обновлении 7.0.1 до версии Lightroom Classic CC, выпущенной 26 октября 2017 г. Теперь параметр Удалить старые версии в приложении Creative Cloud для ПК отключен по умолчанию для пользователей, выполняющих обновление до Lightroom Classic. Дополнительные сведения см. в этом блоге.
Примечание.
В случае непреднамеренного удаления Lightroom 6 во время обновления до Lightroom Classic перейдите к разделу Переустановка Lightroom 6.
Проблема
При обновлении Lightroom Classic с предыдущих версий с помощью приложения Creative Cloud для ПК, например при обновлении Lightroom 6 до Lightroom Classic, предыдущие версии Lightroom по умолчанию удаляются.
Причина
По умолчанию все предыдущие версии приложений удаляются при обновлении до последней версии с помощью приложения Creative Cloud для ПК. Если необходимо сохранить ранее установленные версии приложений, следует изменить настройки обновления по умолчанию в приложении Creative Cloud для ПК.
Обновление недоступно | Lightroom for mobile (Android)
Если вы используете более старую версию Lightroom for mobile (Android) и заходите в Google Play Store, чтобы обновить ее до последней версии, функция обновления будет недоступна.
Решение
Чтобы устранить проблему, выполните следующие действия:
Убедитесь, что устройство совместимо с последним обновлением
Убедитесь, что телефон Android, на котором нужно установить Lightroom for mobile, удовлетворяет следующим системным требованиям:
Минимальные системные требования
- Процессор: четырехъядерный процессор архитектуры ARMv7 с тактовой частотой 1,5 ГГц
- ОЗУ: 2 ГБ
- Внутренняя память: 8 ГБ
- Версия ОС Android: 8.x (Oreo) и выше
Рекомендуемые системные требования
- Процессор: четырехъядерный процессор архитектуры ARMv8 с тактовой частотой 2.2 ГГц
- ОЗУ: 4 ГБ и более
- Внутренняя память: 8 ГБ и более
- Версия ОС Android: 8.x (Oreo) и выше
Проверьте, установлено ли последнее обновление Lightroom.
Возможно, на вашем устройстве уже установлена последняя версия Lightroom, если включена функция автоматического обновления. Чтобы проверить версию Lightroom, установленную на вашем устройстве:
Запустите Lightroom for mobile (Android)
![]()
Нажмите в левом верхнем углу окна Lightroom for mobile (Android), чтобы развернуть боковую панель.
Нажмите О приложении Lightroom . Версия Lightroom отображается в верхней части экрана.

Если вы не можете запустить Lightroom на своем устройстве, вы можете проверить версию Lightroom в настройках вашего устройства.
Update Creative Cloud apps
Depending on your version of the Creative Cloud desktop app, select the Account icon in the upper right and then select Preferences .

Does your screen look different? See instructions for the earlier version of Creative Cloud desktop app.
Select Apps in the left sidebar.
- All apps : To set automatic updates for all apps, turn on Auto-update .
- Specific apps : To set automatic updates for specific apps, turn on Auto-update , and then set the toggle as needed for each individual app.
Previous versions are uninstalled by default but you can opt to keep them using Advanced options . Learn more about Advanced options.

Select Done .
Using a plug-in? Third-party plug-ins may not always work with the latest version of the Creative Cloud apps. Contact your plug-in vendor for information about compatibility and updates.
Advanced options for individual apps
Once you enable the Auto-update feature, you get the option to retain or remove a specific version of any app.
- Import previous settings and preferences: Retains the previous settings and preferences for the updated apps.
- Remove older versions: Uninstalls the previous versions and saves your hard disk space.

Unable to auto-update?
Following are some reasons why you can’t enable auto-update for your apps:
- Using macOS 13 Ventura? If you’ve turned off the Adobe Creative Cloud login item in your macOS System Settings , you can’t update your apps automatically. The Creative Cloud desktop app adds login items to support various features, including auto-update. Learn how we use login items.
- Enterprise or teams customer? If you’ve received your Adobe plan from a school or organization and if you don’t see the above Auto-update option, your admin has turned off auto-updates in your school or organization. If you’re an admin in a school or organization, learn how to manage auto-updates for your users.
There can be more reasons why auto-update may not be available. Learn more about some common scenarios.
Update your Creative Cloud apps manually
If you don’t want to automatically update your apps, you can update them manually with the help of the Creative Cloud desktop app.
Depending on your version of the Creative Cloud desktop app, do one of the following to manually update your apps:
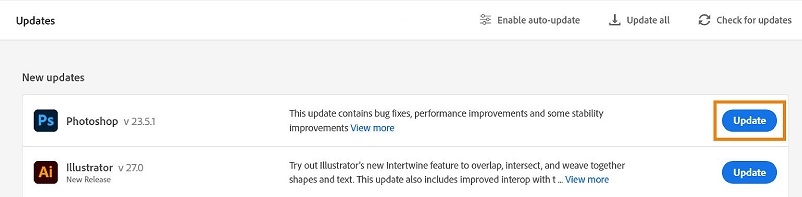
From the left sidebar, select Updates .

From the right sidebar, select Apps > Manage updates .

Does your screen look different? See instructions for the earlier version of the Creative Cloud desktop app.
In the Updates screen, select Update to update the app you want.
Your app is updated.
Can I schedule an update for later?
Yes, you can schedule your app update for a later time. Open the Creative Cloud desktop app and go to Apps > Update . You can find the available app updates in the New updates section. Hover over the Update option for your desired app, and then select Later . You get a confirmation message that your app will be updated when it’s no longer in use. Your app also starts showing up in the Scheduled updates section of the Updates screen. The Creative Cloud desktop app will attempt to update your app later when the app isn’t running. To view step-by-step detailed instructions, see Schedule Creative Cloud app updates for later .
Note that your app will update only when it is not in use. If it is already in use when the Creative Cloud desktop app attempts to update it, you get the following prompt to close any open programs to continue with the update.

Update all your apps at once
If you want to update all your apps at once, select Update all in the upper-right of the Updates screen. Save your work and close all Adobe apps before you begin. If Adobe apps are open, you may receive a warning to close them. For more help, see Close conflicting processes or applications.

Note: We don’t recommend using the Update all option if you want to retain the older version of the apps.
How to Update Lightroom

As an Amazon Associate we earn from qualifying purchases.
Every once in a while, Adobe rolls out an updated version of Lightroom Classic CC. As a photographer, it’s a good practice to keep updating the software as it has better features and bug fixes for optimized performance. Today I are going to explain how to update Lightroom so that you can safely move on to the new version.
- How to Update Lightroom to the Latest Version
- Step 1: Make Sure Your OS is Compatible with the Latest Version Requirements
- Step 2: Have Your Catalog and Images Backed Up
- Step 3: Update Lightroom Classic From the Adobe Creative Cloud Application
- Step 4: Upgrade Your Lightroom Catalog to the New Format
- Step 5: Rename Your Catalog
- Step 6: Set the Preferences and Backup Settings in the New Version
How to Update Lightroom to the Latest Version
It is vital to upgrade to the most advanced version of Lightroom Classic if you want to improve your workflow and to ensure stability and security. Also, keep in mind that outdated versions of software often have security flaws that may put your device and data at risk.
Even if updating your editing software is optional, I highly recommend you to do so. Because folks at Adobe constantly try to make Lightroom more efficient and user-friendly for you with every new version.

Upgrading Adobe Lightroom Classic is a straightforward procedure. However, the time it takes to move to the new version depends upon your internet speed and your catalog size. The process requires a few essential steps that you shouldn’t miss to make sure your catalog is safely moved to the new version.
Step 1: Make Sure Your OS is Compatible with the Latest Version Requirements
The most crucial factor to consider while updating Lightroom is to check whether your operating system supports the newest version. If you are a PC user, the latest version of Lightroom requires you to have Windows 10 (64 bit). For Mac users, your OS must be Mojave (version 10.14), Big Sur, or Catalina.
Your system must have a minimum of 8 GB RAM and more than 2GB of space available on the hard disk for installing the new version. Further specifications are stated by Adobe to which you can refer before upgrading Lightroom.
Step 2: Have Your Catalog and Images Backed Up
It is recommended to backup your Lightroom catalog and image folders before updating the software. It is a precautionary step to keep the catalog and images safe in case of a glitch in the update process.
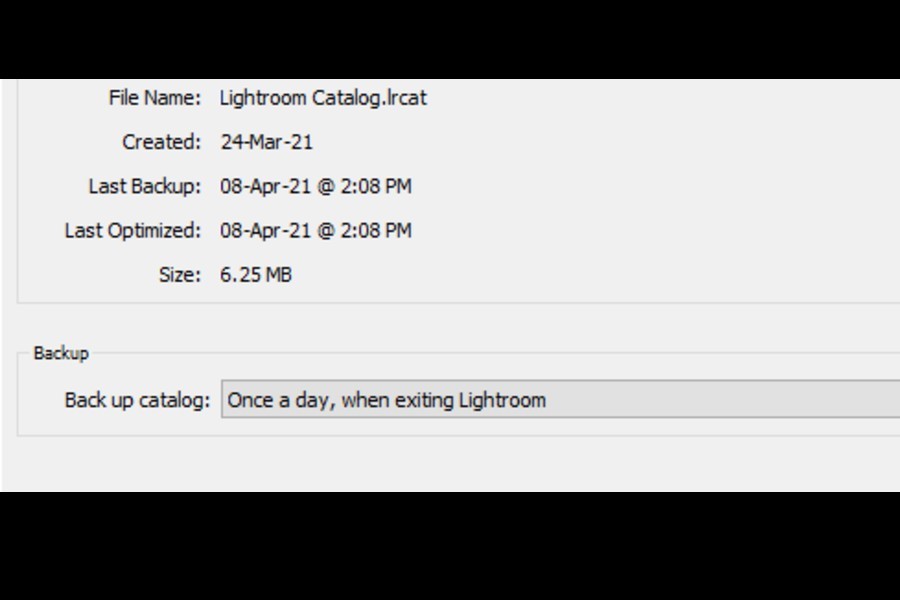
Quick tip: You can set the backup schedule of your catalog update in the Catalog Settings to once a day when exiting Lightroom, or once a week.
Sometimes, when you update Lightroom, it doesn’t locate your catalog automatically. Therefore, you must know the name of your catalog and where it is saved.
- Go to the Edit menu on Windows and Lightroom Classic Menu on Mac.
- Click on Catalog Settings.
- Open the General tab in the dialog box.
- View the location where your catalog is saved. Note the name of your catalog as well.

- Back up your Catalog file with the .lrcat extension. It might take longer if you have a large catalog.
- You can also move your catalog to an external hard drive at this point.
Step 3: Update Lightroom Classic From the Adobe Creative Cloud Application
Whenever Adobe rolls out a new version of Lightroom, you will be notified about it. To get auto-updates, your auto-update checking option should be enabled. Under the Edit menu (PC) or Lightroom menu (Mac), go to the preferences tab. Tick the checkbox for “Automatically check for updates.”
To check for the updates manually, you can go to the Help menu and click on Updates.

After that, go to the Adobe Creative Cloud Installer App.
- Sign in to your Creative Cloud account.
- Check under the Creative Cloud Manager app window, you will see an Update option besides Lightroom Classic. If you aren’t able to see the update option here, it means that your Operating System needs to be updated to fulfill the requirements of the new version.
- Click on it, and the process to download and install the new version of Lightroom Classic will begin.
- Once the download is complete, you will be able to see it on your desktop.
Step 4: Upgrade Your Lightroom Catalog to the New Format
The next step in the process to update Lightroom is to convert your Lightroom catalog to the latest database format.

- Launch the new version of Lightroom on your computer.
- You will get a notification box asking you to confirm the catalog that you want to upgrade. If it is the wrong catalog go to Choose a different catalog option to open the correct one.
- Here is where taking note of the name of your catalog is helpful. Double-check the name and make sure that it is the same catalog that you wish to use in the latest version.
- Click on Upgrade. After the process is completed without any error, the new version of Lightroom will open.
Step 5: Rename Your Catalog
The upgrade process in the new Lightroom versions changes the name of your catalog by adding a version number to its name. If you want to rename your catalog, here is how to do it.
- Under the Edits menu in Windows or Lightroom menu in Mac, go to the Catalog settings.
- Click on the General tab.
- Select the Show button present besides your catalog location.
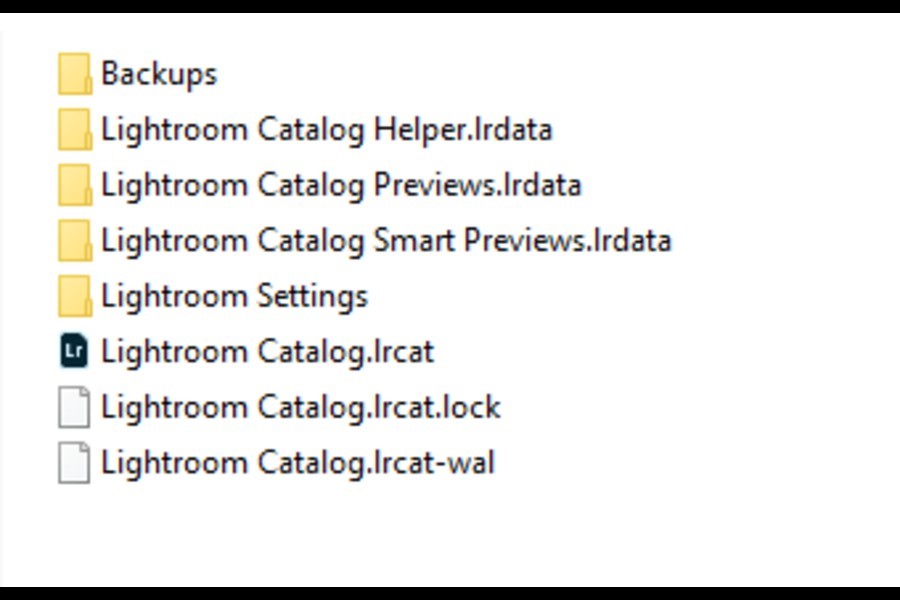
- A file finder/explorer window will open where your catalog is stored.
- Now exit Lightroom Classic and come back on the explorer window.
- You can see that your old catalog is also there in the folder. Rename it by adding anything that tells you that it’s the old one and then move it to the backups folder.
- Now rename your new catalog (by removing the version number attached to it). Make sure not to remove the .lrcat extension accidentally.
- Rename the other folders with the same name as your new catalog name, ensuring that their respective file extensions remain untouched, as shown below.
- No double click on the new catalog, and your Lightroom Classic will launch once again.
Step 6: Set the Preferences and Backup Settings in the New Version
- Open the Lightroom Classic menu on Mac, or Edits menu on Windows.
- Go to the Preferences.
- Choose the General tab.
- Set the preference for Default Catalog. Select the catalog that you just renamed a while ago.
- Make sure the Auto check for updates option is checked.
- Click on Ok if you are a PC user, or close the tab if you are using Mac.
Conclusion
Updating to the newest version of Lightroom is not a complicated process, though you must make sure you have backed up everything beforehand. Your Operating System must be compatible with the Lightroom Classic’s prerequisites. The new versions have better performance and security, therefore upgrading is highly recommended.