Немного карбона и черного цвета. Центральная консоль + решетка

Так как жена сказала что центральная консоль в машине ужасно пачкается и царапается и видно постоянно пыль и отпечатки, решил наклеить пленку по типу карбона.

Как все снимается можно посмотреть в интернете, а вот что получилось в результате можно взглянуть тут.


Пленку брал типа 4D карбон на али. Клеится просто, главное острый канцелярский скальпель и строительный фен. На блок с отображением текущей передачи наклеил пленку прозрачную (взял такую, которой авто оклеивают у ребят) . Получилось не плохо на мой взгляд.

Потом не понравилось что много хрома спереди. Вот и решил тоже пленкой обклеить. Клеили в компании «АвтоВинил 89». Получилось достойно. Жене очень понравилось!
Mazda CX-5 Service & Repair Manual: Upper Panel Removal/Installation
5. Take the shaded area shown in the figure, and remove the upper panel in the direction of the arrow in the order of (1), (2) while detaching clips A, pin B, hooks C.
6. Remove clips D.
7. Install in the reverse order of removal.
 Switch Panel Removal/Installation
1. Disconnect the negative battery cable.. 2. Remove the car-navigation unit. (with car-navigation system). 3. Insert your hand from the lower side of the lower panel (without car-navigation sys .
 Amenities
Other materials:
Crankshaft Position (CKP) Sensor
Purpose/Function Detects the crankshaft speed as basic information for mainly determining the fuel injection timing and ignition timing. Detects the crankshaft speed and inputs it to the PCM as a CKP signal. Construction Installed on the side of the cylinder block (ri .
Power Seat Switch Inspection
WARNING: Handling a side air bag improperly can accidentally operate (deploy) the air bag, which may seriously injure you. Read the service warnings/cautions in the Workshop Manual before handling the front seat (side air bag integrated).. 1. Switch the ignition off (LOCK). 2. .
Gear Position Indicator [Fw6 A EL, Fw6 Ax EL]
Purpose/Function The gear position indicator illuminates while under manual shift control and displays the gear number while driving. Construction The gear position indicator is built into the instrument cluster. Operation The TCM sends a gear position indic .
2016 Center Console Removal
Here is a write-up on the center console removal for the 2016 CX-5. I did this to install some ambient lighting (I am making a separate how to on that). Also check out this thread for info on just accessing the Command Knob or getting under the cup holders. http://www.mazdas247.com/forum/show. b-cup-holder-access-for-cleaning-or-otherwise
Needed tools for this project: Philips screwdriver, Trim pullers (a cheap set from harbor freight is fine) or a small Flathead screwdriver. Depending how anal you are, some protective tape wouldn’t hurt either. I also recommend you have some kind of «interior cleaner» product that you like to use, and if you desire, a protectant such as 303 aerospace with some microfiber cloths for when you are putting everything back together and make it all nice and clean.
First things first, whenever doing anything with wires, be sure to disconnect the battery first. Mazda uses a 10mm bolt/nut in many places, one of them is here. Just disconnect the — side and make sure it won’t make contact. Disconnecting power will reset your trip A and B, as well as average MPG and speed, but all other settings should remain the same. BUT if your car has a power driver seat as mine does, do the following steps FIRST or you will get stuck (hand)
Also, I found that having the car in park made spaces tight towards the front to maneuver or get things out. You may want to try putting the car in drive and then turning it off if it will let you? I didn’t try this, so YMMV.

Start by removing the back of the Center Console. It just pops straight off fairly easily, though you can use your trim puller to get it started towards the top. It is removed in the picture below
While not necessary, life will be easier with the console lid off. In the picture above, there is a screw on each side, circled in red. There are two more screws after opening the lid where the arrow is. We can take those out to remove the lid.
Next, there is a plastic cap on each side towards the bottom, circled in blue on the picture above. These are tricky to get off, especially without making any marks on the plastic. Once you do get them off, there is a screw on each side which needs to come out. These screws hold down the back end of the console to the chassis.
If your car has a power driver seat, move your seat back all the way now. Now is the time to disconnect the battery terminal.
Next, if you have not already, make sure your console and cup holders are empty. As illustrated below, pull up on the trim where the cup holders are at, first at the back(circled in Yellow) and then the front (circled in red).


There are 2 cables connected to this part, one to the command knob, and the other to the emergency break. Make sure to unplug both of those by pushing the little tab down and pulling the connector out. If your command buttons need a cleaning at all, you can detach it from the rest of the trim with 4 screws underneath.

Once off, our next step is to remove the back half of the console. But first, we will need to undo the cables that are connected to the trim. I have circled each spot below witch, depending how far you are following this guide, will need to be taken off to remove the trim they are attatched to. These required some work to get them out and a good fork shaped trim puller.
Now for the back half, it should be free to lift off now without much difficulty. The only snaps/ guides are where it connects to the front half.

For the front, start by taking off the decorative panel. It may theoretically not be necessary to remove, however, it does make everything much easier as it gives a place to grab. This is probably the most suborn, over engineered piece of trim in the entire car, so I highly recommend watching a you-tube video on it if you have not yet to avoid breaking any snaps. To my knowledge, it is the same with all year models to date of the CX-5 (2016.5).
I also removed the trim around the head unit and the glove box because of what I was doing, but these should not be necessary. The head unit trim pops out pretty easy, and for the glove box is also easy. Again, same with previous year models, so a quick you-tube search will come up with instructions.

Next, we are going to remove the side walls which are the panels at the bottom front of the center console, under the dash. To remove, pull out gently on the top and bottom, on the side towards the back of the car (2 clips circled in yellow below). The front is just a guide, so it should now slide right out.
Next, remove the upper outside panels on the center console near the shifter, which is obviously missing in the picture above. it just has some snaps holding it in place, so it is pretty easy to remove, even without a trim puller. It just pulls straight out.
These two panels expose 2 screws on each side, circled in red above, which will need to be removed.
Our next step gets a bit tricky, and this is where the shifter being in park was giving me problems. First remember to unplug the cable going down. I could not figure out how to remove the head or anything which would have made life easier. The trim piece around the shifter lifts up pretty easy, but is then stuck on the shifter because of the faux leather.
There are three screws on the panel underneath which can be undone to remove the rim which holds the leather to the rest of the trim. I have circled them in red in both images below to give you an orientation. The leather is also attatched in 3 places which should be fairly obvious and is easy to remove. Once the screws are out, the rim holding the leather should slide out of the guides circled in blue and the trim should come off.


After getting that part off, you can now remove the inside upper panels by the shifter. Just as the upper outside panels, there are some clips holding it in, and it just takes a little outward force to remove them.

The next part to come off would be the front side sections of the center console. I did not get any good pictures unfortunately, so there is only an after one below.
This trim has some clips (Red), 1 latitudinal rod guide (Green), and 1 longitudinal placement guide (Blue).
The trick is to undo the clips on both sides, get the rod out, and slide it forward past the guides at the bottom, and pull the whole unit away from the dash. You may have better luck undoing the brace holding the sides together (which is visible in the picture with the wire clips). While no one part is particularly difficult, with how flimsy the entire unit is, it is a bit like rubbing your belly and tapping your head.(spin) Again, just pay attention to those two guides and you should be fine, for both removal and placement. This is also where having the decorative trim removed comes in handy as the trim goes all the way up next to the climate controls.
Almost done! Last is the cubby, which also with the shifter forward requires some Tetris skills. It has 2 cables feeding it on the back, which are easier to remove from the passenger side. After that, twist, turn, and flip whatever way you can and it will eventually come out. You will likely not notice it getting it out, but when placing it, there is a guide on the back to make sure it sits in the right place.
Once I had everything removed, again, I went and cleaned everything. The center console is probably one of the hardest parts to clean and gets the most grime accumulation.
To put everything back, simply follow this in reverse. Good luck, and happy console modding!
Как разобрать ценральную консоль и бороду до подлокотника

И поскольку сразу посыпались вопросы как это все разобрать решил сотворить эту запись, пока помню.
Буду использовать свои фото и фото найденные в инете.
Во-первых, сразу надо оговориться что существует очень много различных вариантов исполнения салона у фокусов, в зависимости от года и комплектации. Я описываю лишь свой вариант, а именно ФФ2, 2008 год, испанец, комплектация Ghia SE, магнитола квадрат.
Итак. Порядок не обязательно такой. Мы пойдем сверху вниз.
1. Снимаем рамку, которая вокруг магнитолы.
Для начала вынимаем магнитолу и видим вот такую картину.
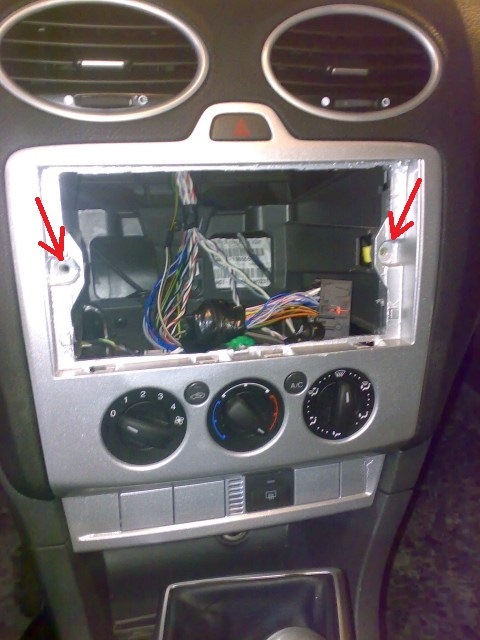
Чтобы открутить эти болты понадобится отвертка или насадка типа torx соответствующего диаметра.
Вот такая, если кто не знает

Больше эта накладка никак не закреплена и её можно аккуратно тянуть на себя.
2. Далее снимаем рамку обогревов.
Как только сняли верхнюю рамку вам откроются еще 2 точно таких же болта как и ранее.
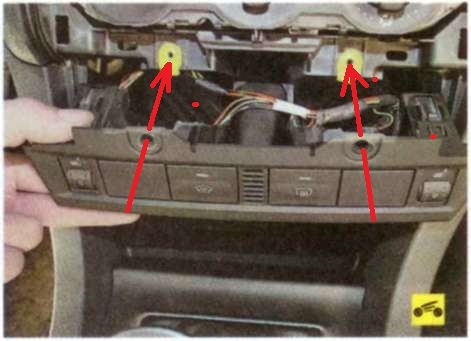
Как только всё открутили, можно будет немного вытянуть рамку на себя. Чтобы снять её полностью надо отсоединить разъемы от кнопок обогревов (у кого-то еще кнопка ЕСП). Разъемы от крутилок обогрева сидений отсоединять не нужно. Блоки с крутилками отделяются от рамки вместе с проводами. Там все легко и просто.
3. Далее у нас вроде по порядку идет мини-бардачок (у кого-то пепельница)…но не тут то было. Эту штуку мы пока пропускаем.
На данном этапе нам нужно снять пластик, который идет к подлокотнику.
а) Для этого сначала снимаем вот этот кожух ручки КПП.

Этот кожух держится только на каких-то защелках. Поэтому поддеваем его снизу и тянем аккуратно вверх.

б) Теперь у нас появляется возможность убрать прикуриватель. Его мы просто выталкиваем снизу рукой просунутой через открывшуюся полость в раойне кпп. Отсоединяем провода и всё.
в)Теперь открываем подлокотник и откручиваем вот эти 2 болта

Откручиваем и отводим в сторону чтобы не мешалась.

г) Далее надо вытащить резиновый коврик из ниши для всякой мелочевки. Под ним мы обнаружим очередной винтик.
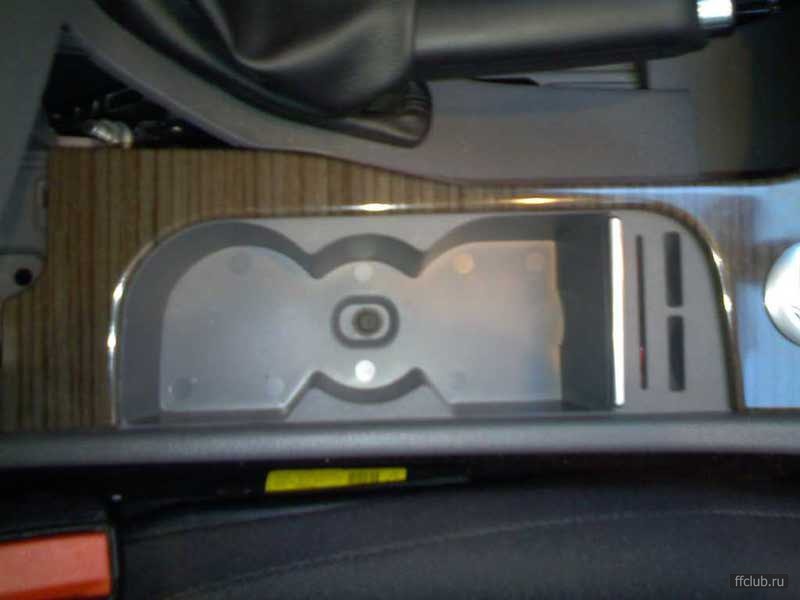
д) Теперь можно снимать всю эту бороду.
Сначала поднимаем вверх ту сторону что ближе к подлокотнику.
Потом цепляемся покрепче и тянем на себя всю эту пластмассу. Она держится на 4 защелках в указанных местах

Тянуть нужно по направлению к потолочному плафону примерно.
4. Как только сняли всю эту бороду, нашему взгляду откроются еще 2 болтика вот в этих местах

Именно эти пара болтов держат мини-бардачок (пепельницу).
5. Вот собственно и всё. В итоге у вас должен быть на руках примерно вот такой наборчик