Как установить WordPress на сервер Ubuntu?
WordPress – это популярная система для блогинга с открытым исходным кодом, использует PHP и MySQL. Система была создана в 2003 году и используется более чем для 22% блогов по всему миру, под неё создано уже больше 20 000 плагинов.
Перед началом работы вам необходимо установить Apache/NginX, MySQL и PHP на ваш VPS, установка описана в отдельной статье.
Шаг 1: Скачиваем WordPress
Мы можем скачать WordPress непосредственно с официального сайта при помощи программы wget:
При помощи данной команды вы скачаете последнюю версию WordPress в вашу домашнюю директорию.
Для разархивирования воспользуемся следующей командой:
mkdir -p /var/www tar -xzvf latest.tar.gz -C /var/www
Шаг 2: Создаем базу данных для WordPress и пользователя
После разархивации файлы будут расположены в директории /var/www/wordpress.
Сначала нам необходимо переключиться и создать базу данных под наш будущий проект.
Авторизуемся в шелле MySQL:
После того, как вы вошли в систему, необходимо создать нового пользователя и базу данных. Не забывайте, что каждая из команд в MySQL должна заканчиваться точкой с запятой.
Для начала создадим базу данных(для примера, мы назовём ее wordpress, вы же можете выбрать любое название).
CREATE DATABASE wordpress; Query OK, 1 row affected (0.00 sec)Теперь создадим нового пользователя:
CREATE USER wordpressuser@localhost; Query OK, 0 rows affected (0.00 sec)Следующим шагом необходимо назначить привилегии нашему новому пользователю, иначе установщик WordPress не сможет запуститься.
GRANT ALL PRIVILEGES ON wordpress.* TO wordpressuser@localhost IDENTIFIED BY 'password'; Query OK, 0 rows affected (0.00 sec)Убедимся, что назначенные права в MySQL применились:
FLUSH PRIVILEGES; Query OK, 0 rows affected (0.00 sec)Теперь выйдем из MySQL и продолжим установку WordPress.
Шаг 3: Подготавливаем установочные файлы WordPress
Первым делом нам необходимо создать установочный файл wp-config, для ускорения мы сделаем это на базе файла-примера — wp-config-sample.php.
cd /var/www/wordpress cp wp-config-sample.php wp-config.phpsudo nano wp-config.php
Найдите следующий блок в файле и замените названия базы данных, пользователя и пароль.
// ** MySQL settings - You can get this info from your web host ** // /** The name of the database for WordPress */define('DB_NAME', 'wordpress'); /** MySQL database username */ define('DB_USER', 'wordpressuser'); /** MySQL database password */ define('DB_PASSWORD', 'password');Сохраните и выйдите.
Создадим виртуальный хост в apache:
sudo nano /etc/apache2/sites-available/wordpress.conf DocumentRoot /var/www/wordpress/ ServerName example.com ErrorLog /var/log/apache2/wordpress_error.log CustomLog /var/log/apache2/wordpress_access.log common Options FollowSymLinks Options +Indexes AllowOverride All Order allow,deny Allow from all sudo ln -s /etc/apache2/sites-available/wordpress.conf /etc/apache2/sites-enabled/ sudo /etc/init.d/apache2 reloadШаг 4: Выполняем копирование файлов
Теперь необходимо выставить разрешения на доступ доступ к директории. Перейдем в неё:
sudo chown -R www-data:root /var/www/wordpressПосле этого остается заполнить небольшую веб-форму непосредственно на сайте и WordPress будет установлен.
Для работы веб-формы требуется особый модуль php. Если он у вас не установлен, то установите его данной командой:
sudo apt-get install php5-gd
Шаг 5: Завершаем установку
После этого остается только закончить установку на нашем сайте. Для этого зайдите на страницу install.php, добавив к ip-адресу или домену вашего сайта
и заполните предлагаемую форму.
How To Install WordPress on Ubuntu 22.04 with a LAMP Stack

WordPress is a popular, open-source content management system (CMS) that allows users to create, customize, and manage content on their website. A CMS provides the basic infrastructure to build a website, which is useful for users who may not have the knowledge to build and code their own website from scratch. The WordPress CMS has many customization tools, such as an administrative dashboard with a user-friendly interface to create new web pages, add media, and more. For these reasons, WordPress is one of the most used CMS in the market today.
There are many different approaches to getting access to WordPress, but some setup processes are more complex than others. This tutorial is intended for those who desire to install and administer a WordPress instance on an unmanaged cloud server via the command line. Though this approach requires more steps than a ready-made WordPress installation, it offers administrators greater control over their WordPress environment.
This tutorial will be using a LAMP (Linux, Apache, MySQL, and PHP) stack, which is one option for a server architecture that supports WordPress by providing the Linux operating system, Apache web server, MySQL database, and PHP programming language. We’ll install and set up WordPress via LAMP on a Linux Ubuntu 22.04 server.
Depending on your needs and goals, you may find other options that are more suitable. As open-source software, WordPress can be freely downloaded and installed, but to be available on the web, you will likely need to purchase cloud infrastructure and a domain name. Continue following this guide if you are interested in working through the server-side installation and setup of a WordPress site.
If you are looking to access a ready-made WordPress installation, DigitalOcean Marketplace offers a one-click app to get you started with WordPress through installation when spinning up your server.
Prerequisites
To complete this tutorial, you will need:
- One Ubuntu 22.04 server set up by following the Ubuntu 22.04 initial server setup guide. Ensure you have a non-root sudo user and firewall enabled.
- A LAMP stack installed on your server. Follow our guide on How To Install Linux, Apache, MySQL, PHP (LAMP) stack on Ubuntu 22.04 to install and configure this software.
- Your site secured with TLS/SSL certificates. WordPress takes in user input and stores user data, so it is important for it to have a layer of security. TLS/SSL is the technology that allows you to encrypt the traffic from your site so that your and your users’ connection is secure. Here are two options available to meet this requirement:
- If you have a domain name you can secure your site with Let’s Encrypt, which provides free, trusted certificates. Follow our Let’s Encrypt guide for Apache to set this up.
- If you do not have a domain and you are just using this configuration for testing or personal use, you can use a self-signed certificate instead. This provides the same type of encryption, but without domain validation. Follow our self-signed SSL guide for Apache to get set up.
When you are finished with the setup, log into your server as your sudo user and continue to the first step.
Step 1 — Creating a MySQL Database and User for WordPress
The first step is a preparatory one. WordPress uses MySQL to manage and store site and user information. You have MySQL installed already, but need to make a database and a user for WordPress to use.
To get started, log into the MySQL root (administrative) account by issuing the following command (note that this is not the root user of your server):
Note: If you installed MySQL by following a tutorial other than the one listed in the prerequisites, you may have enabled password authentication for your root MySQL user. If so, you can connect to MySQL with the following command:
Within the database, create a dedicated database for WordPress to control. You can call this whatever you would like, but we will be using the name wordpress in this guide. Create the database for WordPress by running the following command:
Note: Every MySQL statement must end in a semi-colon ( ; ). Check to make sure this is present if you are running into any issues.
Next, you’re going to create a separate MySQL user account that you’ll use exclusively to operate your new database. Creating specific databases and accounts can support you from a management and security standpoint. We will use the name wordpressuser in this guide, but feel free to use any name you prefer for this use.
You can create this user by running the following command. Remember to choose a strong password here for your database user where we have password :
Next, let the database know that your wordpressuser should have complete access to the database you set up:
You now have a database and user account, each made specifically for WordPress. You need to flush the privileges so that the current instance of MySQL knows about the recent changes made:
Exit out of MySQL by writing the following:
In the next step, you’ll lay some foundations for WordPress plugins by downloading PHP extensions for your server.
Step 2 — Installing Additional PHP Extensions
When setting up our LAMP stack, we only required a very minimal set of extensions in order to get PHP to communicate with MySQL. WordPress and many of its plugins, however, leverage additional PHP extensions.
You can download and install some of the most popular PHP extensions for use with WordPress. But first, use the APT package management tools to update your local package index:
Then you can install the various PHP extensions for WordPress:
This will lay the groundwork for installing additional plugins on your WordPress site.
Note: Each WordPress plugin has its own set of requirements. Some may require additional PHP packages to be installed. Check your plugin documentation to discover its PHP requirements. If they are available, they can be installed with apt as demonstrated in the previous example.
You’ll need to restart Apache to load these new extensions. In the next section, you’ll make some more tweaks to Apache’s configuration, so you can wait until then, or restart now to complete the PHP extension process:
After you’ve restarted, or if you’re choosing to wait, you can continue to the next section to begin making adjustments to the Apache configuration.
Step 3 — Adjusting Apache’s Configuration to Allow for .htaccess Overrides and Rewrites
Next, you’ll be making a few minor adjustments to your Apache configuration. Based on the prerequisite tutorials, you should have a configuration file for your site in the /etc/apache2/sites-available/ directory.
In this guide, we’ll use /etc/apache2/sites-available/ wordpress .conf as an example, but you should substitute the path to your existing configuration file where appropriate. Additionally, we will use /var/www/ wordpress as the root directory of our WordPress installation. You should use the web root specified in your own configuration. If you followed our LAMP tutorial, it may be your domain name instead of wordpress in both of these instances.
Note: It’s possible you are using the 000-default.conf default configuration (with /var/www/html as your web root). This is fine to use if you’re only going to host one website on this server. If not, it’s better to split the necessary configuration into logical chunks, one file per site.
With your paths identified, you can move on to working with .htaccess so that Apache can handle configuration changes on a per-directory basis.
Enabling .htaccess Overrides
Currently, the use of .htaccess files is disabled. WordPress and many WordPress plugins use these files extensively for in-directory tweaks to the web server’s behavior.
Open the Apache configuration file for your website with your preferred text editor. Here, we’ll use nano :
To allow .htaccess files, you need to set the AllowOverride directive within a Directory block pointing to your document root. Add the following content inside the VirtualHost block in your configuration file, making sure to use the correct web root directory:
/etc/apache2/sites-available/wordpress.conf
. . . wordpress/> AllowOverride All . . .When you are finished, save and close the file. In nano , you can do this by pressing CTRL and X together, then Y , and ENTER .
Enabling the Rewrite Module
Next, you can enable mod_rewrite so that you can use the WordPress permalink feature:
This allows you to have more human-readable permalinks to your posts, like the following two examples:
http://example.com/2012/post-name/ http://example.com/2012/12/30/post-nameThe a2enmod command calls a script that enables the specified module within the Apache configuration.
Enabling the Changes
Before implementing the changes you’ve made, check to make sure you haven’t made any syntax errors by running the following test:
You may receive output like the following:
OutputAH00558: apache2: Could not reliably determine the server's fully qualified domain name, using 127.0.1.1. Set the 'ServerName' directive globally to suppress this message Syntax OKIf you wish to suppress the top line, add a ServerName directive to your main (global) Apache configuration file at /etc/apache2/apache2.conf . The ServerName can be your server’s domain or IP address. This is just a warning message, however, and doesn’t affect the functionality of your site. As long as the output contains Syntax OK , you are ready to continue.
Restart Apache to implement the changes. Make sure to restart now even if you have restarted earlier in this tutorial:
Next, you’ll download and set up WordPress itself.
Step 4 — Downloading WordPress
Now that your server software is configured, you can download and set up WordPress. For security reasons, it is always recommended to get the latest version of WordPress from their site.
First, change into a writable directory (we recommend a temporary one like /tmp ):
Then download the compressed release with the following curl command:
Extract the compressed file to create the WordPress directory structure:
You’ll be moving these files into your document root momentarily. Before doing so, you can add a dummy .htaccess file so that this will be available for WordPress to use later.
Create the file by running the following:
You’ll also copy over the sample configuration file to the filename that WordPress reads:
-
cp /tmp/wordpress/wp-config-sample.php /tmp/wordpress/wp-config.php
Additionally, create the upgrade directory so that WordPress won’t run into permissions issues when trying to do this on its own following an update to its software:
Now you can copy the entire contents of the directory into your document root. We are using a dot at the end of our source directory to indicate that everything within the directory should be copied, including hidden files (like the .htaccess file we created). Ensure that you replace the /var/www/ wordpress directory with the directory you have set up on your server:
You’re now ready to configure your WordPress directory.
Step 5 — Configuring the WordPress Directory
Before starting the web-based WordPress setup, you need to adjust some items in your WordPress directory.
Adjusting the Ownership and Permissions
Another important step is setting up reasonable file permissions and ownership for the files and directories WordPress uses to function.
Start by giving ownership of all the files to the www-data user and group. This is the user that the Apache web server runs as, and Apache will need to be able to read and write WordPress files in order to serve the website and perform automatic updates.
Update the ownership with the chown command which allows you to modify file ownership. Be sure to point to your server’s relevant directory:
Next, run two find commands to set the correct permissions on the WordPress directories and files. This first find command sets every directory within the /var/www/<>^wordpress directory and sets each one’s permissions to 750 :
This one finds each file within the directory and sets their permissions to 640 :
These permissions should get you working effectively with WordPress, but note that some plugins and procedures may require additional tweaks.
Setting Up the WordPress Configuration File
Now, you need to make some changes to the main WordPress configuration file.
When you open the file, your first task will be to adjust some secret keys to provide a level of security for your installation. WordPress provides a secure generator for these values so that you do not have to try to come up with good values on your own. These are only used internally, so it won’t hurt usability to have complex, secure values here.
To grab secure values from the WordPress secret key generator, run the following:
You will receive unique values that resemble output similar to the following:
Warning! It is important that you request unique values each time. Do NOT copy the following example values!
Outputdefine('AUTH_KEY', '1jl/vqfsDO NOT COPY THESE VALUES c_jThese are configuration lines that you can place directly into your configuration file to set secure keys. Copy the output you received now.
Next, open the WordPress configuration file:
Find the section that contains the example values for those settings:
/var/www/wordpress/wp-config.php
. . . define('AUTH_KEY', 'put your unique phrase here'); define('SECURE_AUTH_KEY', 'put your unique phrase here'); define('LOGGED_IN_KEY', 'put your unique phrase here'); define('NONCE_KEY', 'put your unique phrase here'); define('AUTH_SALT', 'put your unique phrase here'); define('SECURE_AUTH_SALT', 'put your unique phrase here'); define('LOGGED_IN_SALT', 'put your unique phrase here'); define('NONCE_SALT', 'put your unique phrase here'); . . .Delete those lines and insert the values you copied from the command line:
/var/www/wordpress/wp-config.php
. . . define('AUTH_KEY', 'VALUES COPIED FROM THE COMMAND LINE'); define('SECURE_AUTH_KEY', 'VALUES COPIED FROM THE COMMAND LINE'); define('LOGGED_IN_KEY', 'VALUES COPIED FROM THE COMMAND LINE'); define('NONCE_KEY', 'VALUES COPIED FROM THE COMMAND LINE'); define('AUTH_SALT', 'VALUES COPIED FROM THE COMMAND LINE'); define('SECURE_AUTH_SALT', 'VALUES COPIED FROM THE COMMAND LINE'); define('LOGGED_IN_SALT', 'VALUES COPIED FROM THE COMMAND LINE'); define('NONCE_SALT', 'VALUES COPIED FROM THE COMMAND LINE'); . . .Next, you’re going to modify some of the database connection settings at the beginning of the file. You need to adjust the database name, the database user, and the associated password that you configured within MySQL.
The other change you need to make is to set the method that WordPress should use to write to the filesystem. Since you’ve given the web server permission to write where it needs to, you can explicitly set the filesystem method to “direct”. Failure to set this with your current settings would result in WordPress prompting for FTP credentials when performing some actions.
This setting can be added below the database connection settings, or anywhere else in the file:
/var/www/wordpress/wp-config.php
. . . // ** MySQL settings - You can get this info from your web host ** // /** The name of the database for WordPress */ define( 'DB_NAME', 'wordpress' ); /** MySQL database username */ define( 'DB_USER', 'wordpressuser' ); /** MySQL database password */ define( 'DB_PASSWORD', 'password' ); /** MySQL hostname */ define( 'DB_HOST', 'localhost' ); /** Database Charset to use in creating database tables. */ define( 'DB_CHARSET', 'utf8' ); /** The Database Collate type. Don't change this if in doubt. */ define( 'DB_COLLATE', '' ); . . . define('FS_METHOD', 'direct');Save and close the file when you are finished.
Step 6 — Completing the Installation Through the Web Interface
Now that the server configuration is complete, you can complete the installation through the web interface.
In your web browser, navigate to your server’s domain name or public IP address:
https://server_domain_or_IPYou will be prompted to select the language you would like to use:
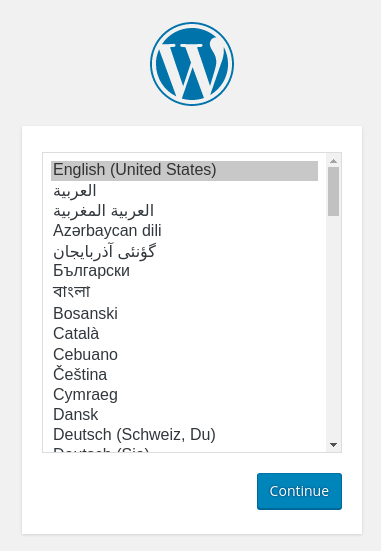
Next, you will come to the main setup page.
Select a name for your WordPress site and choose a username. It is recommended to choose something unique and avoid common usernames like “admin” for security purposes. A strong password is generated automatically. Save this password or select an alternative strong password.
Enter your email address and select whether you want to discourage search engines from indexing your site:
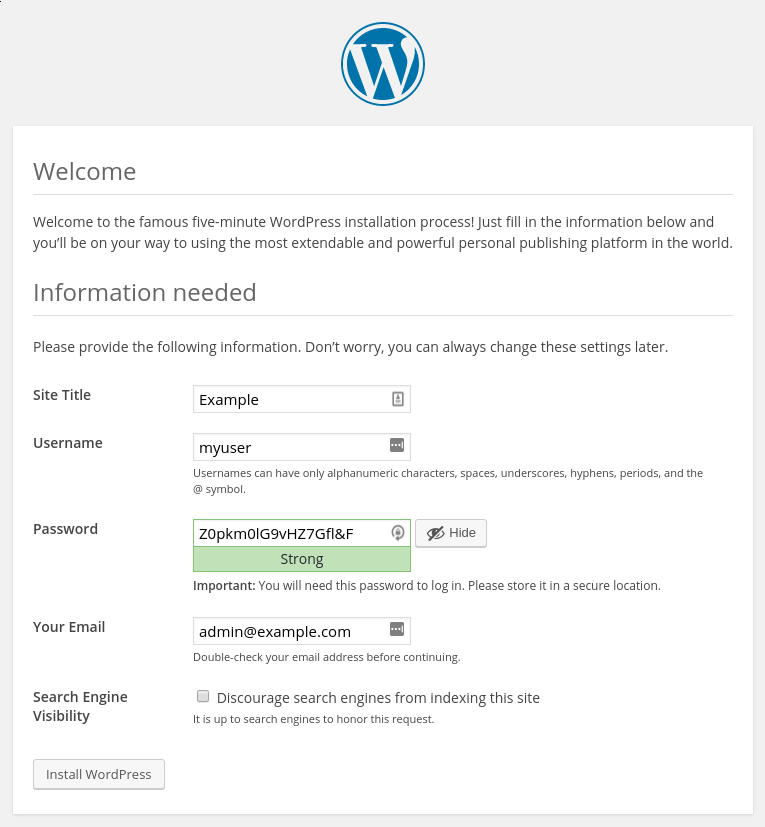
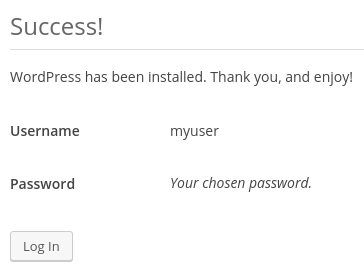
When you click ahead, you will be taken to a page that prompts you to log in:
Once you log in, you will be taken to the WordPress administration dashboard:


At this point, you can begin to design your WordPress website. If this is your first time using WordPress, explore the interface to get acquainted with your new CMS.
Conclusion
Congratulations, WordPress is now installed and is ready to be used.
At this point you may want to start doing the following:
- Choose your permalinks setting for WordPress posts, which can be found in Settings > Permalinks.
- Select a new theme in Appearance > Themes.
- Install new plugins to increase your site’s functionality under Plugins > Add New.
- If you are going to collaborate with others, you may also wish to add additional users at this time under Users > Add New.
You can refer to other resources on alternate ways to install WordPress, learn how to install WordPress on different server distributions, automate your WordPress installations, and scale your WordPress sites by checking out our WordPress Community tag.
Thanks for learning with the DigitalOcean Community. Check out our offerings for compute, storage, networking, and managed databases.
How To Install WordPress on Ubuntu 20.04 with a LAMP Stack
WordPress is an extremely popular open-source technology for making websites and blogs on the internet today. Used by 63% of all websites that use a content management system (CMS), WordPress sites represent 36% of all websites that are currently online.
There are many different approaches to getting access to WordPress and some setup processes are more complex than others. This tutorial is intended for those who desire to install and administer a WordPress instance on an unmanaged cloud server via the command line. Though this approach requires more steps than a ready-made WordPress installation, it offers administrators greater control over their WordPress environment.
If you are looking to access a ready-made WordPress installation, DigitalOcean Marketplace offers a one-click app to get you started with WordPress through installation when spinning up your server.
Depending on your needs and goals, you may find other options that are more suitable. As open-source software, WordPress can be freely downloaded and installed, but to be available on the web, you will likely need to purchase cloud infrastructure and a domain name. Continue following this guide if you are interested in working through the server-side installation and set up of a WordPress site.
This tutorial will be using a LAMP (Linux, Apache, MySQL, and PHP) stack, which is one option for a server architecture that supports WordPress by providing the Linux operating system, Apache web server, MySQL database, and PHP programming language. We’ll install and set up WordPress via LAMP on a Linux Ubuntu 20.04 server.
Prerequisites
In order to complete this tutorial, you will need access to an Ubuntu 20.04 server and will need to complete these steps before beginning this guide:
- Set up your server by following our Ubuntu 20.04 initial server setup guide, and ensure you have a non-root sudo user.
- Install a LAMP stack by following our LAMP guide to install and configure this software.
- Secure your site: WordPress takes in user input and stores user data, so it is important for it to have a layer of security. TLS/SSL is the technology that allows you to encrypt the traffic from your site so that your and your users’ connection is secure. Here are two options available to you to meet this requirement:
- If you have a domain name… you can secure your site with Let’s Encrypt, which provides free, trusted certificates. Follow our Let’s Encrypt guide for Apache to set this up.
- If you do not have a domain… and you are just using this configuration for testing or personal use, you can use a self-signed certificate instead. This provides the same type of encryption, but without the domain validation. Follow our self-signed SSL guide for Apache to get set up.
When you are finished with the setup steps, log into your server as your sudo user and continue below.
Step 1 — Creating a MySQL Database and User for WordPress
The first step that we will take is a preparatory one. WordPress uses MySQL to manage and store site and user information. We have MySQL installed already, but we need to make a database and a user for WordPress to use.
To get started, log into the MySQL root (administrative) account by issuing this command (note that this is not the root user of your server):
You will be prompted for the password you set for the MySQL root account when you installed the software.
Note: If you cannot access your MySQL database via root, as a sudo user you can update your root user’s password by logging into the database like so:
Once you receive the MySQL prompt, you can update the root user’s password. Here, replace new_password with a strong password of your choosing.
You may now type EXIT; and can log back into the database via password with the following command:
Within the database, we can create an exclusive database for WordPress to control. You can call this whatever you would like, but we will be using the name wordpress in this guide. Create the database for WordPress by typing:
Note: Every MySQL statement must end in a semi-colon ( ; ). Check to make sure this is present if you are running into any issues.
Next, we are going to create a separate MySQL user account that we will use exclusively to operate our new database. Creating specific databases and accounts can support us from a management and security standpoint. We will use the name wordpressuser in this guide, but feel free to use whatever name is relevant for you.
We are going to create this account, set a password, and grant access to the database we created. We can do this by typing the following command. Remember to choose a strong password here for your database user where we have password :
Next, let the database know that our wordpressuser should have complete access to the database we set up:
You now have a database and user account, each made specifically for WordPress. We need to flush the privileges so that the current instance of MySQL knows about the recent changes we’ve made:
Exit out of MySQL by typing:
In the next step, we’ll lay some foundations for WordPress plugins by downloading PHP extensions for our server.
Step 2 — Installing Additional PHP Extensions
When setting up our LAMP stack, we only required a very minimal set of extensions in order to get PHP to communicate with MySQL. WordPress and many of its plugins leverage additional PHP extensions.
We can download and install some of the most popular PHP extensions for use with WordPress by typing:
This will lay the groundwork for installing additional plugins into our WordPress site.
Note: Each WordPress plugin has its own set of requirements. Some may require additional PHP packages to be installed. Check your plugin documentation to discover its PHP requirements. If they are available, they can be installed with apt as demonstrated above.
We will need to restart Apache to load these new extensions, we’ll be doing more configurations on Apache in the next section, so you can wait until then, or restart now to complete the PHP extension process.
Step 3 — Adjusting Apache’s Configuration to Allow for .htaccess Overrides and Rewrites
Next, we will be making a few minor adjustments to our Apache configuration. Based on the prerequisite tutorials, you should have a configuration file for your site in the /etc/apache2/sites-available/ directory.
In this guide, we’ll use /etc/apache2/sites-available/ wordpress .conf as an example here, but you should substitute the path to your configuration file where appropriate. Additionally, we will use /var/www/ wordpress as the root directory of our WordPress install. You should use the web root specified in your own configuration. If you followed our LAMP tutorial, it may be your domain name instead of wordpress in both of these instances.
Note: It’s possible you are using the 000-default.conf default configuration (with /var/www/html as your web root). This is fine to use if you’re only going to host one website on this server. If not, it’s better to split the necessary configuration into logical chunks, one file per site.
With our paths identified, we can move onto working with .htaccess so that Apache can handle configuration changes on a per-directory basis.
Enabling .htaccess Overrides
Currently, the use of .htaccess files is disabled. WordPress and many WordPress plugins use these files extensively for in-directory tweaks to the web server’s behavior.
Open the Apache configuration file for your website with a text editor like nano.
To allow .htaccess files, we need to set the AllowOverride directive within a Directory block pointing to our document root. Add the following block of text inside the VirtualHost block in your configuration file, making sure to use the correct web root directory:
/etc/apache2/sites-available/wordpress.conf
wordpress/> AllowOverride All When you are finished, save and close the file. In nano, you can do this by pressing CTRL and X together, then Y , then ENTER .
Enabling the Rewrite Module
Next, we can enable mod_rewrite so that we can utilize the WordPress permalink feature:
This allows you to have more human-readable permalinks to your posts, like the following two examples:
http://example.com/2012/post-name/ http://example.com/2012/12/30/post-nameThe a2enmod command calls a script that enables the specified module within the Apache configuration.
Enabling the Changes
Before we implement the changes we’ve made, check to make sure we haven’t made any syntax errors by running the following test.
You may receive output like the following:
OutputAH00558: apache2: Could not reliably determine the server's fully qualified domain name, using 127.0.1.1. Set the 'ServerName' directive globally to suppress this message Syntax OKIf you wish to suppress the top line, just add a ServerName directive to your main (global) Apache configuration file at /etc/apache2/apache2.conf . The ServerName can be your server’s domain or IP address. This is just a message, however, and doesn’t affect the functionality of your site. As long as the output contains Syntax OK , you are ready to continue.
Restart Apache to implement the changes. Make sure to restart now even if you have restarted earlier in this tutorial.
Next, we will download and set up WordPress itself.
Step 4 — Downloading WordPress
Now that our server software is configured, we can download and set up WordPress. For security reasons in particular, it is always recommended to get the latest version of WordPress from their site.
Change into a writable directory (we recommend a temporary one like /tmp ) and download the compressed release.
Extract the compressed file to create the WordPress directory structure:
We will be moving these files into our document root momentarily. Before we do, we can add a dummy .htaccess file so that this will be available for WordPress to use later.
Create the file by typing:
We’ll also copy over the sample configuration file to the filename that WordPress reads:
-
cp /tmp/wordpress/wp-config-sample.php /tmp/wordpress/wp-config.php
We can also create the upgrade directory, so that WordPress won’t run into permissions issues when trying to do this on its own following an update to its software:
Now, we can copy the entire contents of the directory into our document root. We are using a dot at the end of our source directory to indicate that everything within the directory should be copied, including hidden files (like the .htaccess file we created):
Ensure that you replace the /var/www/ wordpress directory with the directory you have set up on your server.
Step 5 — Configuring the WordPress Directory
Before we do the web-based WordPress setup, we need to adjust some items in our WordPress directory.
Adjusting the Ownership and Permissions
An important step that we need to accomplish is setting up reasonable file permissions and ownership.
We’ll start by giving ownership of all the files to the www-data user and group. This is the user that the Apache web server runs as, and Apache will need to be able to read and write WordPress files in order to serve the website and perform automatic updates.
Update the ownership with the chown command which allows you to modify file ownership. Be sure to point to your server’s relevant directory.
Next we’ll run two find commands to set the correct permissions on the WordPress directories and files:
These permissions should get you working effectively with WordPress, but note that some plugins and procedures may require additional tweaks.
Setting Up the WordPress Configuration File
Now, we need to make some changes to the main WordPress configuration file.
When we open the file, our first task will be to adjust some secret keys to provide a level of security for our installation. WordPress provides a secure generator for these values so that you do not have to try to come up with good values on your own. These are only used internally, so it won’t hurt usability to have complex, secure values here.
To grab secure values from the WordPress secret key generator, type:
You will get back unique values that resemble output similar to the block below.
Warning! It is important that you request unique values each time. Do NOT copy the values below!
Outputdefine('AUTH_KEY', '1jl/vqfsDO NOT COPY THESE VALUES c_jThese are configuration lines that we can paste directly in our configuration file to set secure keys. Copy the output you received now.
Next, open the WordPress configuration file:
Find the section that contains the example values for those settings.
/var/www/wordpress/wp-config.php
. . . define('AUTH_KEY', 'put your unique phrase here'); define('SECURE_AUTH_KEY', 'put your unique phrase here'); define('LOGGED_IN_KEY', 'put your unique phrase here'); define('NONCE_KEY', 'put your unique phrase here'); define('AUTH_SALT', 'put your unique phrase here'); define('SECURE_AUTH_SALT', 'put your unique phrase here'); define('LOGGED_IN_SALT', 'put your unique phrase here'); define('NONCE_SALT', 'put your unique phrase here'); . . .Delete those lines and paste in the values you copied from the command line:
/var/www/wordpress/wp-config.php
. . . define('AUTH_KEY', 'VALUES COPIED FROM THE COMMAND LINE'); define('SECURE_AUTH_KEY', 'VALUES COPIED FROM THE COMMAND LINE'); define('LOGGED_IN_KEY', 'VALUES COPIED FROM THE COMMAND LINE'); define('NONCE_KEY', 'VALUES COPIED FROM THE COMMAND LINE'); define('AUTH_SALT', 'VALUES COPIED FROM THE COMMAND LINE'); define('SECURE_AUTH_SALT', 'VALUES COPIED FROM THE COMMAND LINE'); define('LOGGED_IN_SALT', 'VALUES COPIED FROM THE COMMAND LINE'); define('NONCE_SALT', 'VALUES COPIED FROM THE COMMAND LINE'); . . .Next, we are going to modify some of the database connection settings at the beginning of the file. You need to adjust the database name, the database user, and the associated password that you configured within MySQL.
The other change we need to make is to set the method that WordPress should use to write to the filesystem. Since we’ve given the web server permission to write where it needs to, we can explicitly set the filesystem method to “direct”. Failure to set this with our current settings would result in WordPress prompting for FTP credentials when we perform some actions.
This setting can be added below the database connection settings, or anywhere else in the file:
/var/www/wordpress/wp-config.php
. . . // ** MySQL settings - You can get this info from your web host ** // /** The name of the database for WordPress */ define( 'DB_NAME', 'wordpress' ); /** MySQL database username */ define( 'DB_USER', 'wordpressuser' ); /** MySQL database password */ define( 'DB_PASSWORD', 'password' ); /** MySQL hostname */ define( 'DB_HOST', 'localhost' ); /** Database Charset to use in creating database tables. */ define( 'DB_CHARSET', 'utf8' ); /** The Database Collate type. Don't change this if in doubt. */ define( 'DB_COLLATE', '' ); . . . define('FS_METHOD', 'direct');Save and close the file when you are finished.
Step 6 — Completing the Installation Through the Web Interface
Now that the server configuration is complete, we can complete the installation through the web interface.
In your web browser, navigate to your server’s domain name or public IP address:
https://server_domain_or_IPSelect the language you would like to use:
Next, you will come to the main setup page.
Select a name for your WordPress site and choose a username. It is recommended to choose something unique and avoid common usernames like “admin” for security purposes. A strong password is generated automatically. Save this password or select an alternative strong password.
Enter your email address and select whether you want to discourage search engines from indexing your site:
When you click ahead, you will be taken to a page that prompts you to log in:
Once you log in, you will be taken to the WordPress administration dashboard:
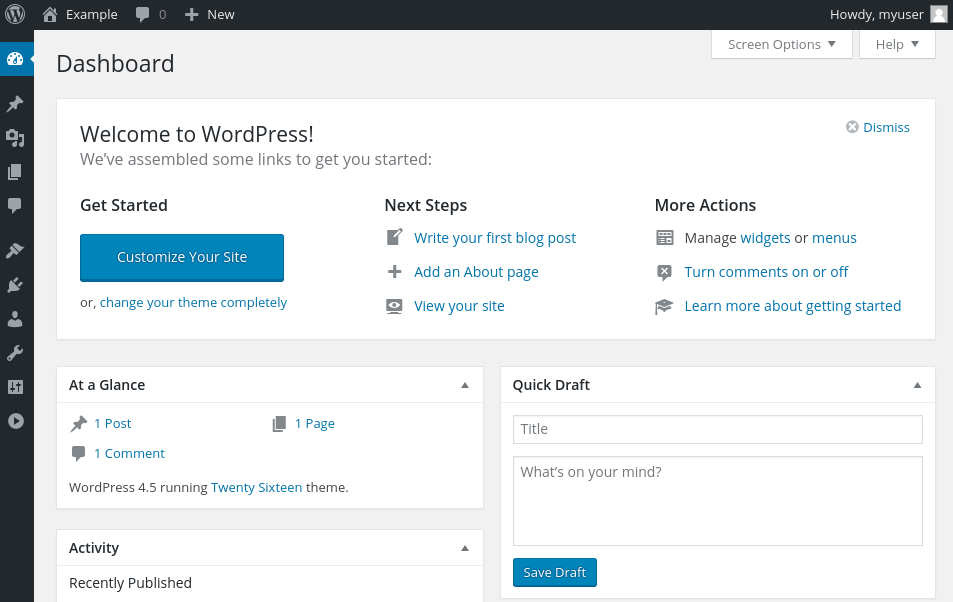
At this point, you can begin to design your WordPress website! If this is your first time using WordPress, explore the interface a bit to get acquainted with your new CMS.
Conclusion
Congratulations, WordPress is now installed and is ready to be used!
At this point you may want to start doing the following:
- Choose your permalinks setting for WordPress posts, which can be found in Settings > Permalinks .
- Select a new theme in Appearance > Themes .
- Install new plugins to increase your site’s functionality under Plugins > Add New .
- If you are going to collaborate with others, you may also wish to add additional users at this time under Users > Add New .
You can find additional resources for alternate ways to install WordPress, learn how to install WordPress on different server distributions, automate your WordPress installations, and scale your WordPress sites by checking out our WordPress Community tag.
Thanks for learning with the DigitalOcean Community. Check out our offerings for compute, storage, networking, and managed databases.
Как установить WordPress на Ubuntu
Хотите установить WordPress на Ubuntu самостоятельно? Если вы любите делать своими руками, читайте дальше, чтобы узнать, как это делается.
- By Ннамди Океке
- обновленный 27 марта 2023
- Время Читать 8 минут

Практичность WordPress сделала его любимцем Интернета, на его долю приходится более 30% всех размещенных веб-сайтов в мире, а также 60% господства среди систем управления контентом.
Хотя он начинался как простой в использовании блоггинг платформы, WordPress также вырос, чтобы включить так много функций. И это делает его отличным инструментом для создания многих типов веб-сайтов.
Многие хостинг-провайдеры предлагают установку WordPress в один клик. Но если вы любите делать что-то самостоятельно или просто хотите установить более современную версию, то это руководство для вас.
Предварительные условия: Обновите или обновите LAMP.
Для работы WordPress требуется стек LAMP (Linux Apache MySQL PHP) или что-то подобное. И поскольку у вас есть Ubuntu, которая удовлетворяет требованиям Linux, вам также необходимо убедиться, что другие компоненты установлены и готовы, прежде чем добавлять WordPress. Обратите внимание, что WordPress может работать в Windows, но лучше всего работает в Linux. Кроме того, вы можете заменить Apache альтернативой, такой как Lightspeed. Но это руководство посвящено LAMP.
Вы также можете обновить систему, чтобы убедиться, что вы используете только последние пакеты. Например, по состоянию на январь 2021 года WordPress доступен в версии 5.6 и требует PHP версии 7.4 и выше и MySQL версии 5.6 и выше. В этом руководстве предполагается, что вы используете Ubuntu 20.04.
Чтобы обновить систему Ubuntu, введите следующие команды:
Обновление sudo apt
sudo apt upgrade
Графическая установка против командной строки
Вы можете установить пакеты LAMP и WordPress либо через командную строку, либо с помощью графического инструмента, такого как Ubuntu Software Center. Но обратите внимание, что последнее возможно только в том случае, если вы используете среду рабочего стола Ubuntu.
В этом пошаговом руководстве предполагается, что вы устанавливаете пакеты в серверной среде без графического пользовательского интерфейса.
Если вы находитесь в среде рабочего стола, вы также можете использовать терминал. Или вы можете выполнить шаги с 1 по 3 с помощью Центра программного обеспечения, а затем продолжить установку с шага 4.
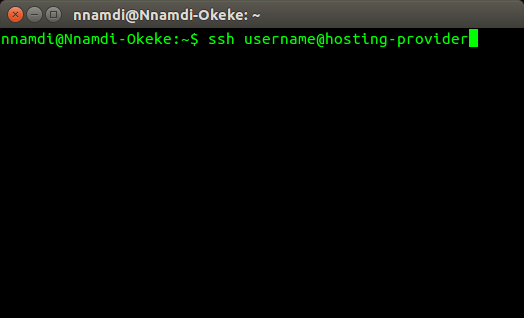
Чтобы войти на удаленный хост, введите:
ssh user@hostname # использовать информацию с вашего хоста
Как установить WordPress на Ubuntu
Выполните следующие действия, чтобы установить WordPress на Ubuntu:
Шаг 1. Установите и настройте Apache
Ничто не работает во всемирной паутине без сервера HTTP (HyperText Transfer Protocol). Итак, вам сначала нужно проверить, работает ли у вас сервер. И если нет, вы устанавливаете один. Мы будем использовать Apache2.
Чтобы проверить, установлен ли Apache, запустите:
sudo systemctl status apache2
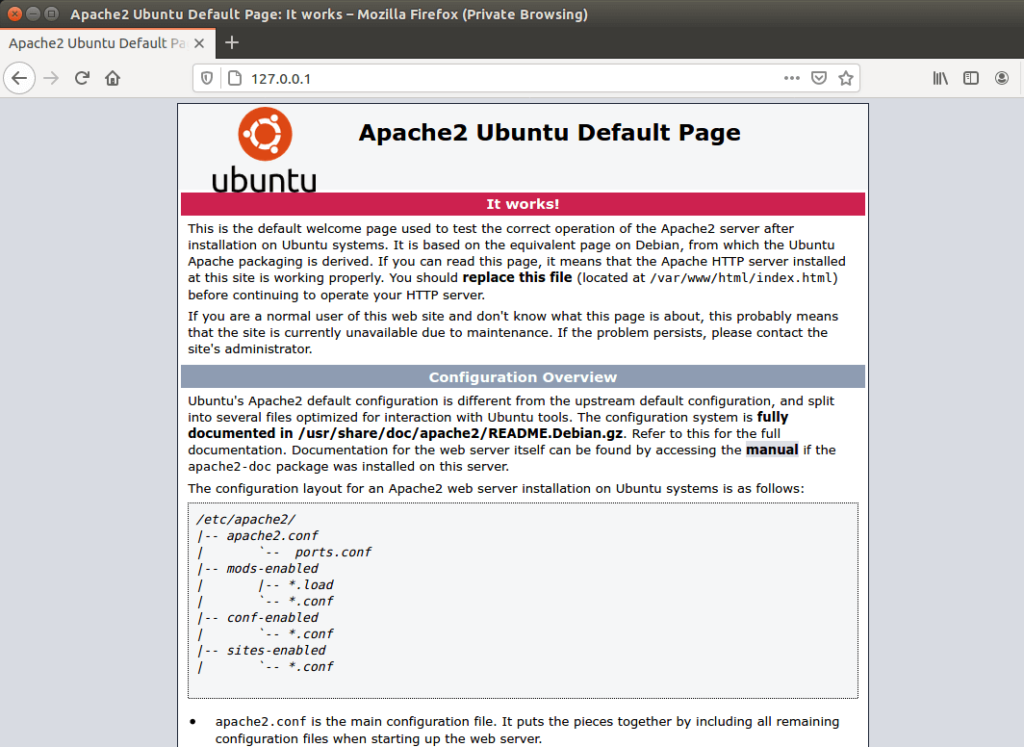
Или введите IP-адрес вашего сервера в веб-браузере. Если Apache находится на локальном компьютере, введите 127.0.0.1 в адресную строку. Вы должны увидеть похожую страницу:
Если Apache не установлен в системе, то установите его с помощью следующей команды:
Обновление sudo apt
sudo apt установить apache2
Затем проверьте приложения, доступные для брандмауэра Ubuntu UFW, используя:
Список приложений sudo ufw
Он должен напечатать что-то вроде:
Вы можете разрешить полный трафик HTTP и HTTPS, выбрав «Apache Full», или разрешить только HTTPS, выбрав «Apache Secure». Например:
sudo ufw разрешить «Apache Secure»
Шаг 2. Установите и настройте MySQL
После того, как ваш Apache установлен и запущен, следующим шагом будет установка MySQL. Вы можете сделать это, введя:
sudo apt установить MySQL-сервер
Это установит все необходимое для запуска базы данных на вашем сервере, включая клиент для среды оболочки. Он попросит вас ввести пароль root (администратора), но вы можете либо ввести его, либо оставить его пустым на потом, во время настройки.
После установки защитите установку с помощью следующей команды:
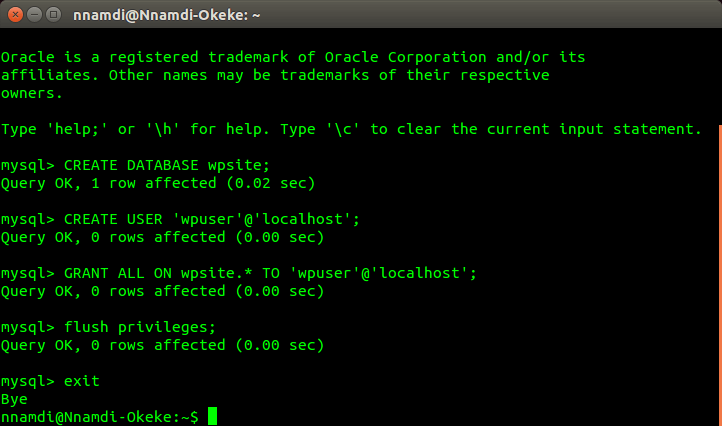
Лучше всего отвечать «да» на все его предложения. Затем войдите в систему с помощью клиента оболочки и создайте базу данных и учетную запись пользователя для WordPress. Вот как вы это делаете.
mysql -u root -p #затем введите свой пароль
mysql> СОЗДАТЬ БАЗУ ДАННЫХ wpsite;
mysql> СОЗДАТЬ ПОЛЬЗОВАТЕЛЯ ‘wpuser’@’localhost’, ОПРЕДЕЛЕННОГО ‘ПАРОЛЕМ’;
mysql> GRANT ALL ON wpsite.* TO ‘wpuser’@’localhost’;
mysql> ПРИВИЛЕГИИ ПРОМЫВКИ;
Шаг 3. Установите и настройте PHP
Теперь пришло время установить PHP-часть установки LAMP. Это тоже просто, просто введите:
sudo apt установить php php-mysql
Или вы можете сразу установить PHP со всеми его популярными расширениями для запуска WordPress, набрав:
sudo apt установить php php-mysql php-gd php-mbstring php-curl php-intl php-zip php-xml php-xmlrpc php-soap
Наконец, используйте nano или ваш любимый редактор, чтобы создать файл index.php в корневом каталоге Apache и сохранить его. Он может содержать простой PHP-скрипт, например:
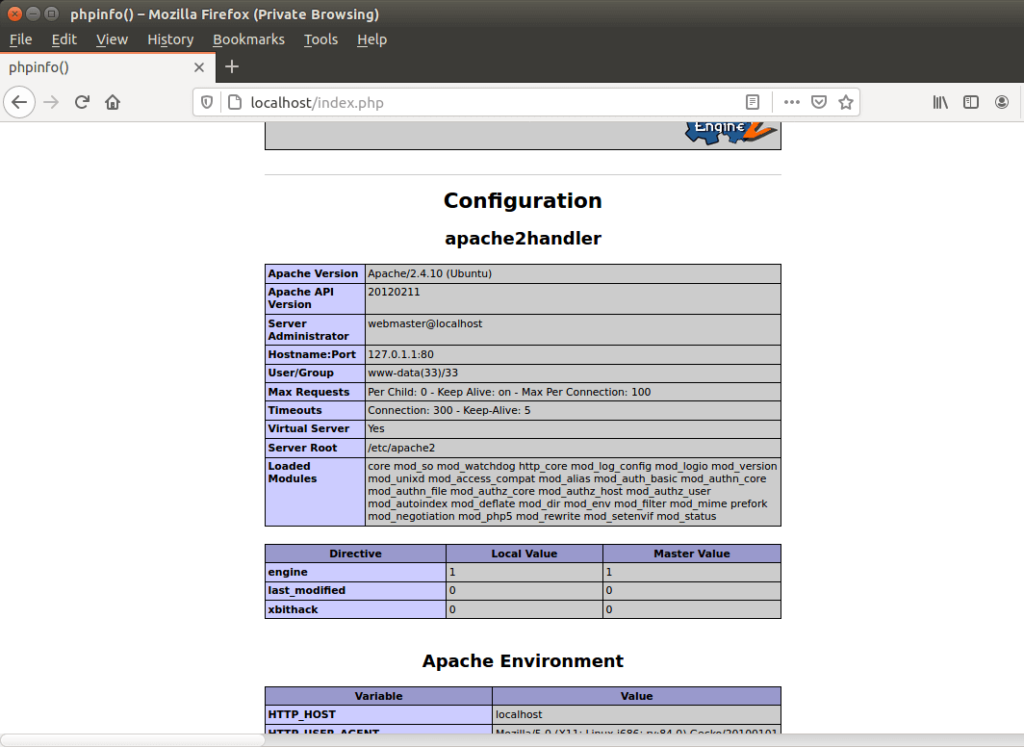
Затем посетите свой сервер Apache в своем браузере, чтобы убедиться, что PHP работает по адресу:
IP-адрес веб-сайта /info.php
Если вы находитесь на локальном компьютере, вы можете посетить:
Обратите внимание, что ваш HTTP-сервер Apache настроен на обслуживание файлов *.html перед файлами *.php. И поскольку теперь у вас есть файлы обоих типов в папке «html», просто введите IP-адрес вашего веб-сайта, и вы увидите страницу приветствия Apache в формате HTML.
Чтобы обслуживать PHP по умолчанию, вам потребуется обновить некоторые файлы конфигурации и перезапустить Apache:
sudo nano /etc/apache2/mods-enabled/dir.conf
DirectoryIndex index.html index.cgi index.pl index.php index.xhtml index.htm
Файл должен выглядеть так, как показано выше. Просто замените index.html на index.php и сохраните. Затем перезапустите Apache, чтобы изменения вступили в силу:
sudo systemctl restart apache2
Ввод только IP-адреса вашего веб-сайта или localhost/127.0.0.1 теперь будет обслуживать index.php по умолчанию.
Шаг 4. Установите и настройте WordPress
Настало время загрузить и установить WordPress. Вы делаете это с помощью следующих команд:
cd /tmp #перейти во временный каталог
wget -c http://wordpress.org/latest.tar.gz #загрузить файл
tar -xzvf последний.tar.gz #извлечение
sudo cp -R wordpress /var/www/html/wordpress # перейти в вашу папку html
sudo chown -R www-data:www-data /var/www/html/wordpress #set owner (группа Apache)
sudo chmod -R 775 /var/www/html/wordpress # установить права на выполнение
Шаг 5. Дальнейшие настройки
До сих пор мы работали только с вашим ip-адресом сайта. Чтобы настроить установку WordPress для работы с вашим доменным именем, выполните следующие действия:
sudo nano /etc/apache2/sites-available/mysite.com.conf
Это должно выглядеть так, как показано ниже, просто измените mysite.com на свой домен.
Имя сервера mysite.com
DocumentRoot / var / www / html / wordpress
CustomLog $ /access.log в сочетании
Затем включите модуль перезаписи Apache, используя:
sudo a2enmod переписать
Эти шаги должны предоставить вам такие причудливые и удобочитаемые URL-адреса, как:
Чтобы завершить настройку, запустите:
sudo apache2ctl configtest #проверить, что все в порядке
sudo a2ensite mysite.com.conf # добавить новую конфигурацию домена
sudo systemctl перезагрузить apache2 # перезапустить сервер
Шаг 6. Запустите и протестируйте
Настройка WordPress завершена, но вам все еще нужно выполнить окончательную установку. Вы делаете это, перейдя в папку WordPress в браузере и следуя инструкциям:
IP-адрес веб-сайта/wordpress или
mysite.com (если вы установили виртуальный хост)
Вам нужно будет создать учетную запись пользователя и ввести данные базы данных MySQL, которые вы создали ранее. Наконец, нажмите кнопку установки и все.
Заключение
Поздравляю, если вы зашли так далеко. Установить WordPress вручную не так просто, как эти простые варианты в один клик, но это очень приятно. Это также позволяет вам настроить свой сервер по своему желанию.
Имейте в виду, что это только начало. Вам могут понадобиться различные плагины WordPress или расширения PHP в будущем, и они могут потребовать от вас выполнения дополнительной работы на сервере.
Ннамди Океке — компьютерный энтузиаст, который любит читать самые разные книги. Он предпочитает Linux, а не Windows/Mac, и использует
Ubuntu с первых дней. Вы можете поймать его в твиттере через БонготраксПолучить технические вещи
Технические тенденции, тенденции стартапов, обзоры, онлайн-доход, веб-инструменты и маркетинг один или два раза в месяц.
Популярное в блоге
- Лучшие бюджетные смартфоны 2023 года (дешевые, но мощные)
- 10 лучших инструментов автоматизации маркетинга для малого бизнеса в 2023 году
- 10 лучших программ для управления проектами на 2023 год (бесплатно и платно)
- Лучшие бюджетные ноутбуки на 2023 год (дешевые, но очень хорошие ноутбуки)
- 5 лучших управляемых хостингов AWS WordPress в 2023 году (Amazon Cloud)
- 7 лучших управляемых Google Cloud WordPress хостингов в 2023 году
- 10 лучших инструментов исследования ключевых слов для SEO в 2023 году
- 10 самых быстрых и лучших тем WordPress в 2023 году
- Как заработать на блоге в 2023 году
- Как привлечь трафик на свой блог в 2023 году
Отказ от ответственности
Некоторые из ссылок здесь являются филиалами. Если вы покупаете через них, вы можете получить эксклюзивную скидку. Он не завышает цену, а предлагает скидку. Покупка по партнерским ссылкам помогает нам продолжать разработку и добавлять на этот сайт больше полезного контента.