What are solutions and projects in Visual Studio?
Applies to: ![]() Visual Studio
Visual Studio ![]() Visual Studio for Mac
Visual Studio for Mac ![]() Visual Studio Code
Visual Studio Code
This article describes the difference between a project and a solution in Visual Studio. It also briefly covers how to create a new project and how to use the Solution Explorer tool window to interact with your projects and solutions.
Projects
When you create an app or website in Visual Studio, you start with a project. In a logical sense, a project contains all files that are compiled into an executable, library, or website. Those files can include source code, icons, images, data files, and more. A project also contains compiler settings and other configuration files that your program might need to communicate with various services or components.
Project file
Visual Studio uses MSBuild to build each project in a solution, and each project contains an MSBuild project file. The file extension reflects the type of project, for example, a C# project (.csproj), a Visual Basic project (.vbproj), or a database project (.dbproj). The project file is an XML document that contains all the information and instructions that MSBuild needs to build your project. Such information and instructions include the content, platform requirements, versioning information, web server or database server settings, and the tasks to perform.
Project files are based on the MSBuild XML schema. To look at the contents of newer, SDK-style project files in Visual Studio, right-click the project node in Solution Explorer and select Edit . To look at the contents of .NET projects, first unload the project (right-click the project node in Solution Explorer and select Unload Project). Then, right-click on the project and choose Edit .
You don’t have to use solutions or projects in Visual Studio to edit, build, and debug code. You can simply open the folder that contains your source files in Visual Studio and start editing. For more information, see Develop code in Visual Studio without projects or solutions.
Create new projects
The easiest way to create a new project is to use a project template for the project type you want. A project template includes a basic set of pregenerated code files, config files, assets, and settings. Use File > New > Project to select a project template. For more information, see Create a new project in Visual Studio.
You can also create a custom project template that you can use to create new projects from. For more information, see Create project and item templates.
When you create a new project, Visual Studio saves it to its default location, %USERPROFILE%\source\repos. To change this location, go to Tools > Options > Projects and Solutions > Locations. For more information, see Options dialog box: Projects and Solutions > Locations.
Solutions
A project is contained within a solution. Despite its name, a solution isn’t an «answer.» It’s simply a container for one or more related projects, along with build information, Visual Studio window settings, and any miscellaneous files that aren’t associated with a particular project.
Solution file
Visual Studio uses two file types (.sln and .suo) to store settings for solutions:
| Extension | Name | Description |
|---|---|---|
| .sln | Visual Studio Solution | Organizes projects, project items, and solution items in the solution. |
| .suo | Solution User Options | Stores user-level settings and customizations, such as breakpoints. |
A solution is described by a text file (extension .sln) with its own unique format; it’s not intended to be edited by hand. Conversely, the .suo file is a hidden file that is not displayed under the default File Explorer settings. To show hidden files, on the View menu in File Explorer, select the Hidden Items checkbox.
Solution folder
A «solution folder» is a virtual folder that’s only in Solution Explorer, where you can use it to group projects in a solution. If you want to locate a solution file on a computer, go to Tools > Options > Projects and Solutions > Locations. For more information, see Options dialog box: Projects and Solutions > Locations.
For an example of a project and solution created from scratch, complete with step-by-step instructions and sample code, see Introduction to projects and solutions.
Solution Explorer
After you create a new project, you can use Solution Explorer to view and manage the project and solution and their associated items. The following illustration shows Solution Explorer with a C# solution that contains two projects:
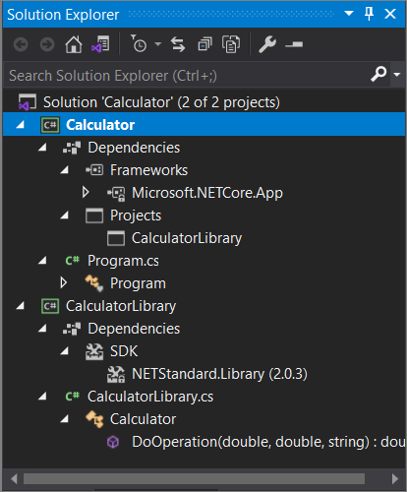
The toolbar across the top of Solution Explorer has buttons to switch from a solution view to a folder view, filter pending changes, show all files, collapse all nodes, view properties pages, preview code in the code editor, and more.
Many menu commands are available from the right-click context menu on various items in Solution Explorer. These commands include building a project, managing NuGet packages, adding a reference, renaming a file, and running tests, just to name a few. For more information, see Learn about Solution Explorer.
Starting with version 17.7, you can also compare files in Solution Explorer by using the right-click context menu options. For more information, see The file comparison tool section of the Learn about Solution Explorer page.
For ASP.NET Core projects, you can customize how files are nested in Solution Explorer. For more information, see File nesting in Solution Explorer.
If you’ve closed Solution Explorer and you want to open it again, choose View > Solution Explorer from the menu bar, or press Ctrl+Alt+L. And, if you’ve closed side tabs and you want to restore them to their default locations, choose Window > Reset Window Layout from the menu bar.
To view the application images and icons that appear in Visual Studio, download the Visual Studio Image Library.
See also
- Manage project and solution properties
- Filtered solutions in Visual Studio
- Project migration and upgrade reference for Visual Studio
Visual Studio Project vs. Solution
I find some missing information in the other answers (at least for people who come from other IDEs like, say, Eclipse) . To say that a solution is a container for projects is only part of the thing. The conceptual feature of a VS project (what determines its ‘granularity’) is that one project produces one output: typically an executable or a library (dll). So, if you are going to code three executables that uses related code, you’ll create one solution and at least three projects — probably more.
answered May 30, 2011 at 20:16
73.8k 21 21 gold badges 142 142 silver badges 191 191 bronze badges
Don’t forget Shared Code projects which can be included without producing an assembly on their own.
Oct 8, 2017 at 8:42
A solution is a container for projects, and tracks dependencies between projects.
answered Mar 5, 2010 at 19:08
1,226 9 9 silver badges 6 6 bronze badges
Just to come up with a metaphor..
A solution is like a house, a project like a room. Each room provides a piece of functionality whereas the house, a container of rooms, provides the means to link the rooms together and organize them appropriately.
Kind of corny but I made it up on the fly, so bear with me 🙂
answered Mar 5, 2010 at 19:11
4,757 3 3 gold badges 29 29 silver badges 36 36 bronze badges
Good explanation. 🙂
Dec 31, 2021 at 14:21
It doesn’t help that Visual Studio seems to make things more confusing. «New Project» actually creates a new SOLUTION containing a project. «Open Project» actually opens a solution containing one (or many) project. (The file menu says «Open Project/Solution» but it really is opening solutions. There is no «Close Project» only «Close Solution» which is accurate.
So, in VS you are always working within a solution. Many solutions contain only one project and newer developers are likely to think of them as the same thing. However you can add other projects into a solution.
answered Sep 17, 2015 at 15:50
371 3 3 silver badges 2 2 bronze badges
What is the point of having multiple projects in one solution? I don’t understand this..
Feb 19, 2020 at 7:18
@Liga You could refer to the answers by David, Cody C and leonbloy.
Jul 4, 2022 at 19:31
In case anyone decides to scroll down this far. I thought the MS docs did a pretty good job at describing the differences. I’ve copy pasted (and rephrased) the relevant bits here:
When you create an app, application, website, Web App, script, plug-in, etc in Visual Studio, you start with a project. In a logical sense, a project contains of all the source code files, icons, images, data files and anything else that will be compiled into an executable program or web site, or else is needed in order to perform the compilation. A project also contains all the compiler settings and other configuration files that might be needed by various services or components that your program will communicate with.
You don’t have to use solutions or projects if you don’t want to. You can simply open the files in Visual Studio and start editing your code.
In a literal sense, a project is an XML file ( .vbproj , .csproj , .vcxproj ) that defines a virtual folder hierarchy along with paths to all the items it «contains» and all the build settings.
In Visual Studio, the project file is used by Solution Explorer to display the project contents and settings. When you compile your project, the MSBuild engine consumes the project file to create the executable. You can also customize projects to product other kinds of output.
A project is contained, in a logical sense and in the file system, within a solution, which may contain one or more projects, along with build information, Visual Studio window settings, and any miscellaneous files that aren’t associated with any project. In a literal sense, the solution is a text file with its own unique format; it is generally not intended to be edited by hand.
A solution has an associated .suo file that stores settings, preferences and configuration information for each user that has worked on the project.
Project management
When you create a C# application in Visual Studio Code, you start with a project. A project contains all files (such as source code, images, etc.) that are compiled into an executable, library, or website. All of your related projects can then be stored in a container called a solution. This article shows you how you can maintain all your projects and their respective files via the Solution Explorer view.
Note: The C# Dev Kit extension is required to use the Solution Explorer view in VS Code.
Solution Explorer
The new C# Dev Kit extension contains a new view in the Primary Sidebar, the Solution Explorer. This view provides a structured view of your application, its solutions, and its projects for effortless, central project management. When you open a Workspace that contains .NET solution files or project files, the Solution Explorer will automatically appear.
If you have a single solution file (.sln file) in the workspace, the Solution Explorer will detect that file and automatically load it after the workspace is loaded. For example, take a look at the animation below showing the experience of opening a workspace with a single solution file.
In the animation above, the workspace was loaded into VS Code for the first time. After the workspace is loaded, the Solution Explorer detects the lone .sln file and automatically loads that.
When you have more than one solution file in the workspace, you will be prompted to select the specific solution file to load. After a solution file is loaded for a workspace, the extension will remember which solution file was loaded last and automatically reload that file when the workspace is loaded in VS Code. In the animation below, you can see the experience of opening a workspace with multiple solution files for the first time.
In the video above, after the workspace is loaded, the Solution Explorer detects that the workspace contains multiple solution files and you are prompted to select the solution to load with the standard VS Code notification. Going forward when you open the same workspace, the Solution Explorer remembers which solution file was loaded last and automatically reload that.
When you have a solution loaded in the Solution Explorer and you would like to close that solution, you can use the Close Solution command. You can find this command in the context menu when you right-click on a solution in the Solution Explorer.

You can also invoke this command in the Command Palette. You can open the Command Palette with ⇧⌘P (Windows, Linux Ctrl+Shift+P ) . This is shown in the following image.
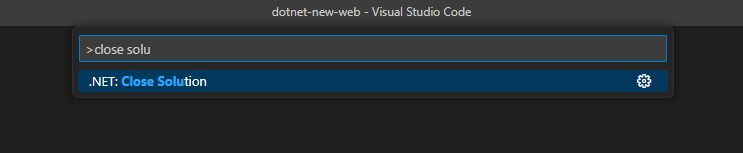
After closing the solution, the Solution Explorer will show a button so that you can open a solution file from the workspace later. You can also invoke that command with the Command Palette with the .NET: Open Solution command.
When you invoke the Open Solution command, if there is a single solution file in the workspace, it will automatically load that. When there are multiple solution files, you’ll be prompted to select the solution file to load. This is the same experience when you first open a workspace with one, or more, solution files. Let’s move on to discuss the support for Solution Folders in the Solution Explorer.
Solution Folders
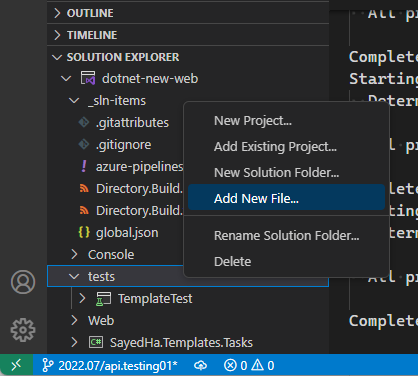
In the Solution Explorer, if a solution contains Solution Folders (virtual folders used to group projects in a solution), they will be displayed. Here, you can interact with Solution Folder contents. To add a new Solution Folder, you can right-click the solution and select the New Solution Folder menu item. Take a look at the short video below.
In the video above, a new Solution Folder named «tests» was created. After creating a Solution Folder, you can add a project into it with the Add Existing Project context menu. The animation below shows this experience.
You can also add a new file to the Solution Folder with the Add New File context menu shown in the following image.
After you invoke this command, you will be prompted to select the file template to be used in the Command Palette. The image below shows this.
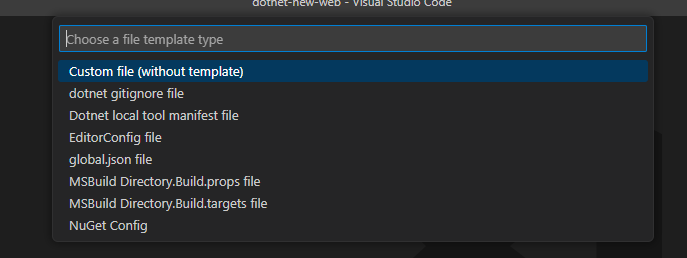
This list shows the file templates that the extension currently supports for Solution Folders. To create a file without using a template (to create a blank file), select Custom file (without template).
To remove a Solution Folder, you can use the Remove context menu option.
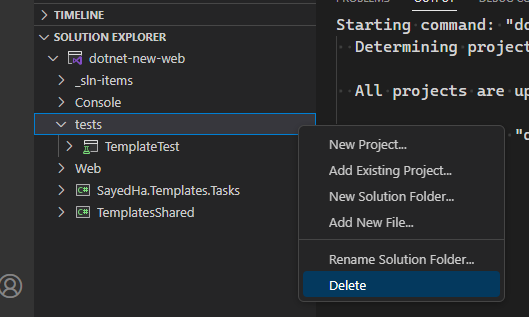
When you remove a Solution Folder from a solution, the Solution Folder and its contents are removed from the solution. The files, and/or projects, that it contains are not deleted from disk. Now that we’ve discussed Solution Folders, let’s move on to see how to interact more with projects in the Solution Explorer.
Working with projects
In the Solution Explorer, there are a number of features to enable you to work with projects. When you first open a solution, you will see the projects and Solution Folders. You can expand Solution Folders or projects to see its contents. The image below shows the Solution Explorer with a few nodes expanded.
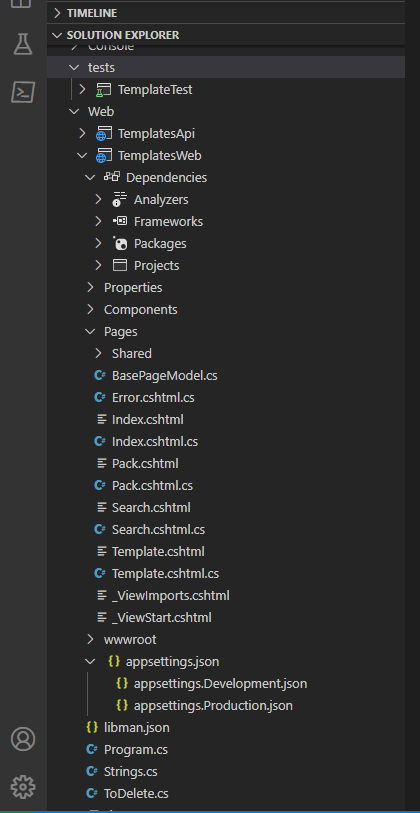
In the image above, we can see the Solution Explorer with a couple Solution Folders expanded, as well as the TemplatesWeb project. There is minimal file nesting supported in this release, we will expand on that support to be more consistent with the file nesting that is seen in Visual Studio IDE.
From here, you can open files by double clicking them in the Solution Explorer. You can also right-click items in the Solution Explorer to get a context specific menu for available actions. For example, to add a new file to a project, right-click on the project and select Add New File. When you select that option, you’ll be prompted to choose the file template to be used for the default content. You’ll get the best experience here if you are working on a project targeting .NET 7.0.200 or above.
You can also add files into projects by creating files as you normally would in VS Code and save them under the folder containing the project file. By default, new files added to the project folder will automatically be added to the project.
In the project view, you can also see the dependencies that the project has, both for Project References as well as Package References. In this version of the C# Dev Kit, you don’t have the ability to modify the dependencies. To add a dependency to a project or package reference, you can use the dotnet add command line tool. To add a package reference, see dotnet add package command — .NET CLI and to add a project reference, see dotnet add reference command — .NET CLI. To remove a reference, use dotnet remove . You can read more information at how to remove a package reference and how to remove a package.
If you would like to see or edit a project file, select the Project node in the Solution Explorer, and the project file will be opened in the editor. This is the same behavior you’ll find when selecting a file in the Solution Explorer.
Using the Solution Explorer, you can also perform common actions such as Build, Rebuild, and Clean using the context menus. You will see these context menus when you have selected the Solution node or project node in the Solution Explorer. This will Build/Rebuild/Clean the selected item as well as its dependencies.
18 хитростей для работы с Visual Studio
Независимо от того, являетесь ли вы новичком или же используете Visual Studio уже в течение многих лет, есть множество советов и хитростей, которые помогут вам стать более продуктивным. Некоторое время мы делились советами в Twitter, используя хештег #vstip, а сегодня собрали подборку лучших из них на сегодняшний день.
Отладчик
Использование F10 вместо F5 для сборки, запуска и присоединения отладчика автоматически прерывается при первом выполнении вашего собственного кода. В точках останова нет необходимости.
Поддерживается начиная с Visual Studio 2005
Reattach to process (Shift+Alt+P) чрезвычайно полезная функция, которая помогает снова и снова присоединяться к одному и тому же процессу.
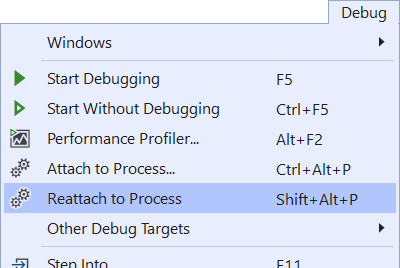
Поддерживается начиная с Visual Studio 2017 v15.8
Синяя точка на поле указывает на переключение потоков при выполнении отладки.
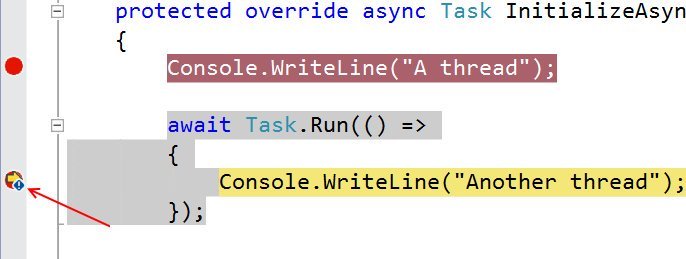
Поддерживается начиная с Visual Studio 2013
Продолжение под катом!
Solution
Повысьте производительность загрузки решения и уменьшите визуальный шум, отключив восстановление расширений узлов в Solution Explorer, а также Reopen documents on solution load.
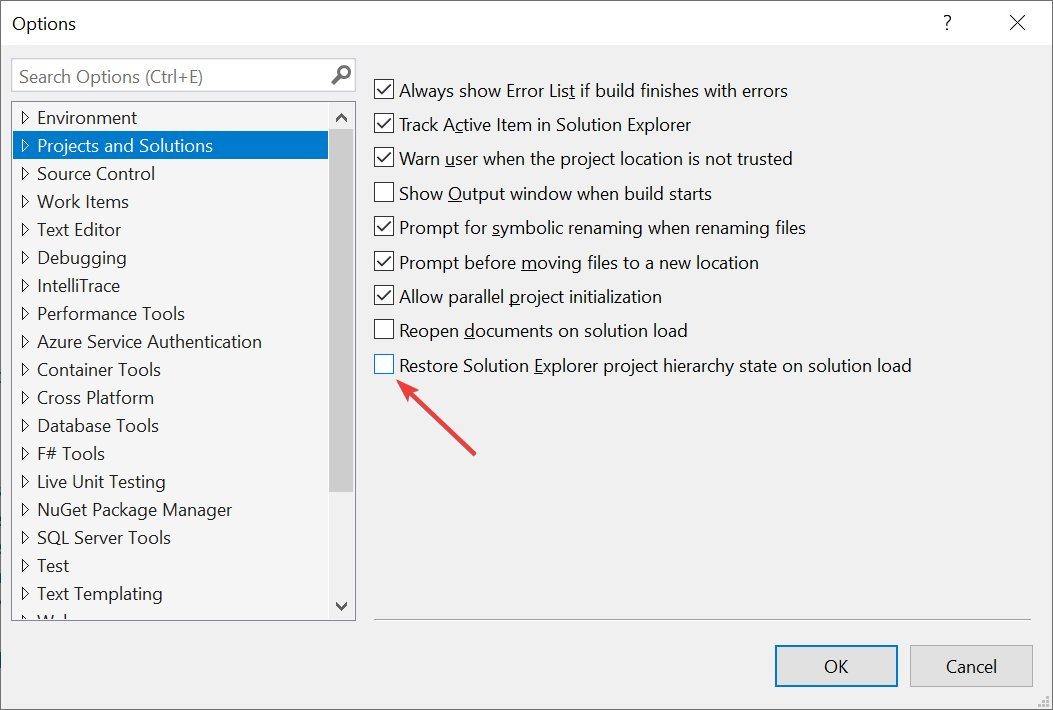
Поддерживается начиная с Visual Studio 2019
Для быстрой навигации используйте Ctrl+T, чтобы найти что-либо в вашем решении — файлы, классы и т. д.

Поддерживается начиная с Visual Studio 2017
Назначьте сочетание клавиш для выполнения “git pull”, чтобы не приходилось использовать для этого CLI или Team Explorer.
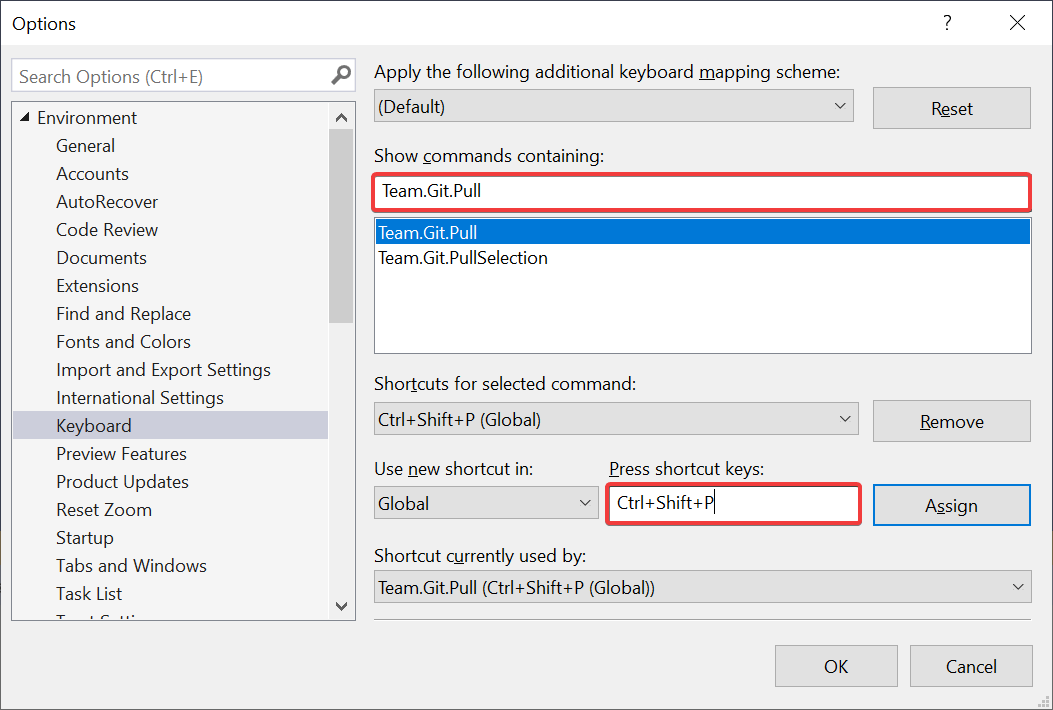
Поддерживается начиная с Visual Studio 2019
Дайте Solution Explorer возможность автоматически выбирать текущий активный документ, чтобы никогда не терять его расположение в проекте.
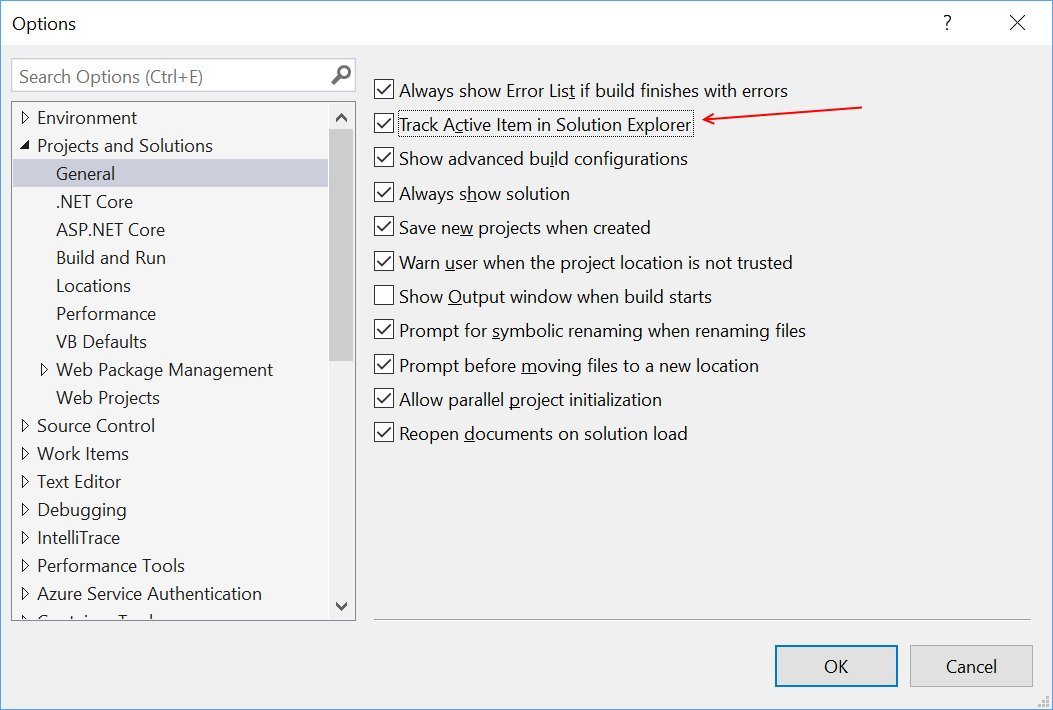
Поддерживается начиная с Visual Studio 2010
Редактор
Легко выделяйте HTML-элементы тегом div, используя комбинацию Shift+Alt+W. Вставленный div вы можете легко отредактировать на любой тег, который вы хотите, и закрывающий тег изменится автоматически.
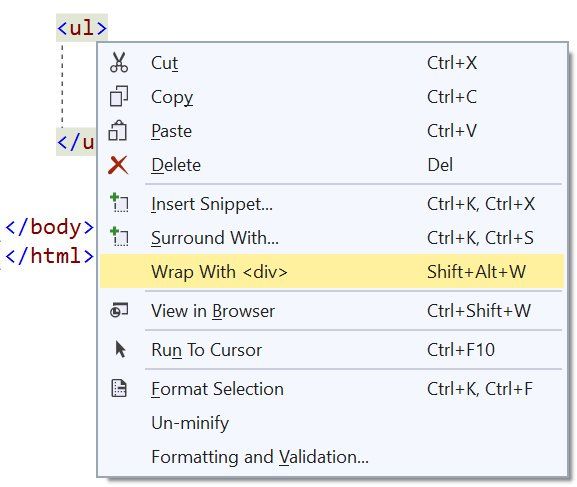
Поддерживается начиная с Visual Studio 2017
Скопируйте любой фрагмент JSON в буфер обмена и вставьте его как строго типизированные классы .NET в любой файл C# или VB.
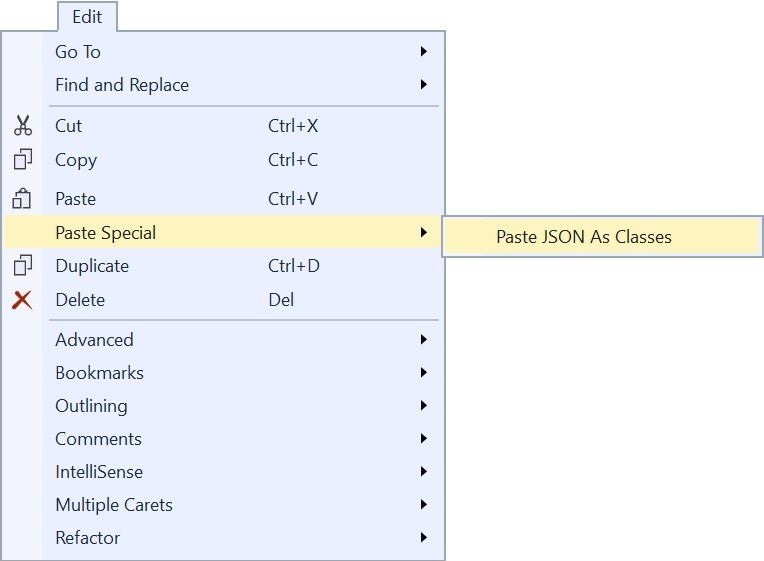
Поддерживается начиная с Visual Studio 2013
Вам не нужно самостоятельно ставить двойные кавычки вокруг имен свойств JSON — просто введите двоеточие, и Visual Studio автоматически поставит их.
Поддерживается начиная с Visual Studio 2015
Сделайте IntelliSense и всплывающие подсказки полупрозрачными на время нажатия и удержания Control.

Поддерживается начиная с Visual Studio 2010
Вместо повторного ввода ‘(‘ для отображения информации о параметрах в сигнатурах методов используйте Ctrl+Shift+Space для отображения используемой в данный момент перегрузки.

Поддерживается начиная с Visual Studio 2010
Прочее
Воспроизведение звука при возникновении определенных событий в Visual Studio.

Поддерживается начиная с Visual Studio 2010
Создавайте собственные макеты окон для конкретных сценариев разработки или настроек монитора, а также легко переключайтесь между ними.
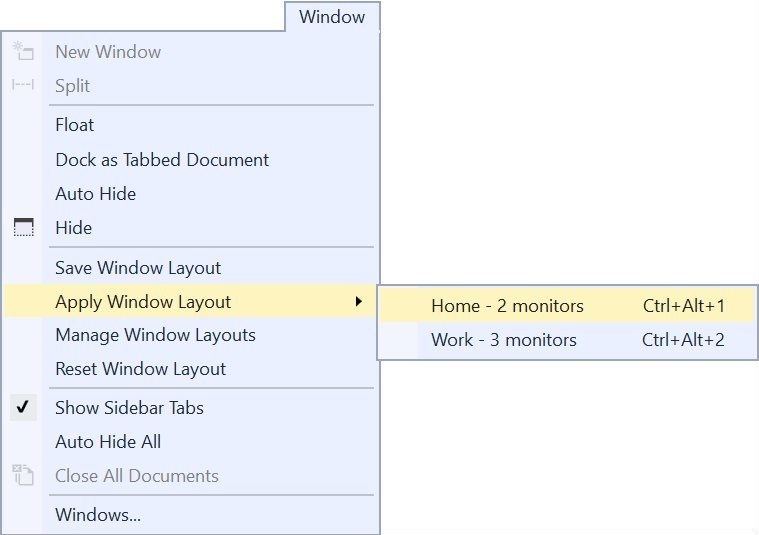
Поддерживается начиная с Visual Studio 2017
Укажите необходимые компоненты Visual Studio для любого решения, и Visual Studio предложит пользователю установить их, если они отсутствуют. Подробнее читайте в статье «Конфигурируйте Visual Studio в вашей организации с помощью .vsconfig».
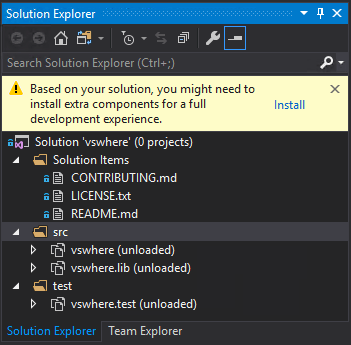
Поддерживается начиная с Visual Studio 2019
Расширения
Visual Studio Spell Checker. Расширение редактора, которое проверяет орфографию комментариев, строк и обычного текста. Оно также может проверять орфографию всего решения, проекта или выбранных элементов. Доступны опции для определения нескольких языков для проверки правописания.

Поддерживается начиная с Visual Studio 2013
Add New File. Расширение для Visual Studio, позволяющее простое добавление новых файлов в любой проект. Просто нажмите Shift+F2, чтобы создать пустой файл в выбранной папке или в той же папке, что и выбранный файл.
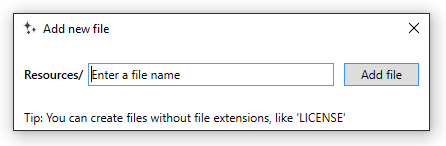
Поддерживается начиная с Visual Studio 2015
Git Diff Margin. Git Diff Margin отображает текущие изменения Git в редактируемом файле на поле и на полосе прокрутки Visual Studio.
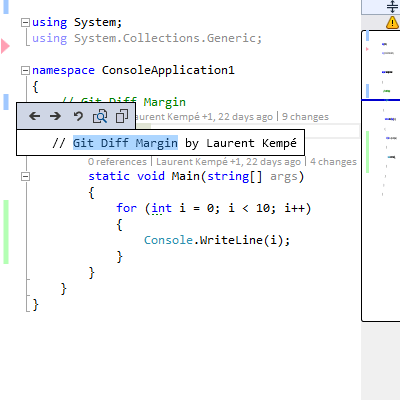
Поддерживается начиная с Visual Studio 2012
Это были лишь несколько из тысяч доступных расширений. Чтобы увидеть больше — перейдите на Visual Studio Marketplace.
В заключение
Это было всего лишь несколько советов из опубликованных по хештегу #vstip в Twitter. Там есть еще много советов, достойных внимания. Также, если у вас есть отличные советы, пожалуйста, поделитесь ими, указав хештег #vstip.
- microsoft
- visual studio
- Блог компании Microsoft
- Программирование
- Visual Studio