C/C++ for Visual Studio Code
C/C++ support for Visual Studio Code is provided by a Microsoft C/C++ extension to enable cross-platform C and C++ development on Windows, Linux, and macOS. When you create a *.cpp file, the extension adds features such as syntax highlighting (colorization), smart completions and hovers (IntelliSense), and error checking.
Install the extension
- Open VS Code.
- Select the Extensions view icon on the Activity bar or use the keyboard shortcut ( ⇧⌘X (Windows, Linux Ctrl+Shift+X ) ).
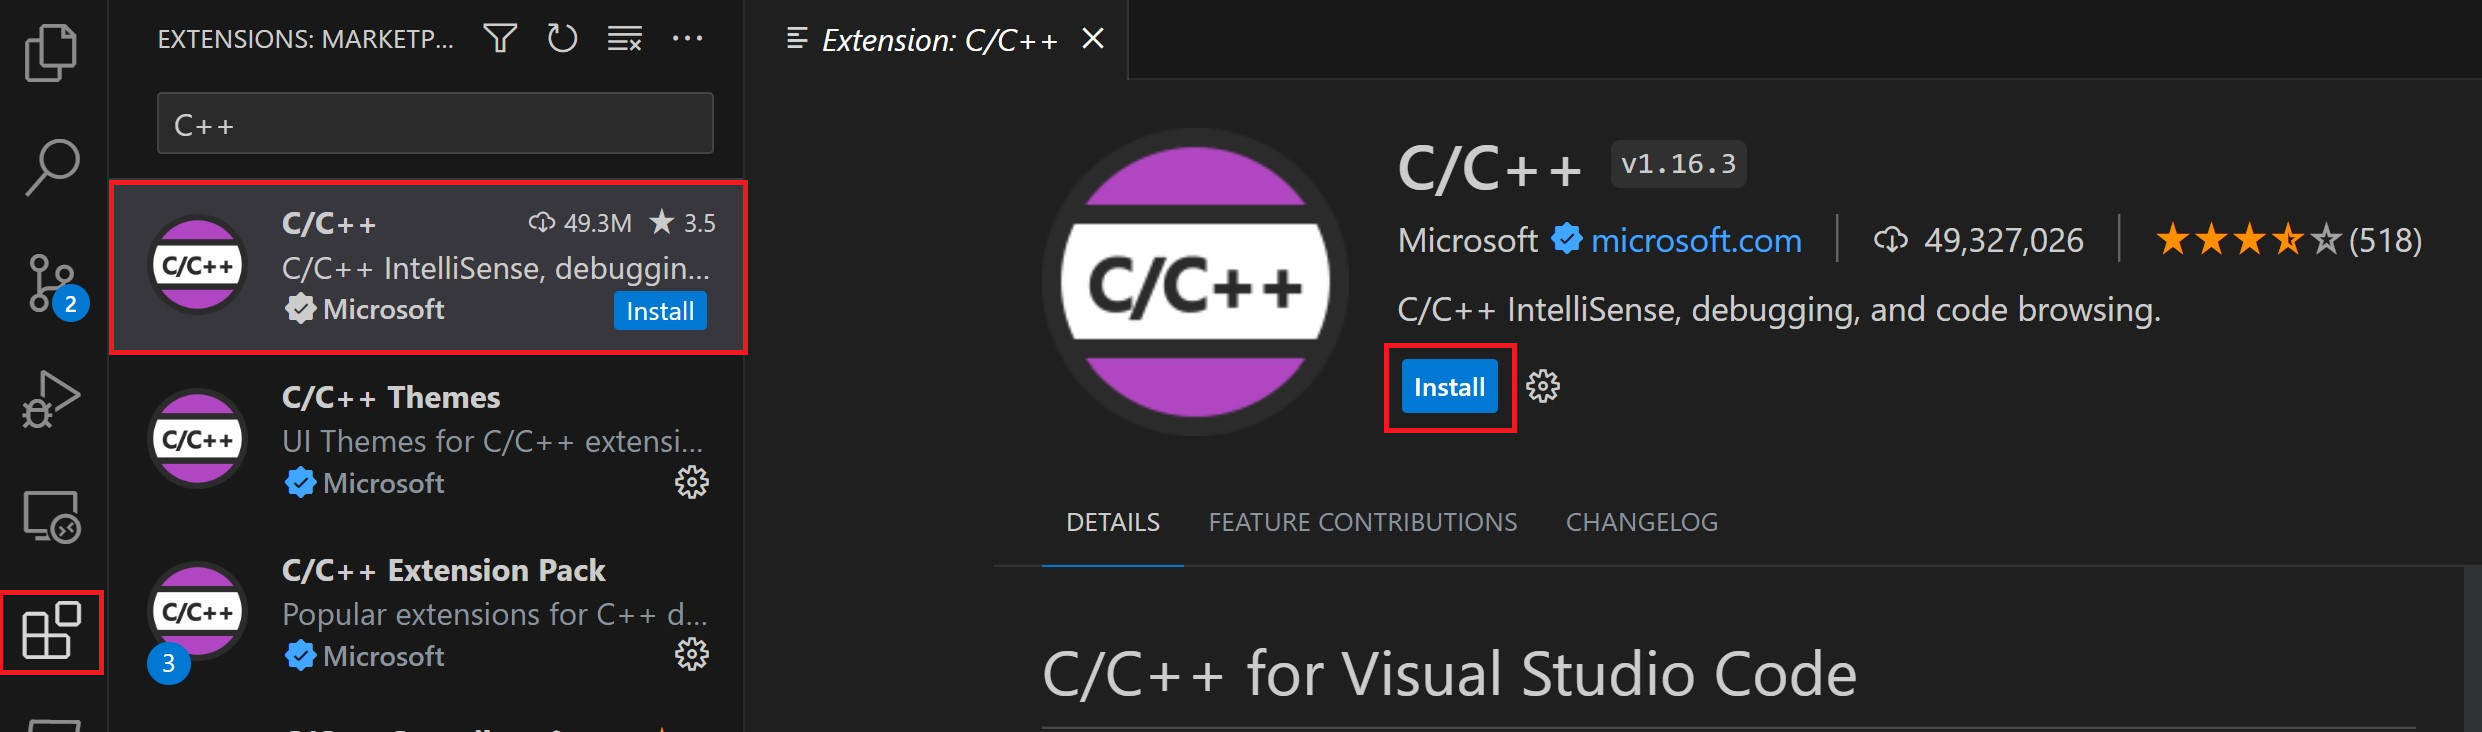
- Search for ‘C++’ .
- Select Install.
Set up your C++ Environment
C++ is a compiled language meaning your program’s source code must be translated (compiled) before it can be run on your computer. The C/C++ extension doesn’t include a C++ compiler or debugger, since VS Code as an editor relies on command-line tools for the development workflow. You need to install these tools or use the tools already installed on your computer.
Check if you have a compiler installed
Note: There may already be a C++ compiler and debugger provided by your academic or work development environment. Check with your instructors or colleagues for guidance on installing the recommended C++ toolset (compiler, debugger, project system, linter).
Common compilers that already come preinstalled on some platforms are the GNU Compiler Collection (GCC) on Linux and the Clang tools with Xcode on macOS.
To check if you already have them installed:
- Open a new VS Code terminal window using ( ⌃⇧` (Windows, Linux Ctrl+Shift+` ) )
- Use the following command to check for the GCC compiler g++ :
g++ --version Or this command for the Clang compiler clang :
clang --version The output should show you the compiler version and details. If neither are found, make sure your compiler executable is in your platform path ( %PATH on Windows, $PATH on Linux and macOS) so that the C/C++ extension can find it. Otherwise, use the instructions in the section below to install a compiler.
Install a compiler
If you don’t have a compiler installed, you can follow one of our installation tutorials:
Windows:
Linux:
macOS:
Note: If you would prefer a full Integrated Development Environment (IDE), with built-in compilation, debugging, and project templates (File > New Project), there are many options available, such as the Visual Studio Community edition.
Example: Install MinGW-x64 on Windows
To understand the process, let’s install Mingw-w64 via MSYS2. Mingw-w64 is a popular, free toolset on Windows. It provides up-to-date native builds of GCC, Mingw-w64, and other helpful C++ tools and libraries.
- Download using this direct link to the MinGW installer.
- Run the installer and follow the steps of the installation wizard. Note, MSYS2 requires 64 bit Windows 8.1 or newer.
- In the wizard, choose your desired Installation Folder. Record this directory for later. In most cases, the recommended directory is acceptable. The same applies when you get to setting the start menu shortcuts step. When complete, ensure the Run MSYS2 now box is checked and select Finish. A MSYS2 terminal window will then automatically open.
- In this terminal, install the MinGW-w64 toolchain by running the following command:
pacman -S --needed base-devel mingw-w64-ucrt-x86_64-toolchain 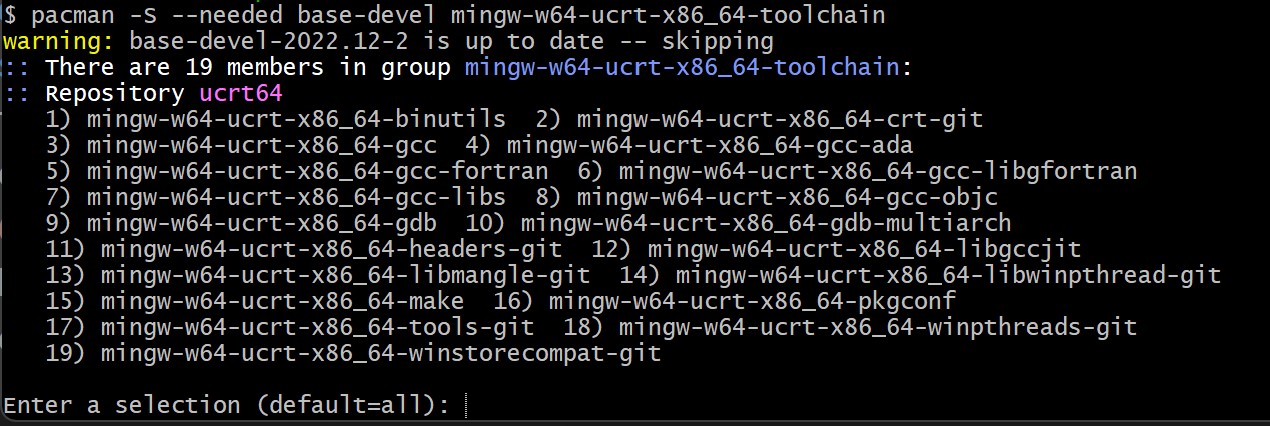
- In the Windows search bar, type Settings to open your Windows Settings.
- Search for Edit environment variables for your account.
- In your User variables, select the Path variable and then select Edit.
- Select New and add the MinGW-w64 destination folder you recorded during the installation process to the list. If you selected the default installation steps, the path is: C:\msys64\ucrt64\bin .
- Select OK to save the updated PATH. For the new PATH to be available, reopen your console windows.
gcc --version g++ --version gdb --version You should see output that states which versions of GCC, g++ and GDB you have installed. If this is not the case, make sure your PATH entry matches the Mingw-w64 binary location where the compiler tools are located or reference the troubleshooting section.
Create a Hello World App
To make sure the compiler is installed and configured correctly, lets create a Hello World C++ program.
Create a C++ file
- On Windows, launch a Windows command prompt (Enter Windows command prompt in the Windows search bar). On macOS and Linux, you can enter these commands in the terminal.
- Run the following commands. They are creating an empty folder called projects where you can place all your VS Code projects. The next commands create and navigate you to a subfolder called helloworld . From there, you are opening helloworld directly in VS Code using the code command.
mkdir projects cd projects mkdir helloworld cd helloworld code . The «code .» command opens VS Code in the current working folder, which becomes your «workspace». Accept the Workspace Trust dialog by selecting Yes, I trust the authors since this is a folder you created.
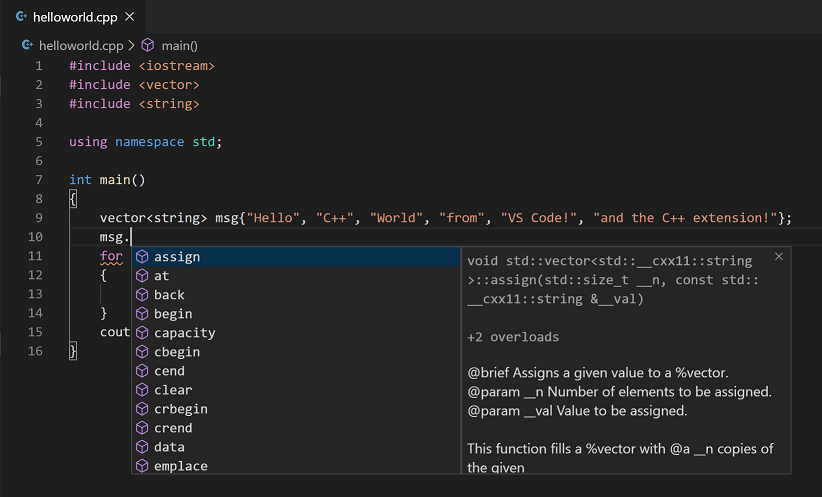
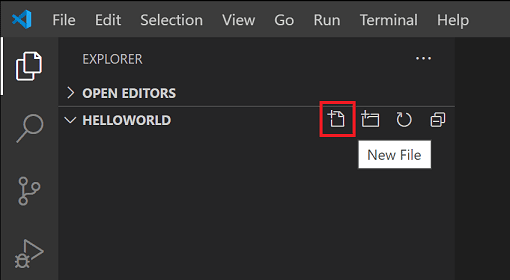
Now create a new file called helloworld.cpp with the New File button in the File Explorer or File > New File command.
Add Hello World source code
Paste in the following source code:
#include int main() std::cout < "Hello World" < std::endl; > Now press ⌘S (Windows, Linux Ctrl+S ) to save the file. You can also enable AutoSave to automatically save your file changes, by checking Auto Save in the main File menu.
Run helloworld.cpp
- Make sure you have helloworld.cpp open so it is the active file in your editor.
- Press the play button in the top right corner of the editor.

- Choose C/C++: g++.exe build and debug active file from the list of detected compilers on your system.
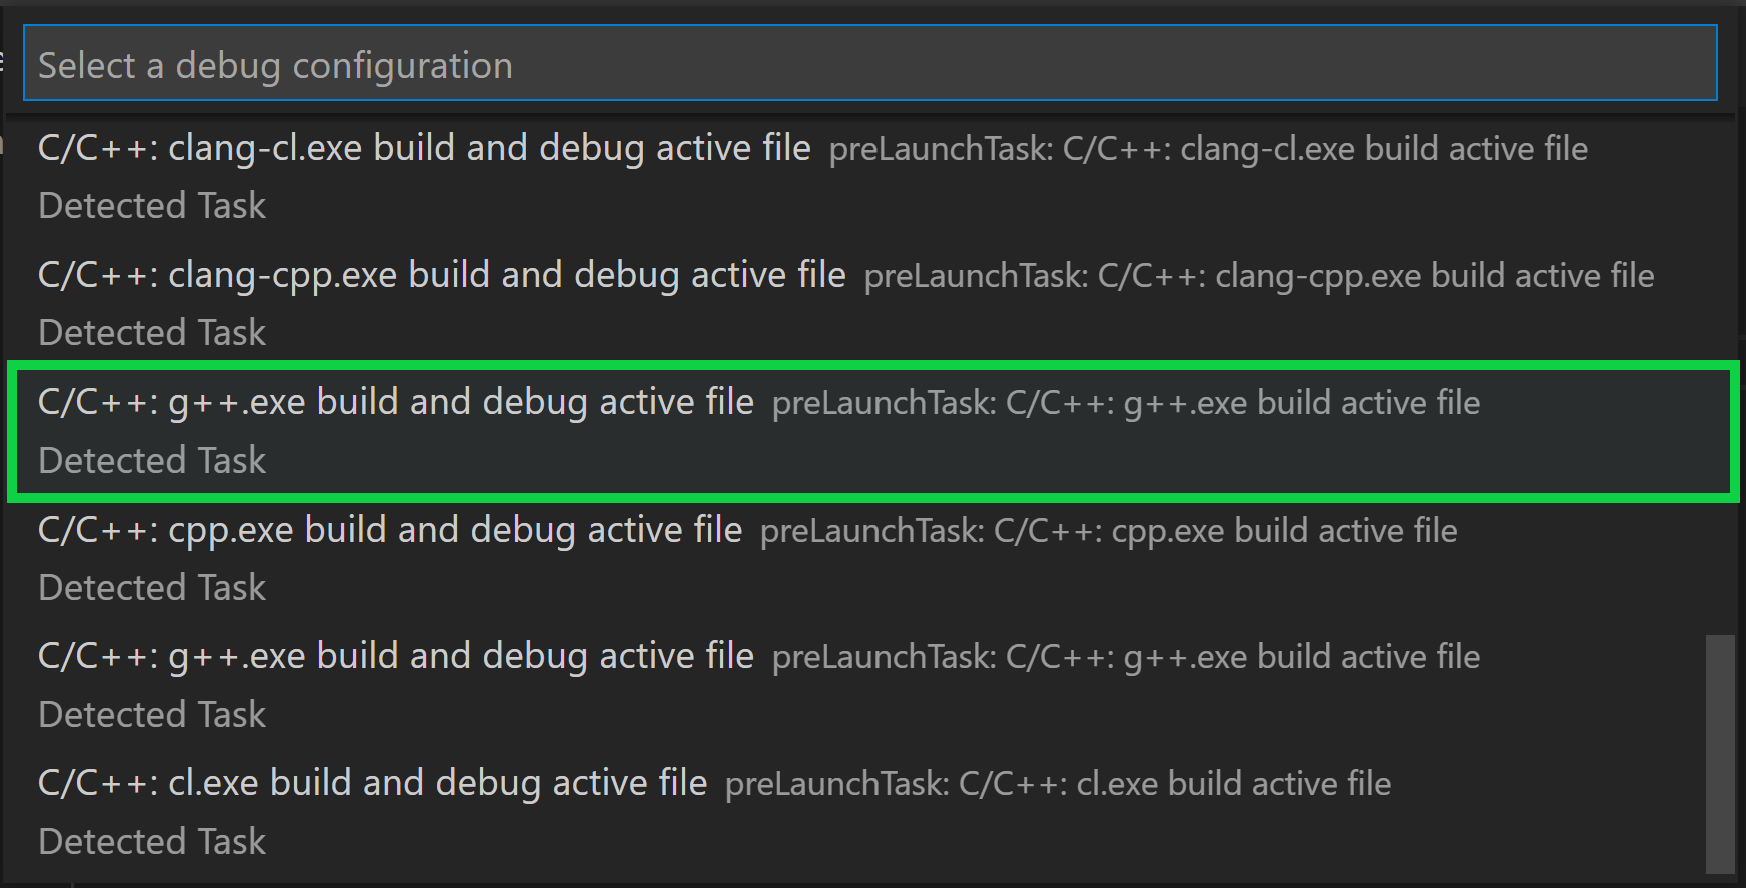
You are only prompted to choose a compiler the first time you run helloworld.cpp . This compiler becomes «default» compiler set in your tasks.json file.

- After the build succeeds, you should see «Hello World» appear in the integrated Terminal.
Congratulations! You’ve just run your first C++ program in VS Code! The next step is to learn more about the Microsoft C/C++ extension’s language features such as IntelliSense, code navigation, build configuration, and debugging using one of the Tutorials in the next section.
Tutorials
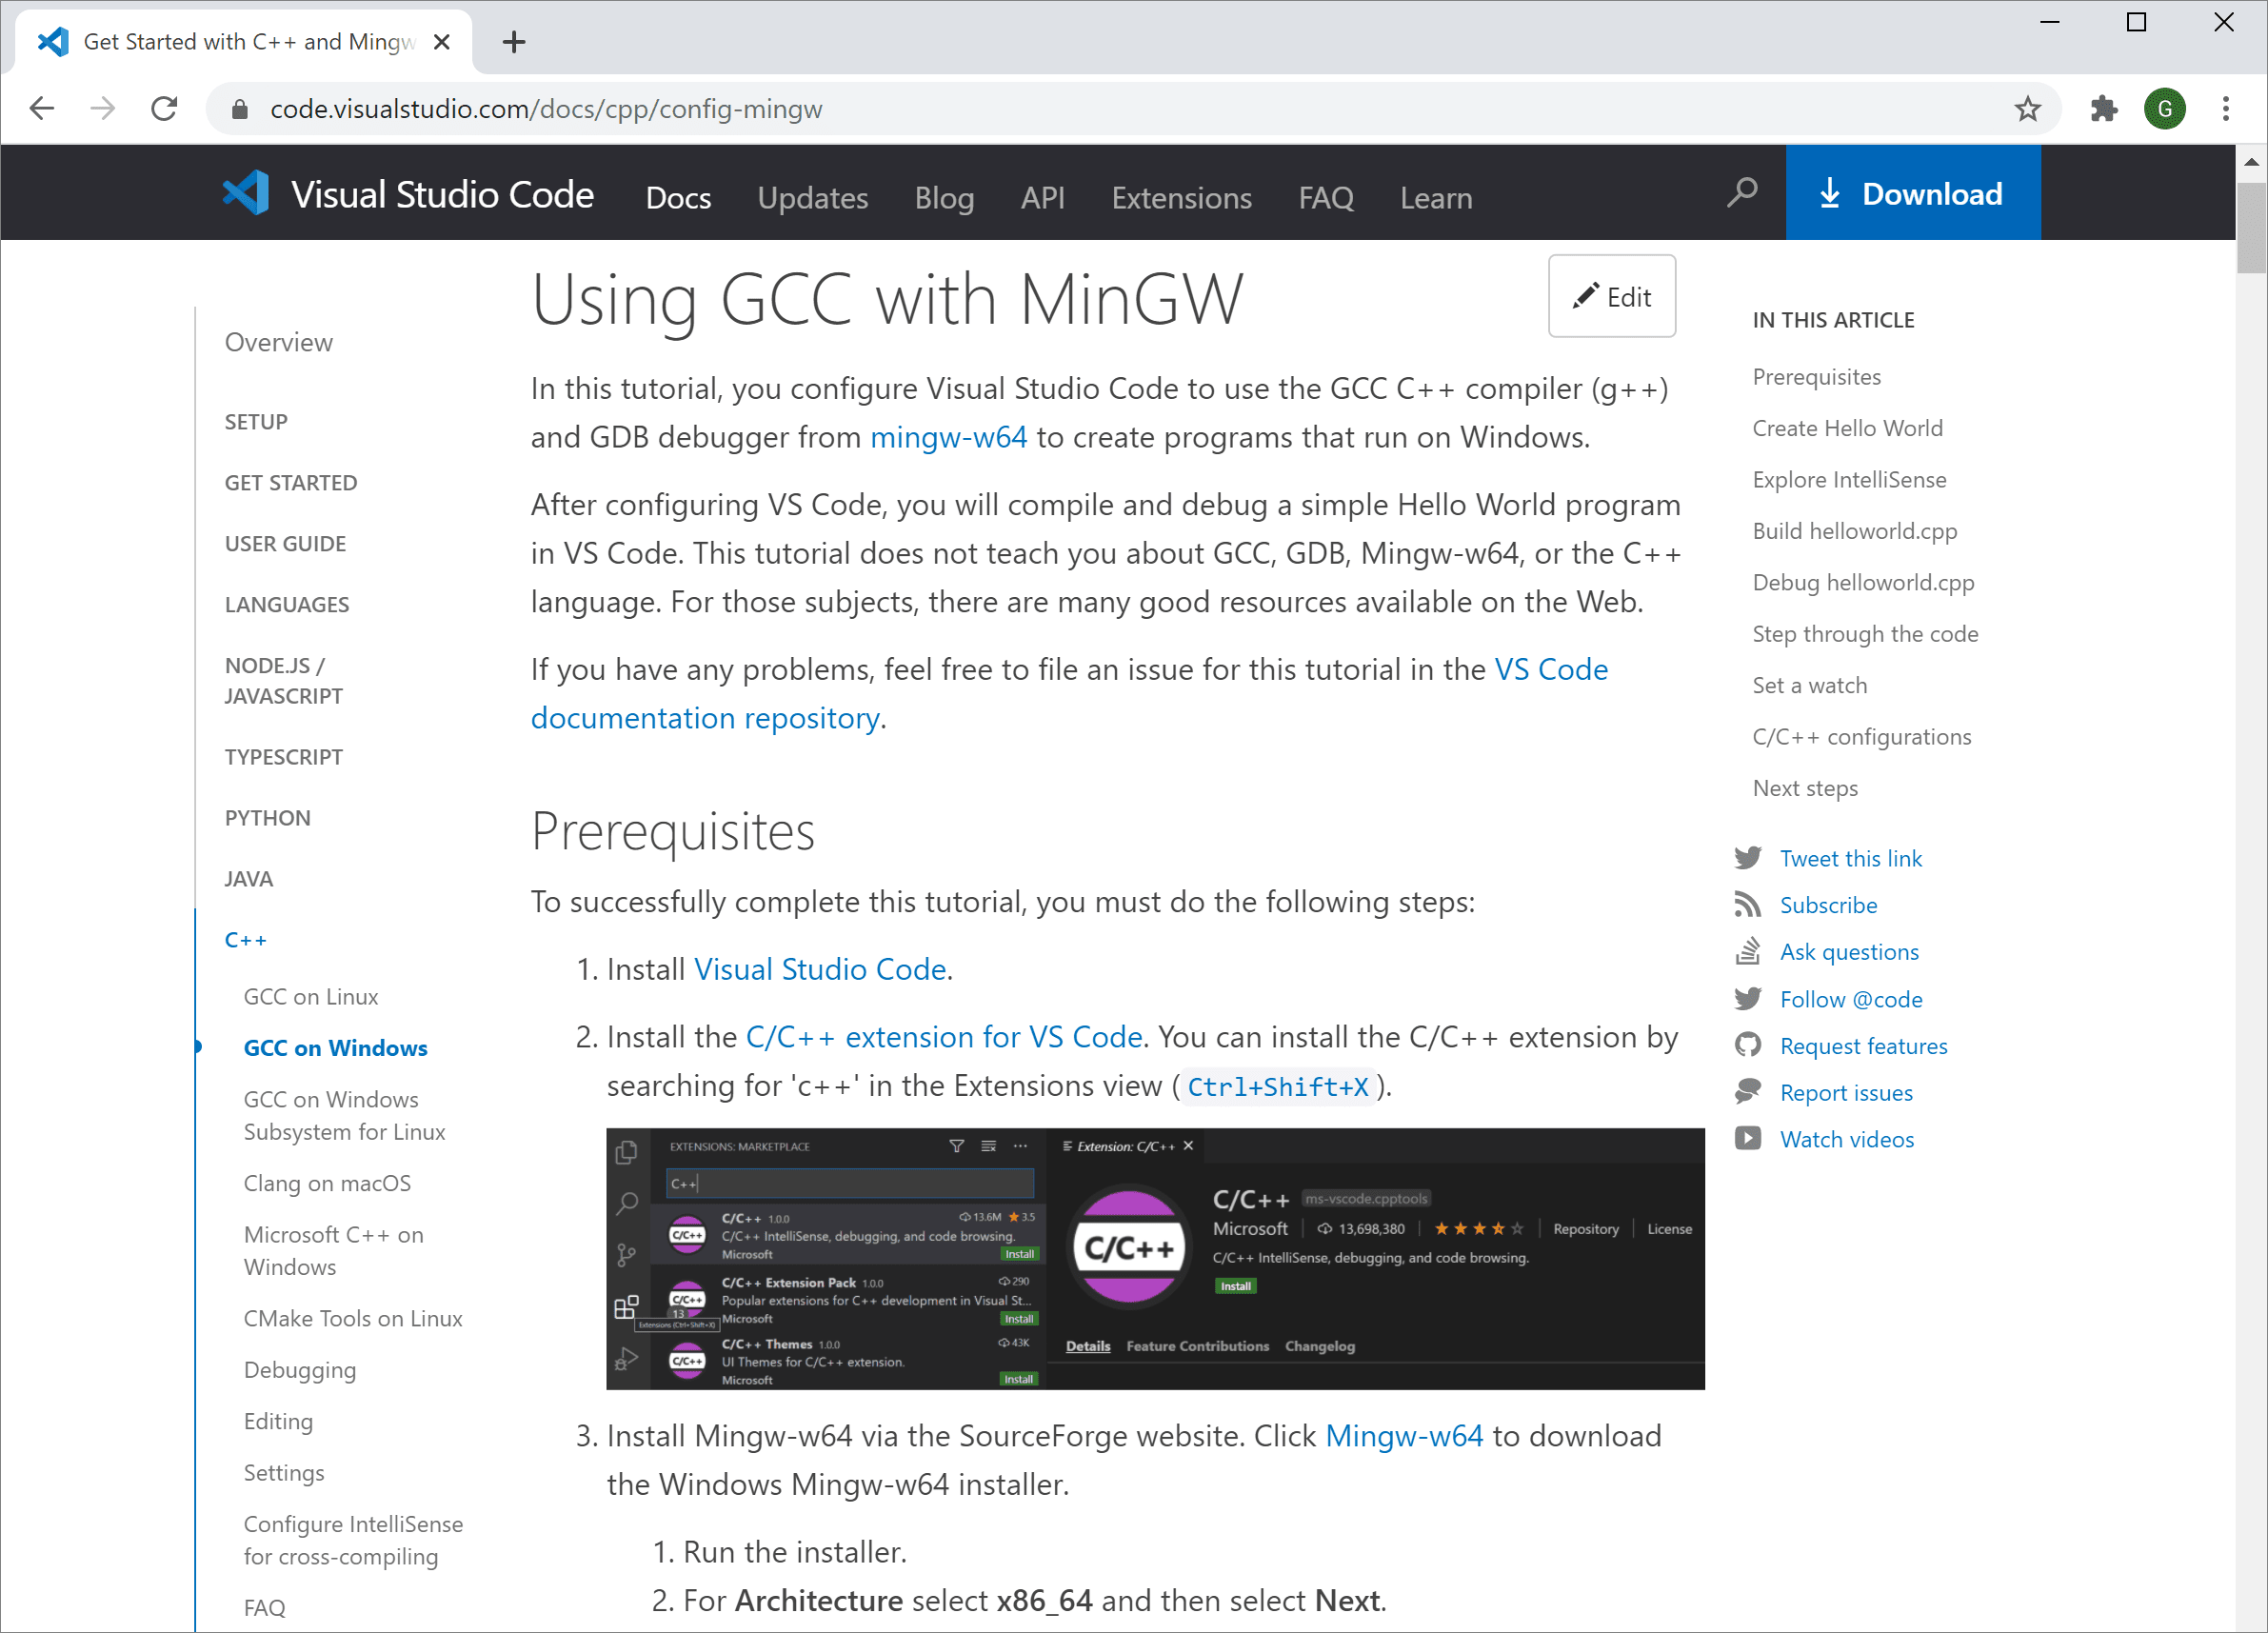
Get started with C++ and VS Code with tutorials for your environment:
- GCC on Windows via MinGW
- Microsoft C++ on Windows
- GCC on Linux
- GCC on Windows Subsystem For Linux
- Clang/LLVM on macOS
- CMake Tools on Linux
Documentation
You can find more documentation on using the Microsoft C/C++ extension under the C++ section of the VS Code website, where you can find articles on:
Remote Development
VS Code and the C++ extension support Remote Development allowing you to work over SSH on a remote machine or VM, inside a Docker container, or in the Windows Subsystem for Linux (WSL).
To install support for Remote Development:
- Install the VS Code Remote Development Extension Pack.
- If the remote source files are hosted in WSL, use the WSL extension.
- If you are connecting to a remote machine with SSH, use the Remote — SSH extension.
- If the remote source files are hosted in a container (for example, Docker), use the Dev Containers extension.
Enhance completions with AI
GitHub Copilot is an AI-powered code completion tool that helps you write code faster and smarter. You can use the GitHub Copilot extension in VS Code to generate code, or to learn from the code it generates.

GitHub Copilot provides suggestions for numerous languages and a wide variety of frameworks, and it works especially well for Python, JavaScript, TypeScript, Ruby, Go, C# and C++.
You can learn more about how to get started with Copilot in the Copilot documentation.
Feedback
If you run into any issues or have suggestions for the Microsoft C/C++ extension, please file issues and suggestions on GitHub. If you haven’t already provided feedback, you can take this quick survey.
Working with C#
The C# support in Visual Studio Code is optimized for cross-platform .NET development (see working with .NET and VS Code for another relevant article). Our focus with VS Code is to be a great editor for cross-platform C# development by providing a rich C# editing experience, AI-powered development, solution management, and integrated testing experiences
VS Code supports debugging of C# applications running on either .NET or Mono.
For detailed instructions on:
- .NET debugging — see the C# Dev Kit debugging documentation.
- Mono debugging — see the Mono Debug extension’s README.
Installing C# support
C# language support is provided with the C# Dev Kit extension. You can install it from within VS Code by searching for ‘C# Dev Kit’ in the Extensions view ( ⇧⌘X (Windows, Linux Ctrl+Shift+X ) ) or if you already have a project with C# files, VS Code will prompt you to install the extension as soon as you open a C# file.
For more information about the C# Dev Kit extension, see the C# documentation.
C# Dev Kit
Visual Studio Code uses the power of Roslyn and C# Dev Kit to offer an enhanced C# experience. We offer support for:
- .NET projects
- MSBuild projects
- C# scripts (CSX)
Supported .NET project types include:
- ASP.NET Core App
- ASP.NET Core Web API
- ASP.NET Core MVC Web App
- Blazor Server App
- Blazor WebAssembly App
- Console App
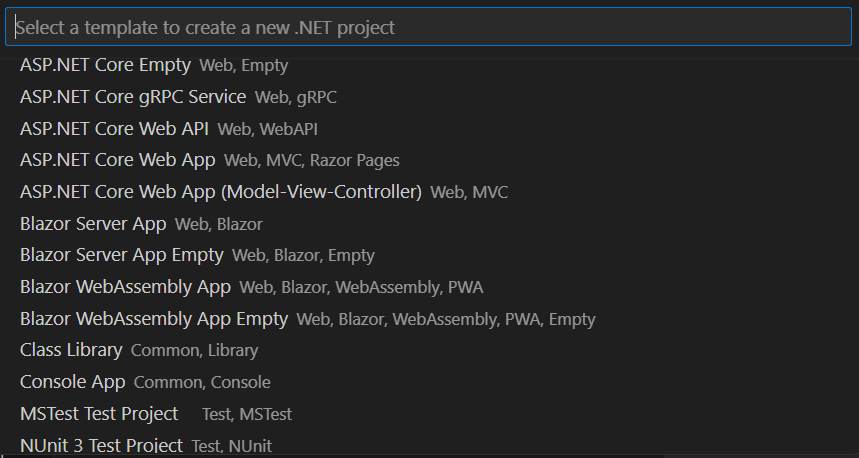
To find a full list of supported project types within VS Code, open the Command Palette and search for .NET: New Project... This will display a full list of supported project types.
When you open a Workspace that contains .NET solution files or project files, the Solution Explorer will automatically appear. If you have a single solution file (.sln file) in the workspace, the Solution Explorer will detect that file and automatically load it after the workspace is loaded. For more information on managing your C# projects in VS Code, look at the documentation on Project Management.
Editing Evolved
There is a lot to discover with C# and the editor, such as format on type, IntelliSense, the rename-refactoring, etc.

For more information on the C# Dev Kit editing features, go to the Navigate and Edit documentation. For a full description of VS Code editing features, go to the Basic Editing and Code Navigation documentation.
Here are a few highlights.
IntelliSense
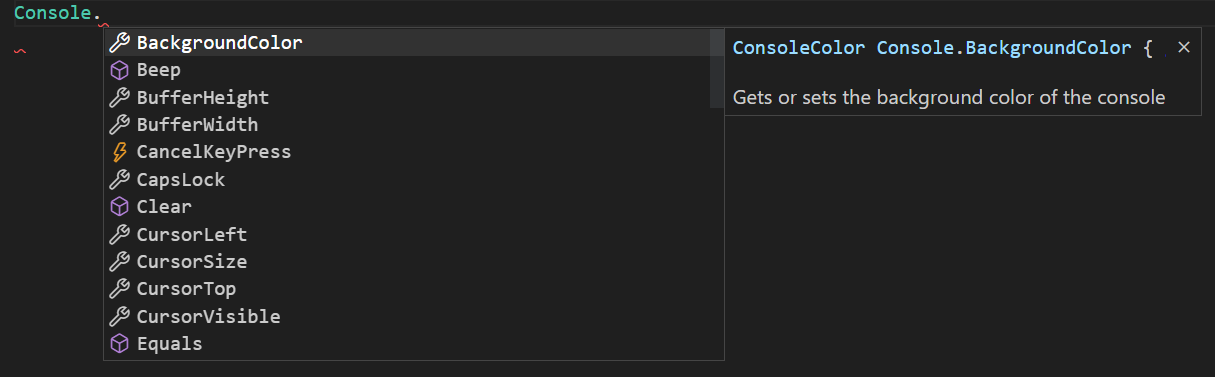
IntelliSense just works: hit ⌃Space (Windows, Linux Ctrl+Space ) at any time to get context specific suggestions.
Enhance completions with AI
GitHub Copilot is an AI-powered code completion tool that helps you write code faster and smarter. You can use the GitHub Copilot extension in VS Code to generate code, or to learn from the code it generates.

GitHub Copilot provides suggestions for numerous languages and a wide variety of frameworks, and it works especially well for Python, JavaScript, TypeScript, Ruby, Go, C# and C++.
You can learn more about how to get started with Copilot in the Copilot documentation.
Snippets for C#
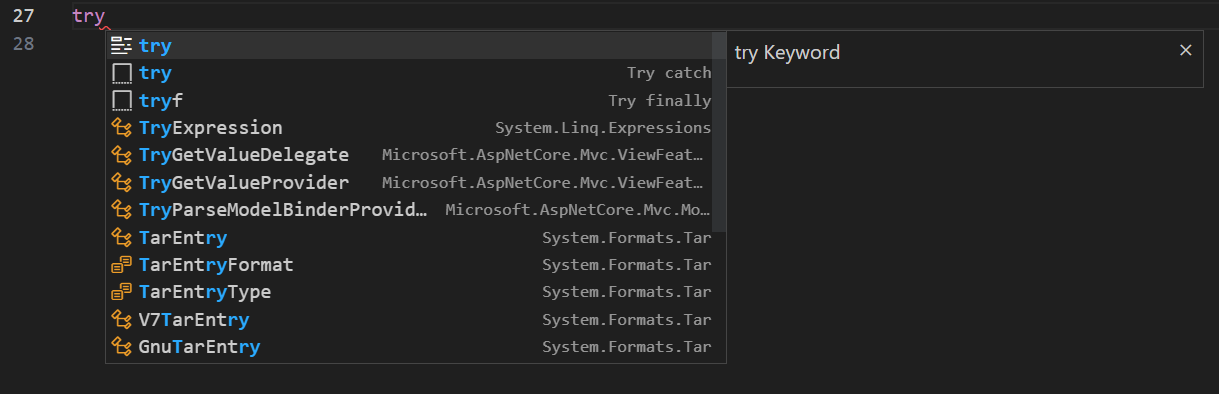
For information on snippets in C# Dev Kit, go to the Navigate and Edit documentation. There are also several built-in snippets included in VS Code that will come up as you type or you can press ⌃Space (Windows, Linux Ctrl+Space ) (Trigger Suggest) and we will give you a context specific list of suggestions.
Tip: You can add in your own User Defined Snippets for C#. Take a look at User Defined Snippets to find out how.
Search for Symbols
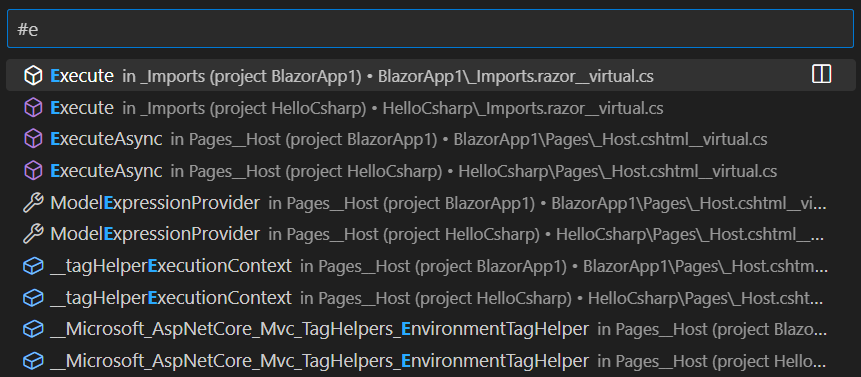
There are also features outside the editor. One is the ability to search for symbols from wherever you are. Hit ⌘T (Windows, Linux Ctrl+T ) , start typing, and see a list of matching C# symbols. Select one and you’ll be taken straight to its code location.
CodeLens
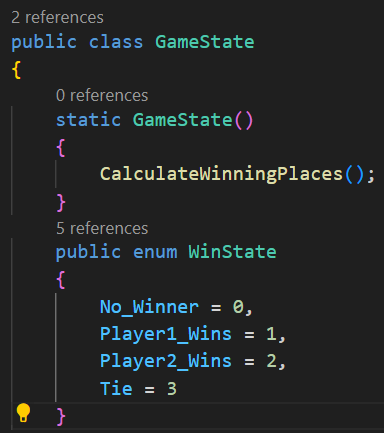
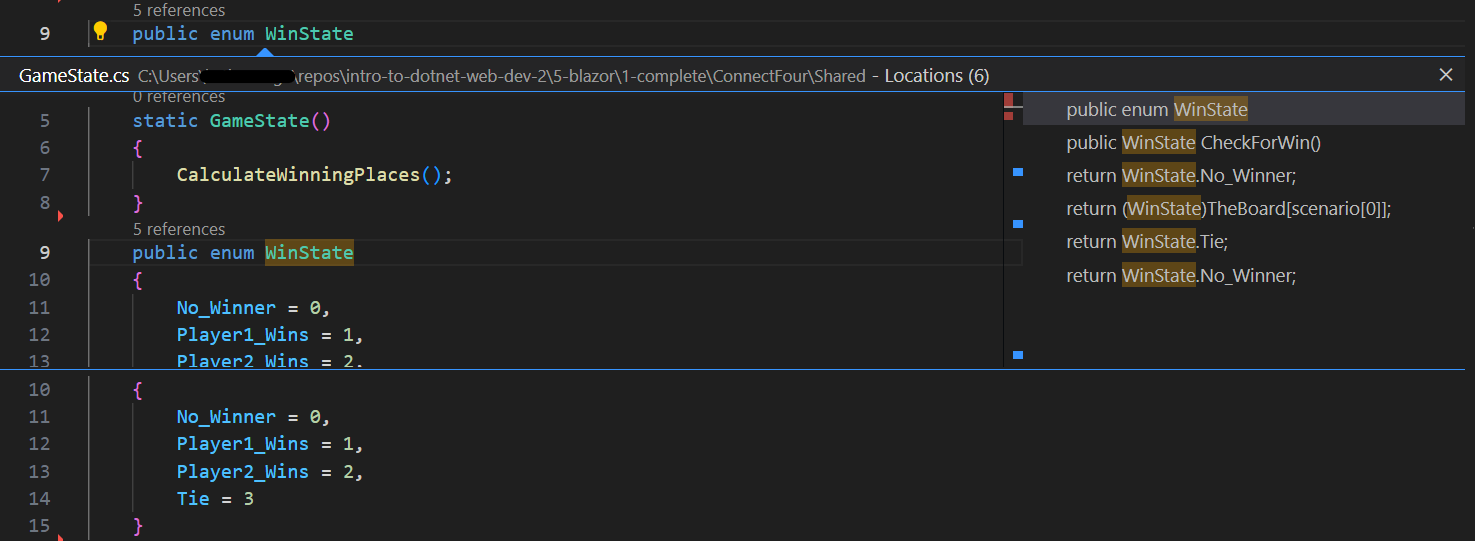
Another cool feature is the ability to see the number of references to a method directly above the method. Click on the reference info to see the references in the Peek view. This reference information updates as you type.
Note: Methods defined in object , such as equals and hashCode do not get reference information due to performance reasons.
Tip: You can turn off references information displayed in CodeLens with the editor.codeLens setting.
Find References/Peek Definition
You can click on the references of an object to find the locations of its use in place without losing context. This same experience works in reverse where you can Peek the definition of an object and see it inline without leaving your location. For information on Peek Definition in C# Dev Kit, go to the Navigate and Edit documentation.
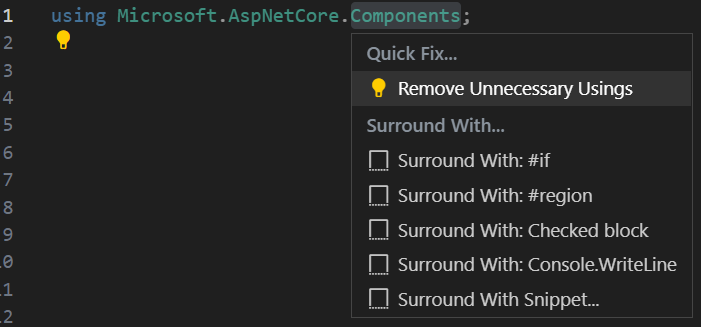
Quick Fixes / Suggestions
There are some basic quick fixes supported in VS Code. You will see a lightbulb and clicking on it, or pressing ⌘. (Windows, Linux Ctrl+. ) provides you with a simple list of fixes/suggestions.
Testing
The extension supports the following test frameworks:
The C# Dev Kit extension provides the following features:
- Run/Debug tests cases
- View test report
- View tests in Testing Explorer
Next steps
Read on to find out about:
- C# Dev Kit documentation
- .NET Development — get up and running with cross-platform .NET
- Basic Editing — Learn about the powerful VS Code editor.
- Tasks — Use tasks to build your project and more.
- Debugging — Find out how to use the debugger with your project.
- Unity development — Learn about using VS Code with your Unity projects.
Среды разработки для С
Одной из распространенных сред разработки для программирования на Windows является Visual Studio . В данном случае мы будем использовать бесплатную и полнофункциональную среду Visual Studio 2019 Community, которую можно найти по адресу https://visualstudio.microsoft.com/ru/vs/community/.
После загрузки и запуска установщика Visual Studio в нем необходимо отметить пункт Разработка классических приложений на C++ :
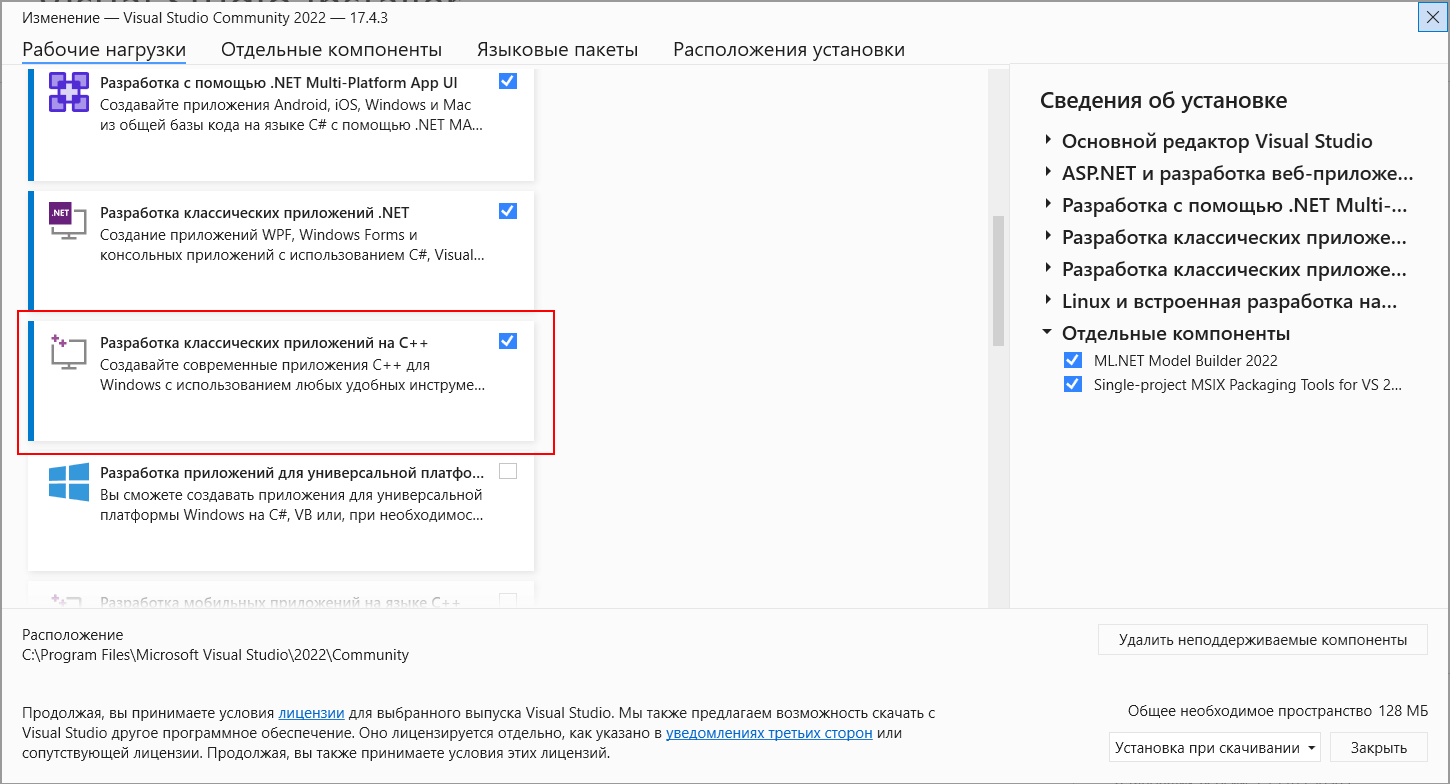
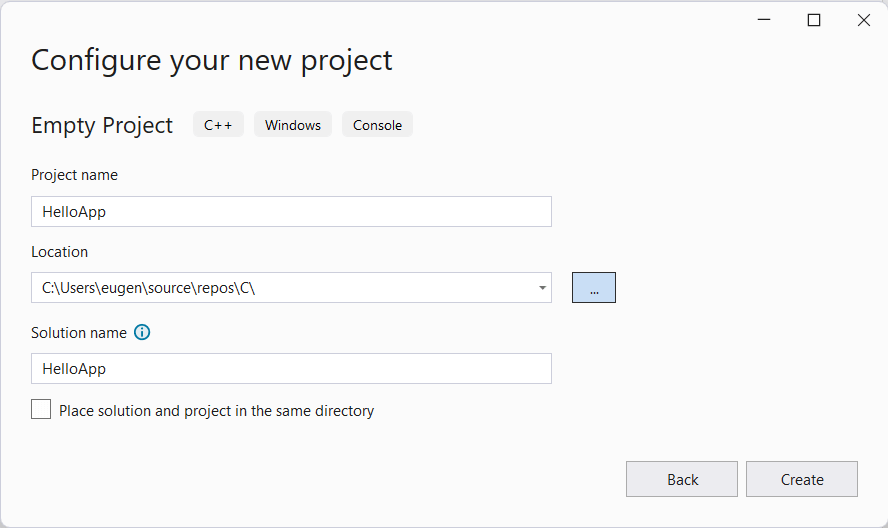
Выбрав все необходимые пункты, нажмем ОК для запуска установки. После установки Visual Studio создадим первый проект. Для этого откроем Visual Studio. На стартовом экране выберем тип Empty Project для языка C++:
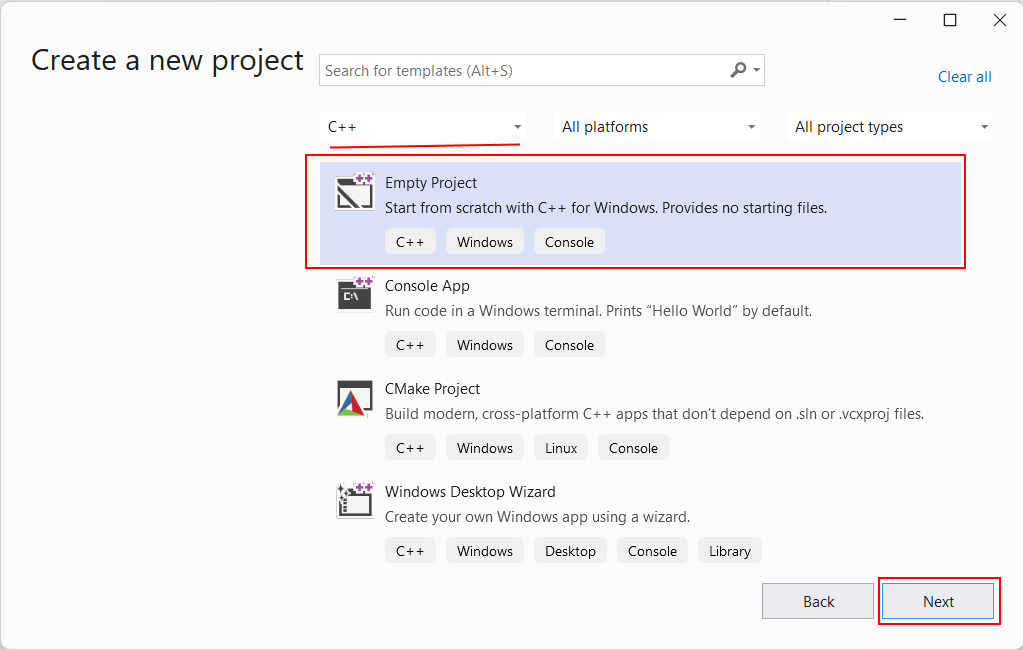
На следующем экране в поле для имени проекта дадим проекту имя HelloApp и также можно указать расположение проекта. И затем нажмем на Create для создания проекта.
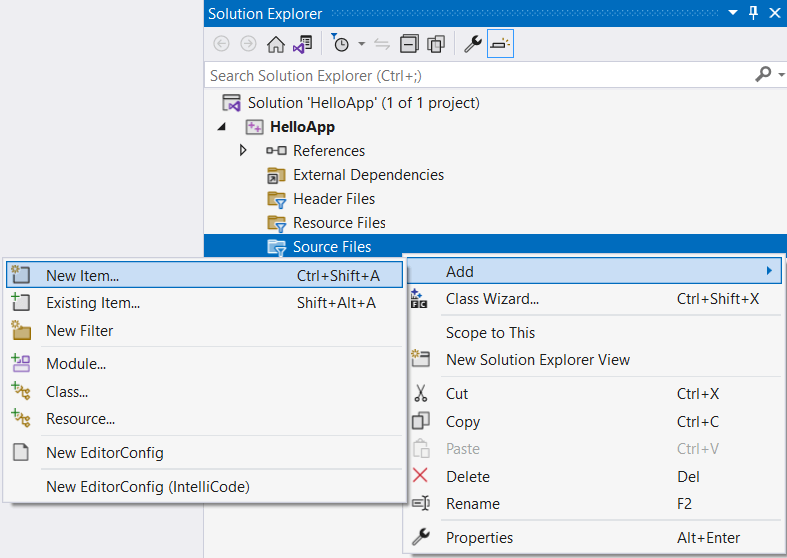
После этого Visual Studio создаст пустой проект. Добавим в него текстовый файл для набора исходного кода. Для этого в окне Solution Explorer (Обозреватель решений) нажмем правой кнопкой мыши на узел Source Files и в контекстом меню выберем Add -> New Item. :
Затем нам откроется окно для добавления нового элемента:
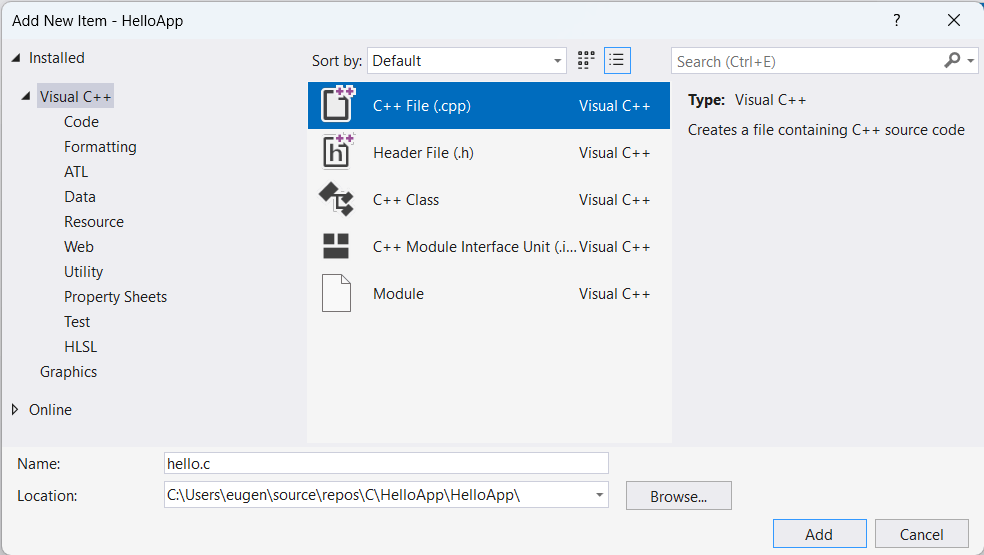
Здесь нам надо выбрать пункт C++ File(.cpp) , а внизу окна укажем для файла имя hello.c . Как правило, исходные файлы на Си имеют расширение .с . Оно указывает, что этот файл содержит исходный код на языке С, и он будет обрабатываться соответствующим компилятором.
Настройка проекта
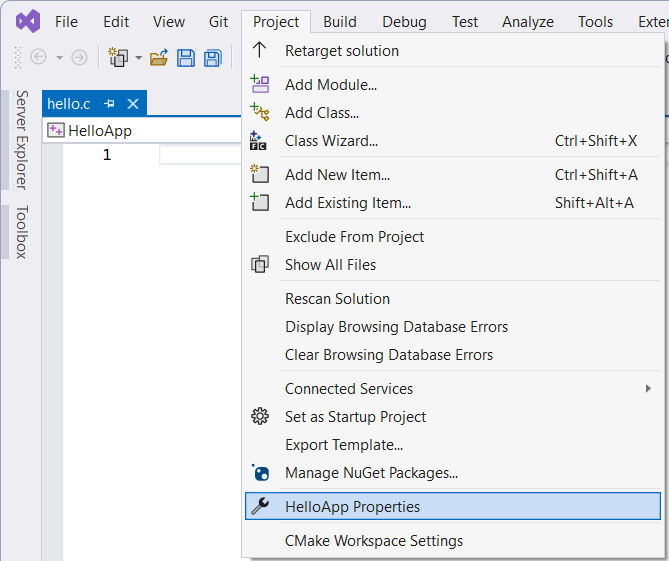
После добавления файла изменим опции проекта. Для этого перейдем к пункту меню Project -> Properties
В окне свойств проекта в левой части перейдем к секции С/С++ и далее к пункту Advanced :
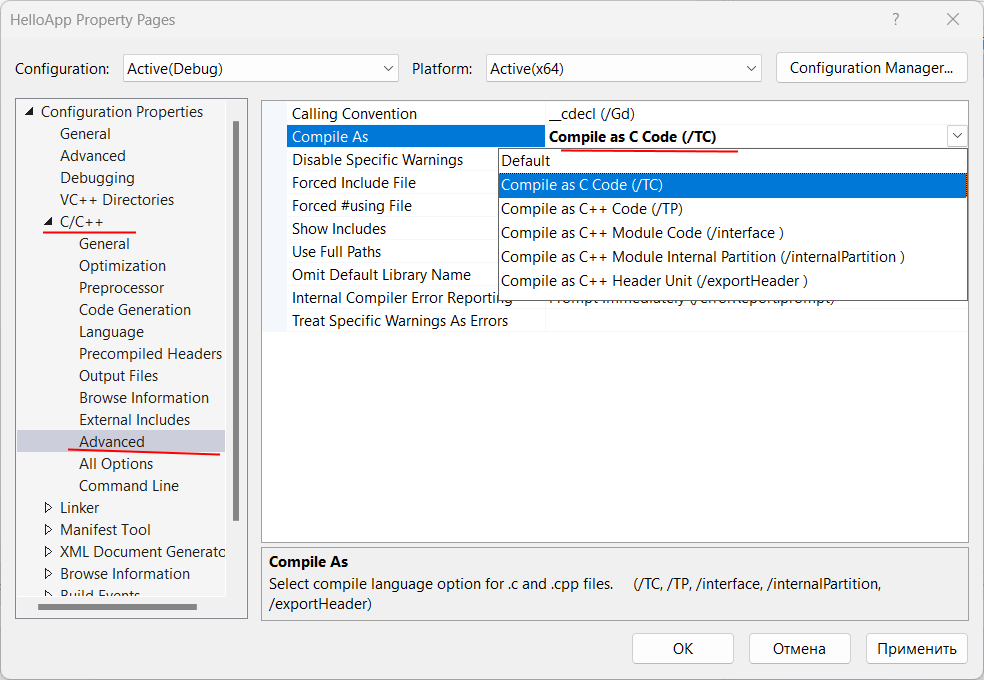
В правой части окна для поля Compile As установим значение Compile as C Code (/TC) . Тем самым мы говорим, чтобы по умолчанию исходный код компилировался именно как код С, а не С++.
После установки этого значения нажмем на кнопку «Применить», чтобы новые настройки конфигурации вступили в силу.
Для работы с языком Си может быть полезна еще одна настройка — установка стандарта языка. Перейдем к пункту С/С++ -> Language . Здесь в поле C Language Standard мы можем установить один из доступных стандартов для языка Си, который будет применяться для компиляции:
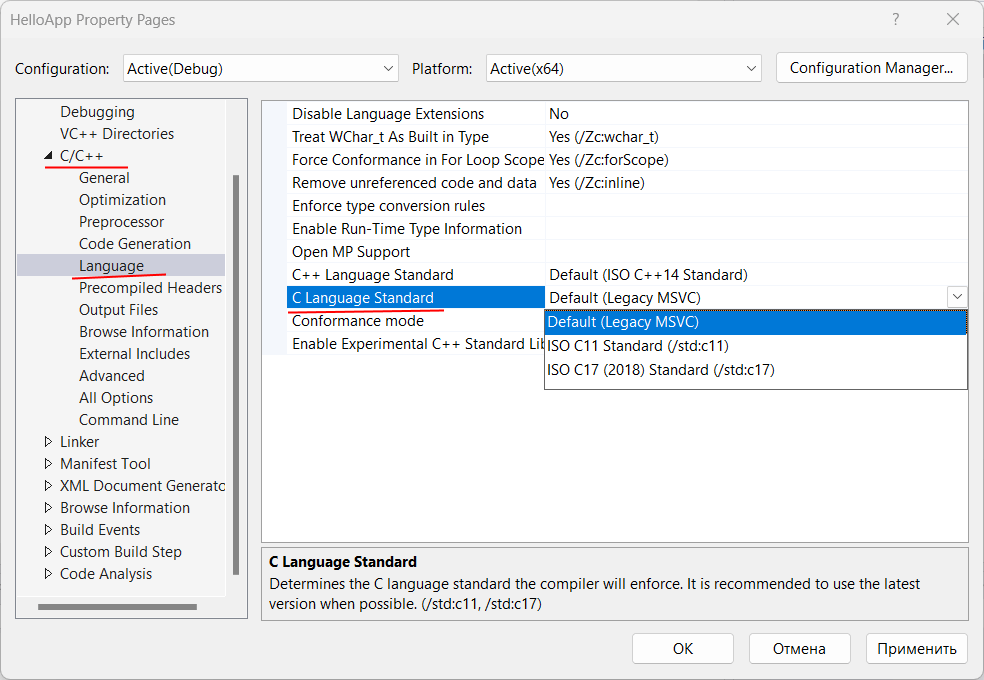
Правда, в данном случае он не играет значения, поэтому оставим для этого параметра настройку по умолчанию.
Определение кода программы
После добавления файла >hello.c проект будет иметь следующую структуру:
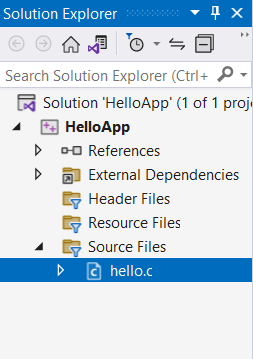
Вкратце пробежимся по этой структуре. Окно Solution Explorer содержит в решение. В данном случае оно называется HelloApp. Решение может содержать несколько проектов. По умолчанию у нас один проект, который имеет то же имя — HelloApp. В проекте есть ряд узлов:
- External Dependencies : отображает файлы, которые используются в файлах исходного кода, но не являются частью проекта
- Header Files : предназначена для хранения заголовочных файлов с расширением .h
- Resource Files : предназначена для хранения файлов ресурсов, например, изображений
- Source Files : хранит файлы с исходным кодом
Теперь определим в файле hello.c простейший код, который будет выводить строку на консоль:
#include // подключаем заголовочный файл stdio.h int main(void) // определяем функцию main < // начало функции printf("Hello METANIT.COM!\n"); // выводим строку на консоль return 0; // выходим из функции >// конец функции
Здесь использован весь тот код, который был рассмотрен в предыдущих темах про компиляцию с помощью GCC.
Теперь запустим программу. Для этого в Visual Studio нажмем на сочетание клавиш Ctrl+F5 или выберем пункт меню Debug -> Start Without Debugging :
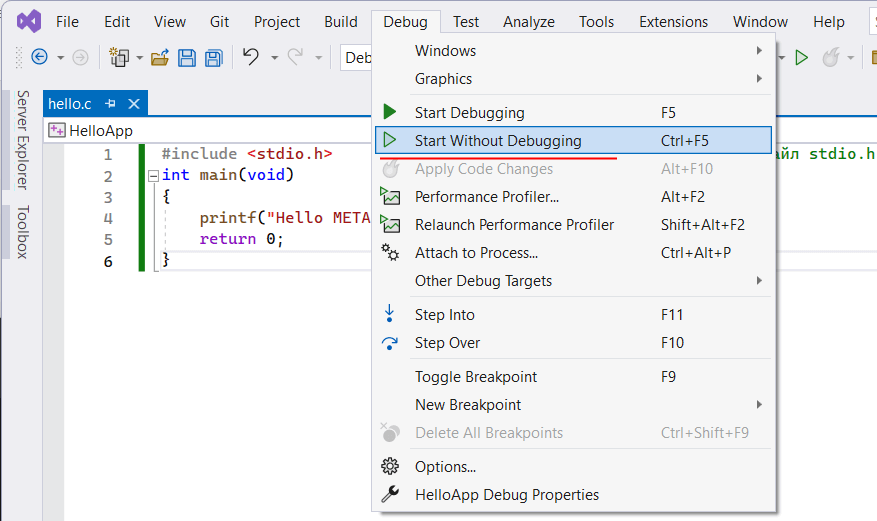
И в итоге Visual Studio передаст исходный код компилятору, который скомпилирует из кода исполняемый файл exe, который потом будет запущен на выполнение. И мы увидим на запущенной консоли наше сообщение:

Затем в проекте в папке x64/Debug мы можем увидеть скомпилированный файл exe, который мы можем запускать независимо от Visual Studio:
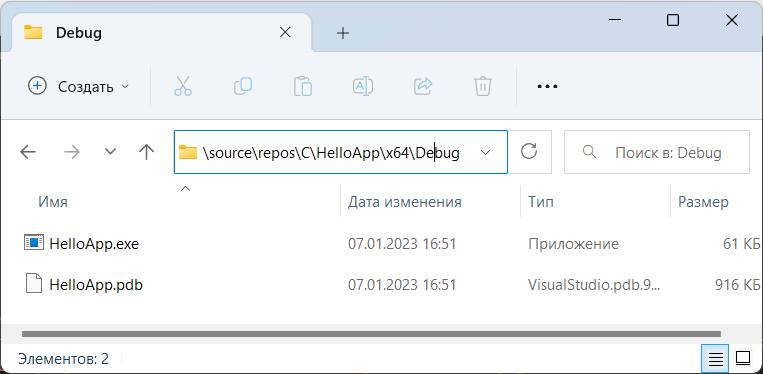
В данном случае файл HelloApp.exe как раз и представляет скомпилированный исполняемый файл.
How to run a C program in Visual Studio Code?

A visual studio code is a lightweight software application with a powerful source code editor that runs on the desktop. It is a free source code editor developed by Microsoft for Windows, Mac OS and Linux. It is a software editor that has a rich extension of various languages like C++, C+, C, Java, Python, PHP, Go, etc. and runtime language extensions such as .NET and Unity. It is easy to edit, build, syntax highlighting, snippets, code refactoring and debugging. In visual studio code, we can change the application’s background theme, keyboard shortcuts set on our preferences, install an extension and add additional functionality.
Prerequisites for running a C program in Visual Studio Code
- We should have a basic knowledge of C programming.
- The Visual Studio Code Editor must be installed in the system.
- Download the C/C++ Extension. It is an extension provided by Microsoft that support visual studio code. It helps in IntelliSence, debugging and code browsing of the programming code in the visual studio.
- Download the C/C++ compilers. There are some popular compilers are:
- GCC on Linux
- GCC via Mingw-w64 on Windows
- Microsoft C++ compiler on windows
- Clang for XCode on MacOS
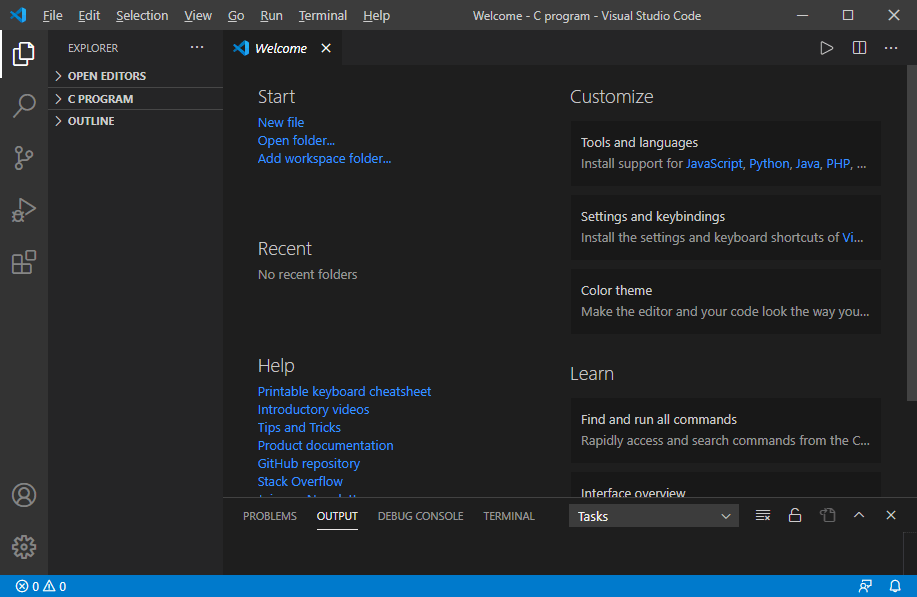
We have already installed the Visual Studio Code in our system. The user interface of VS code look like the following:
Download & Install the C/C++ Extension
1. We need to click on the extension button that displays a sidebar for downloading and installing the C/C++ extension in the visual studio code. In the sidebar, type C Extension.

2. After that, click on the C/C++
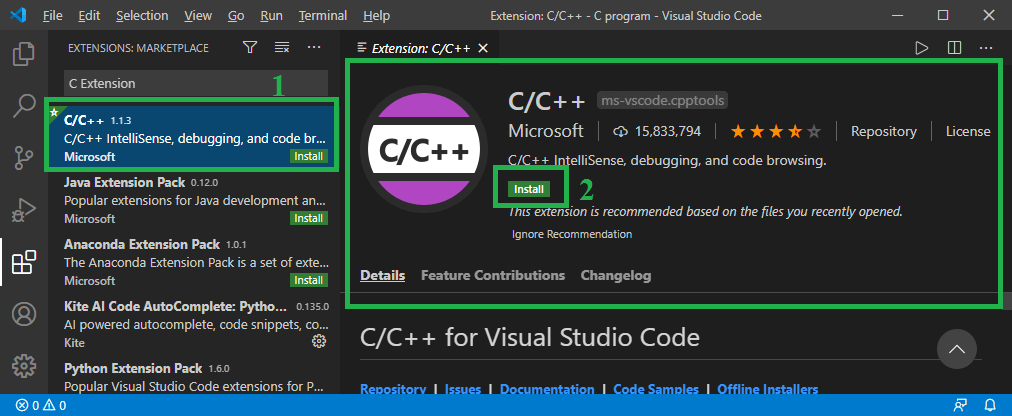
In this image, click on the Install button to install the C/C++ extension.
3. After clicking the Install button, it shows the below image.
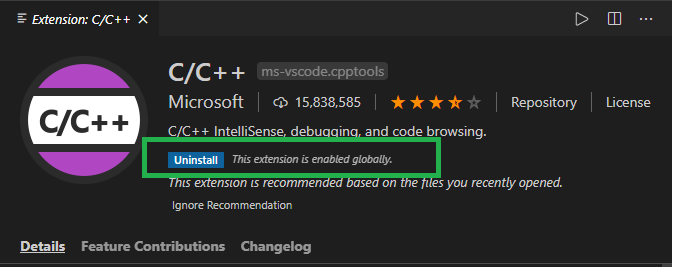
In this image, we can see it shows the Uninstall button that means the C/C++ extension has been successfully downloaded in the visual studio code.
In this image, we can see it shows the Uninstall button that means the C/C++ extension has been successfully downloaded in the visual studio code.
Download and Install Compiler Extension
A MinGW is an advanced GCC compiler software used to compile and execute code. It is software that supports only the window operating system.
Download the MinGW-w64 Compiler
1. Go to the https://sourceforge.net/projects/mingw We land on the following page.
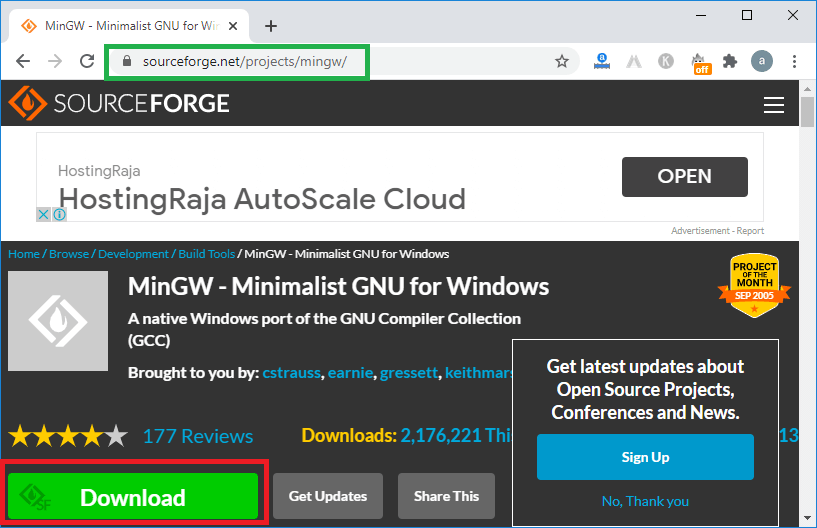
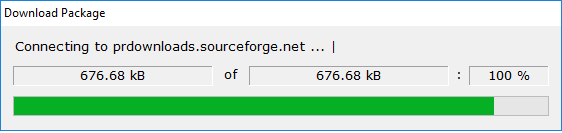
2. After that, click on the Download button, then it starts the downloading of the MinGW GCC compiler, as we can see in the below image.
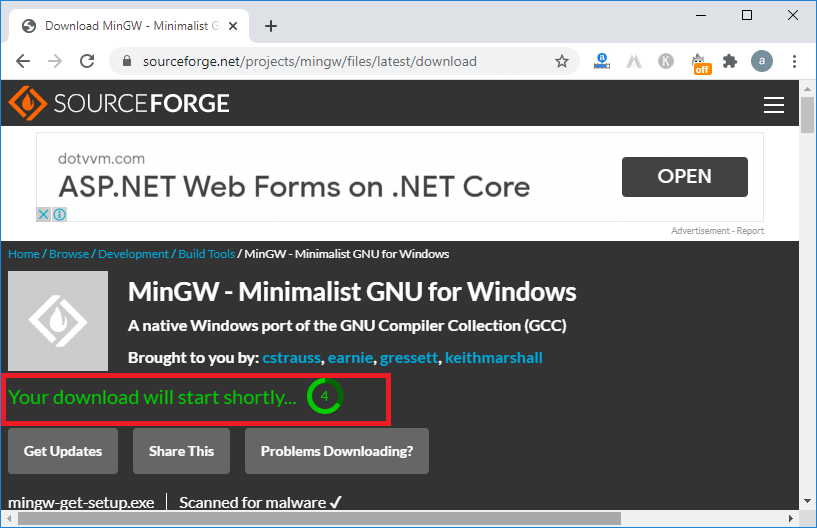
3. MinGW software has been successfully downloaded into the system.
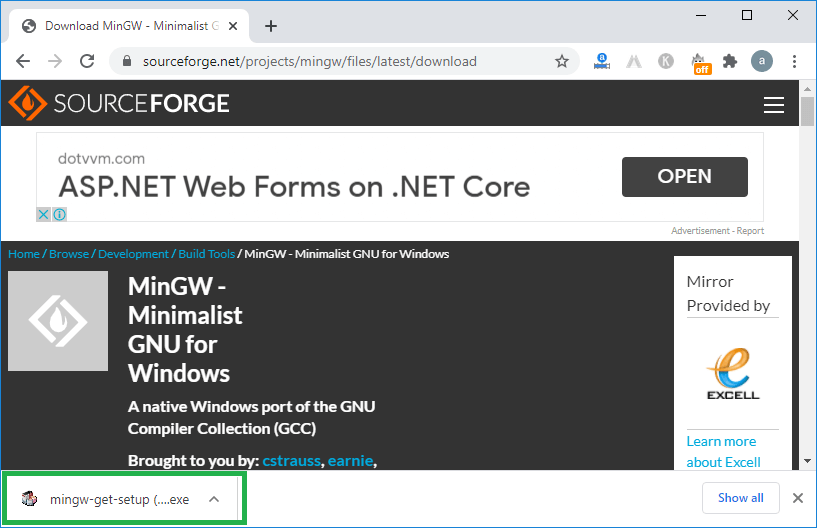
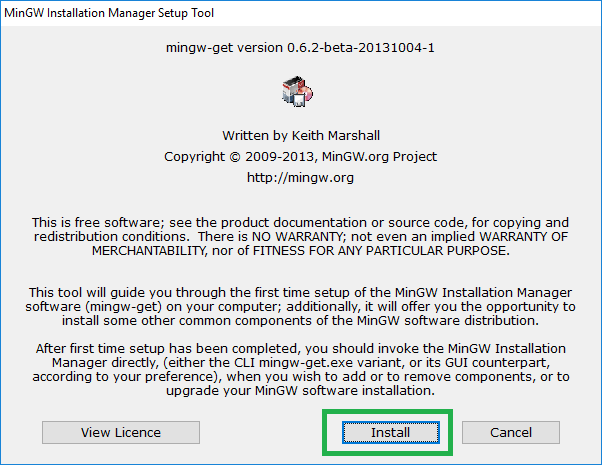
4. Now we double-click on the MinGW set up to install the compiler.
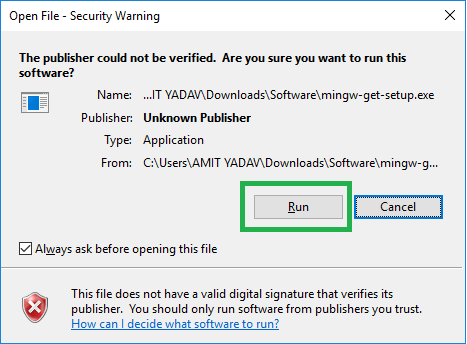
As we can see, it shows that it is a harmful file click on the Run button to proceed with installing the setup.
5. Click on the Install
6. Set it defaults, or we can change the storage location of the setup. After that, click on the Continue
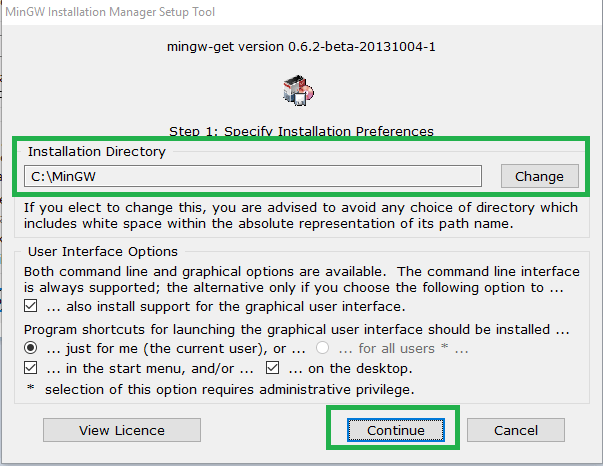
7. After clicking the continue button, it shows step 2 of MinGW Installation Manager.
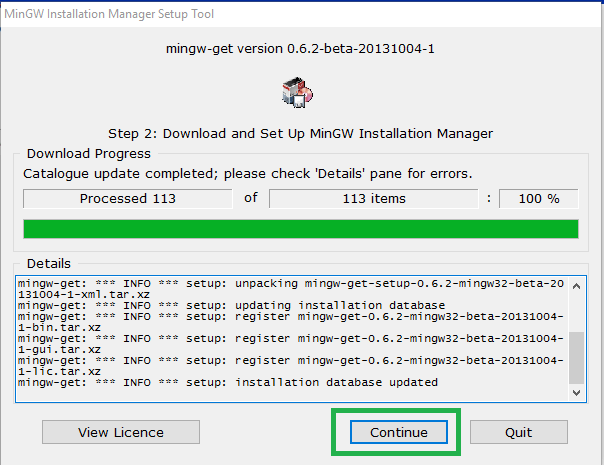
8. As we click on the Continue, it shows the below image. In the MinGW Installation Manager, we need to check the Mingw32-base package and Ming32-gcc-g++ package to run and compile the C/ C++ program in the visual studio code editor.
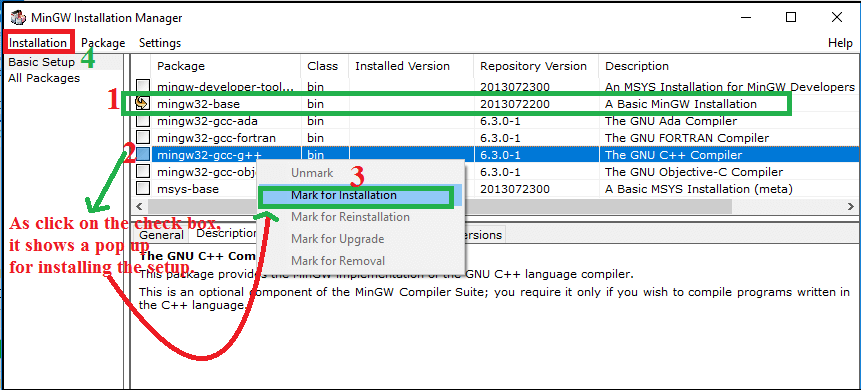
9. After selecting the checkbox, click on the Installation tab (at the top left corner of the dialog box).
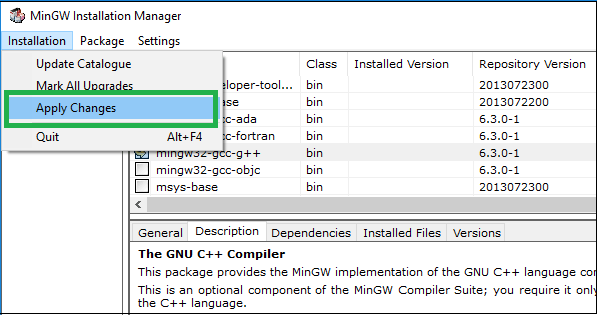
Here we click on Apply Changes to set the package’s installation in MinGW, as given below.

10. After click on the Apply button, it shows the below image.
11. After downloading the packages, it shows the installation process of the package, as shown below.
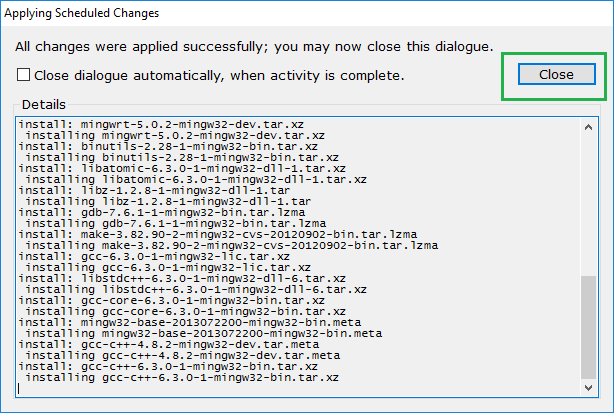
Here we can see all the changes have been successfully applied and then click on the Close button.
Set the Environment Path for the MinGW Set Up
After downloading and installing the MinGW compiler, we now set the environment path to include the C/C++ compiler directory.
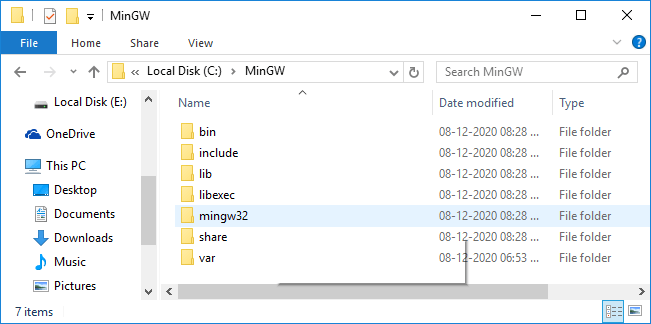
1. Go to the installation directory of the MinGW Set Up. Here we installed the setup at the C drive, as shown below.
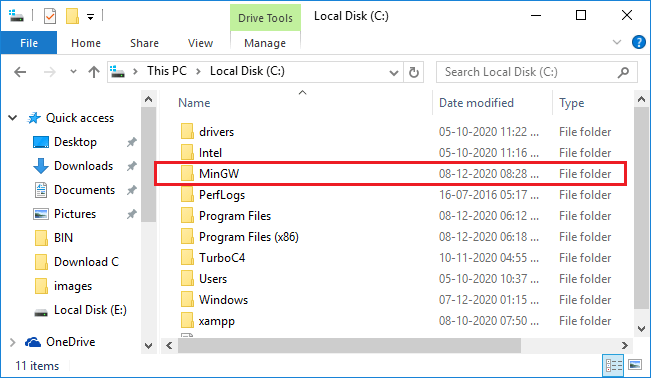
2. Double click on the MinGW folder. It shows the below image.
3. After that, click on the bin folder and then copy the directory path, as shown below.
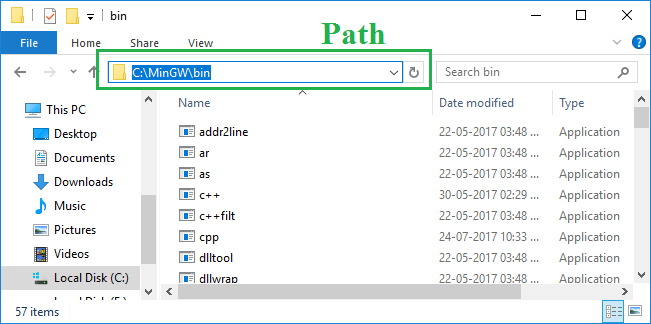
Here is the path of the MinGW folder path: C:\MinGW\bin
4. After copying the directory path, go to This PC -> Right Click on This PC -> Select/ Click on the Properties. It shows the below image.
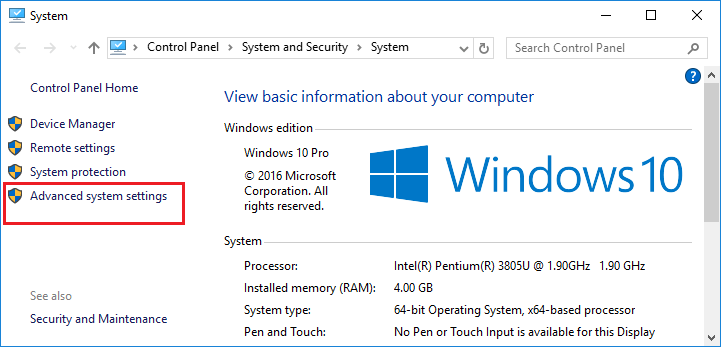
5. After that, click on the Advanced system settings to display a popup box of System Properties, as shown below.
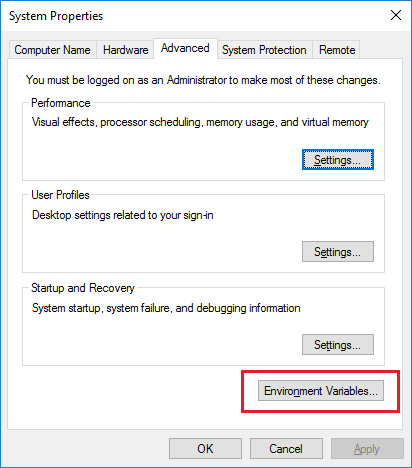
6. Click on the Environment Variables to set the directory path, as shown below.
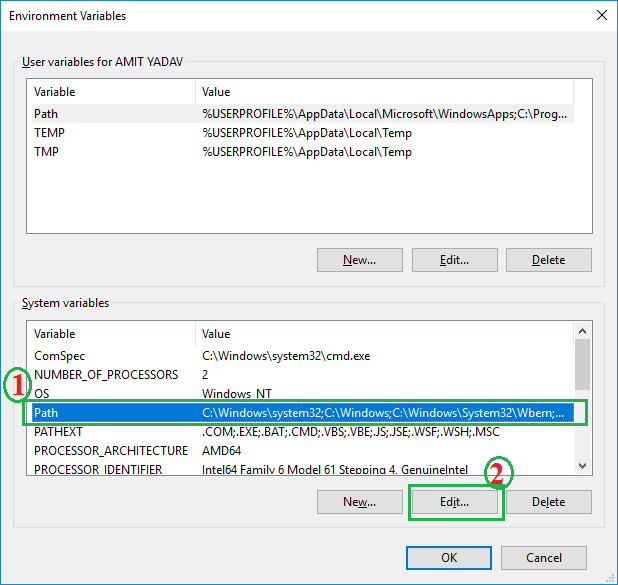
First, we have to click on the System Variables Path and then click on the Edit button, as shown in the above image.
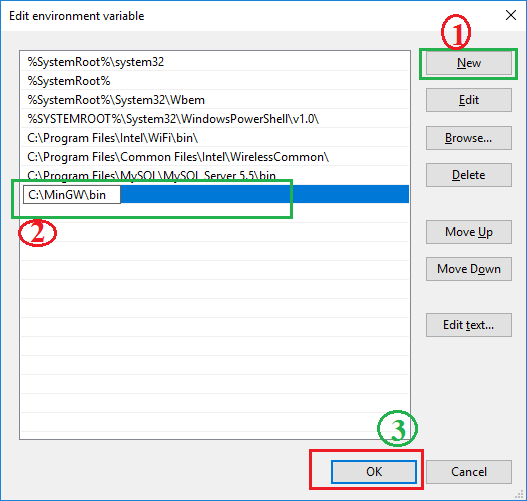
7. As we click on the Edit button, it shows a popup window to set a new path, as shown below.
In the above image, first, we click on the New button and then paste the C:\MinGW\bin path; after that, click the OK button.
8. Similarly, click the OK button to the Environment Variables and System Properties.
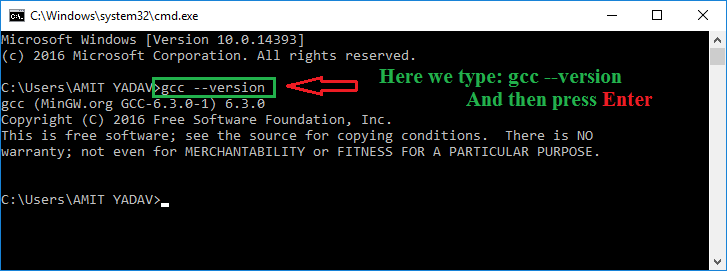
9. If we want to check that the MinGW has been successfully installed in the system: go to the Command Prompt or cmd, write the gcc -version, and press the Enter
Start Coding in the Visual Studio Code Editor
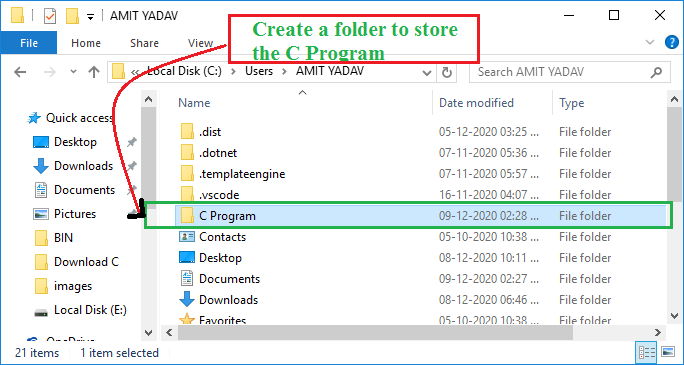
1. Here we created a C Program folder to store all program code. We can create a folder with any name in any directory.
2. Go to the VS Code and click on the Add Folder.
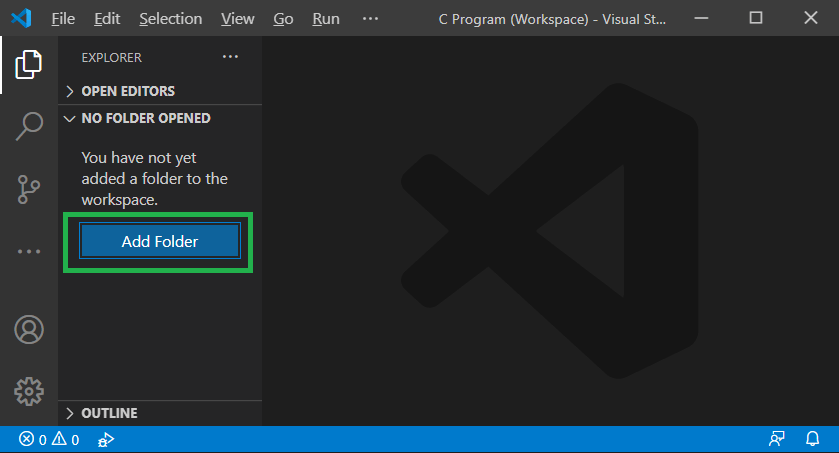
3. As we click on the Add Folder, it shows a popup dialog box to select the folder to store the program.
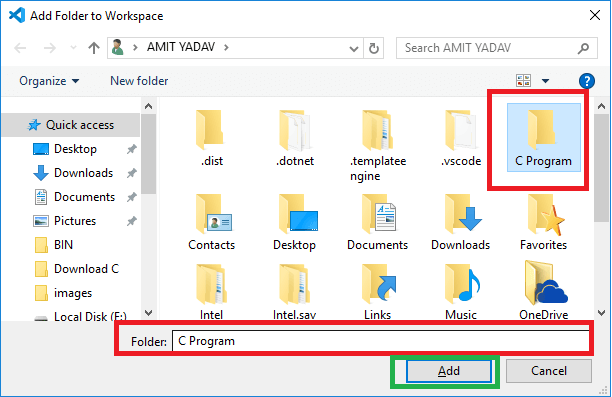
4. After selecting the folder, click on the Add The selected folder appears in the explorer section, as we have shown below.
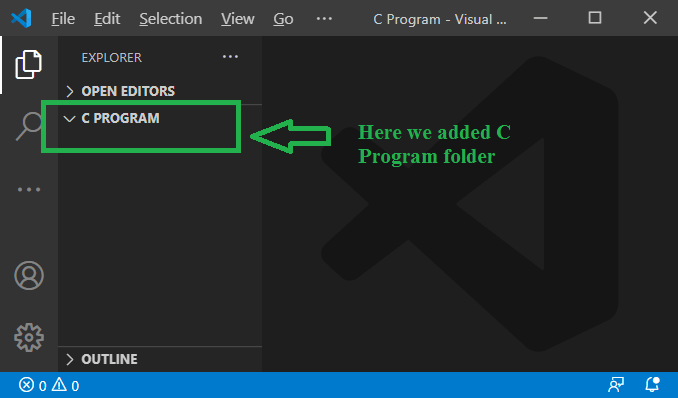
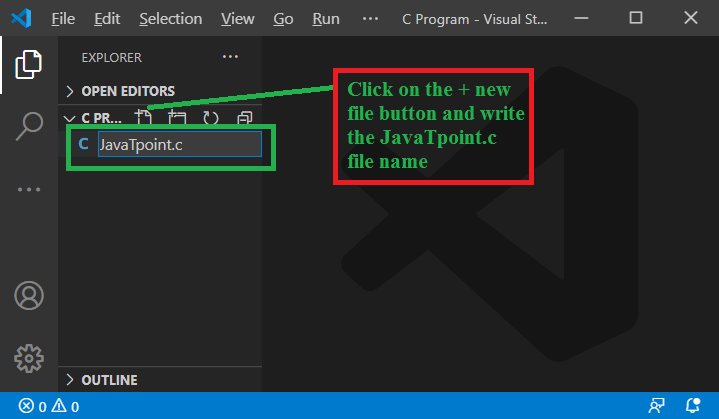
5. Move the mouse over the C PROGRAM folder; it shows a + Click on the button and write the file name as JavaTpoint.c, as shown below.
Now write and understand simple C programming in the VS Code editor.
JavaTpoint.c
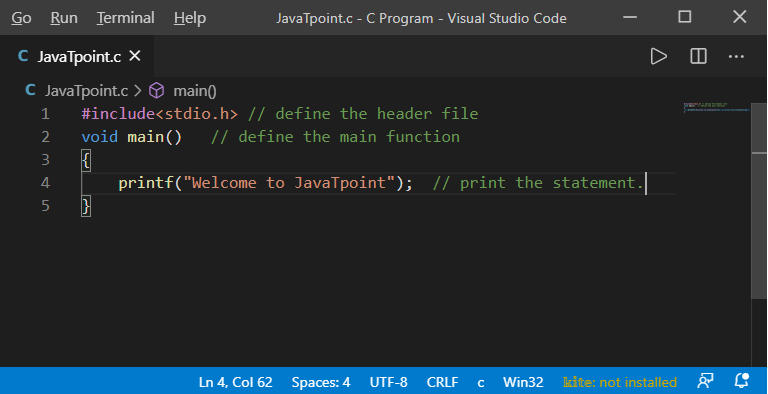
After writing the code, right-click on the program, as shown below.
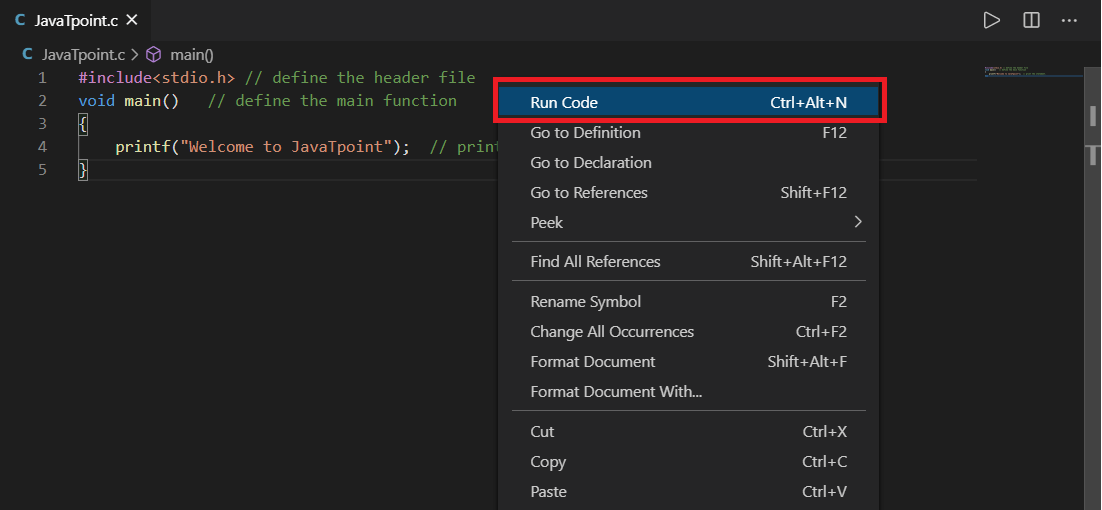
Click on the Run Code option or press Ctrl + Alt + N from the button. It shows the following output.
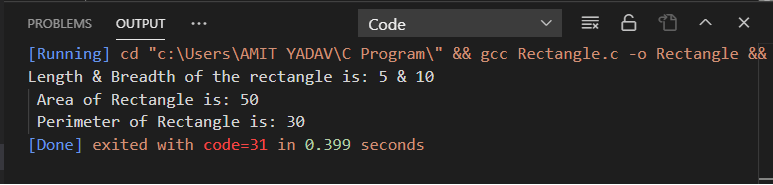
Let’s write a program to calculate the area and perimeter of the rectangle in the VS Code editor.
Rectangle.c
We can click on the Run button or press the Ctrl + Alt + N from the keyboard. It displays the below output.
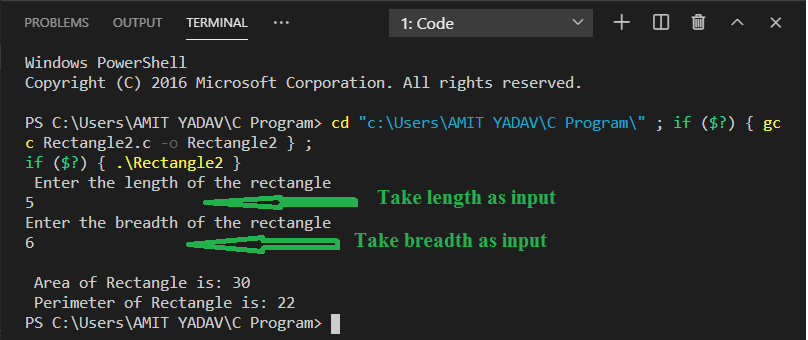
Let’s write another C program to take an input from the user in the Visual Studio Code Editor.
Rectangle2.c
When we click on the Run button or press the Ctrl + Alt + N, it displays the below output.
In the above program, we take length and breadth as input from the keyboard. As the program is compiled, it produces the below statement.

Here Output tab is read-only, and hence we cannot take any input from the user. So, we need to add some steps in the code editor to take user inputs from the console/user.
Following are the steps to take input from the user.
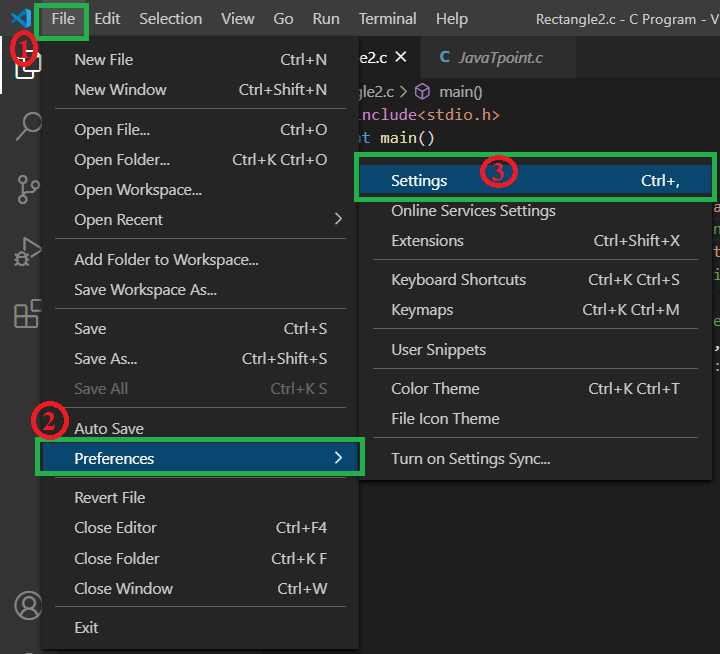
- First of all, we need to stop the background running the c program by pressing the Alt + Ctrl + M from the keyboard.
- After stopping the C file, go & click the File button at the top left corner of the Visual Studio Code Editor, and select the Settings via Preferences, as shown below image.
- After clicking the Settings, it shows the image below.
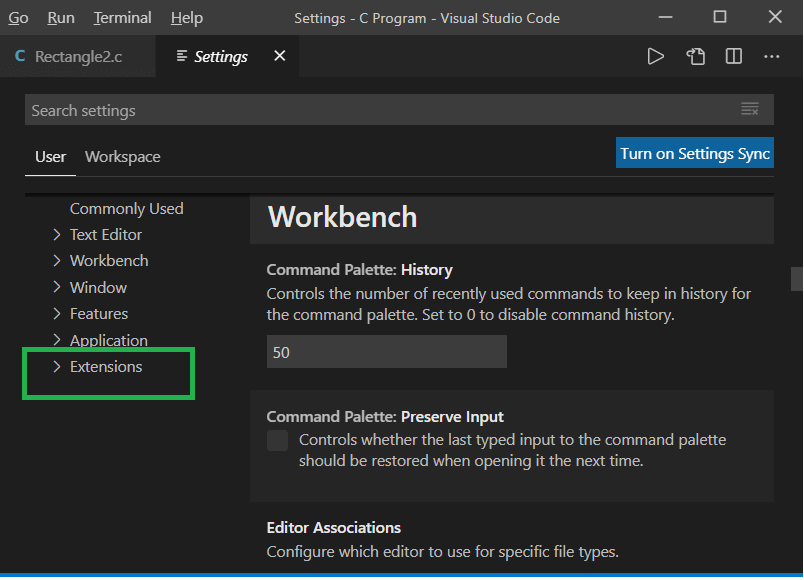
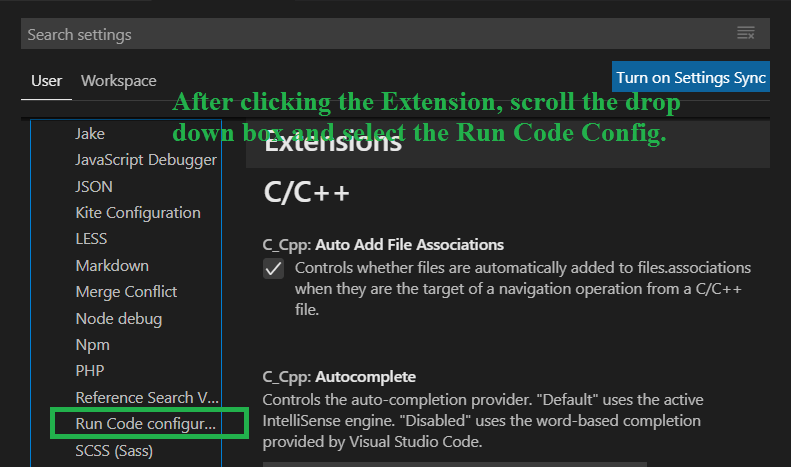
In this image, select the extension button to set the settings for the C Compiler. - Click on the Extension button and scroll the drop-down box to select the Run Code Configuration.
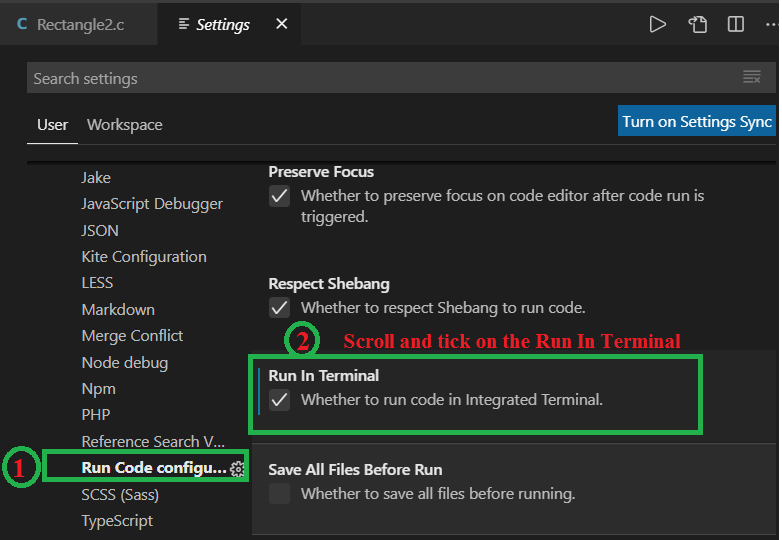
- Now scroll the right-side pane and Tick on the Run In Terminal.
- Go to the c and again execute the program by clicking on the Run, it produces the following results, as shown below.
Next Topic Modulus Operator in C/C++

For Videos Join Our Youtube Channel: Join Now
Feedback
- Send your Feedback to [email protected]